You know how frustrating it can be if you’ve ever tried to remove a screw from a plastic mount. The usual tactics of gripping the head with pliers or using a screwdriver often end in disaster, as the head either snaps off or becomes stripped. But with a few simple tools and techniques, you can easily repair those mounts and get your screws back in place.
The usual tactics of gripping the head with pliers or using a screwdriver often end in disaster, as the head either snaps off or becomes stripped. But with a few simple tools and techniques, you can easily repair those mounts and get your screws back in place. Read on for instructions on how to repair plastic screw mounts.
Summary: Plastic screw mounts are a popular way to attach items to walls and other surfaces. However, they can become loose over time. To repair these plastic screw mounts, you will need some screws, a drill, a screwdriver and an adhesive such as epoxy or super glue.
First, remove the existing screws from the mount and clean off any debris. Next, use the drill to make new pilot holes for the new screws. Finally, secure the mount in place with the new screws and apply a generous amount of adhesive around it for added durability.
10 Effective Methods on How to Repair Plastic Screw Mounts
1. Plastic Welder Gun:
A plastic welder gun is a tool that can be used to fix cracks in things. You attach an adhesive tube to the gun and then squirt a bead of adhesive around the crack. You leave it overnight to dry and then the repair will be as good as new.
2. Acetone Plastic Welder:
Apply a small amount of acetone to the area where you are repairing it. A disposable brush or cotton bud may help to apply it evenly addition, It will soften the plastic so you can allow time for this step to do its magic.
3. Hot Glue Gun:
Apply hot glue to the crack or fracture in your plastic item. The heat of the glue will soften the plastic so it can be molded back together. Ensure you apply enough to cover both pieces and allow them to cool before manipulating them into place.
4. Welding Plastic:
When welding plastic, it is important to create a clean work environment. This means free from any dust or dirt. You should also wear a mask to avoid inhaling fumes. Alternatively, this method may not be suitable for small household items where the fumes will have nowhere to go. Finally, ensure you mix your glue before use, so it is ready when needed.
5. Use Fabric Repair Glue:
Fabric repair glue can be used to repair small fractures in plastic items; just like the hot glue gun, this method will soften the plastic to be molded back into place. Ensure you apply enough to cover both pieces and allow them to cool before manipulating them into place.
6. Plastic Epoxy:
If you want to weld plastic, you can use plastic epoxy. It works great for fixing cracks and breaks in plastic things. First, clean the surface you’re going to weld. You should also put on a mask so you don’t breathe in any bad fumes. Finally, mix the glue before you use it so it’s ready to go.
7. Hot Knife:
A hot knife heats up to a high temperature and can be used for plastic welding. It is a great tool for repairing small fractures in plastic items. First, prepare the surface by removing any dirt or dust. You should also wear a mask to avoid inhaling fumes; alternatively, this method may not be suitable for small household items where the fumes will have nowhere to go.
8. Plasti Dip:
Plastic Dip should be applied to the damaged part and molded into place. For this job, you can use a hairdryer or hot air gun; ensure you leave it on the part long enough to mold it back into shape. Then, leave it to cool and dry before using the item again.
9. Acrylic Welder:
Acrylic welder is similar to the plastic welder gun, except that is has a higher setting and will not melt or damage surrounding plastic areas. As a result, an acrylic welder can be used for small repairs, allow time to cure, and return the plastic item to its original state.
10. Epoxy Putty:
Epoxy putty is a two-part chemical compound that can be used to repair small items made of plastic. It cures and hardens at room temperature, returning the item to its original state. Allow time for the putty to cure before using the item.

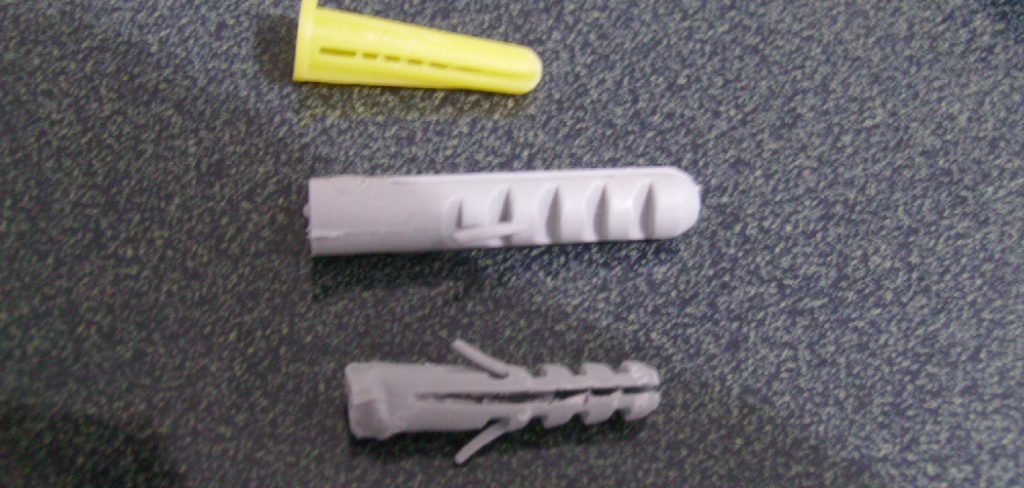
3 Types of Plastic Screw Mounts
1. G-Clamp:
To repair a broken G-clamp, use some pliers and pull the two pieces of the broken g-clamp apart. They should come loose relatively easily, and once they do, you can take the two pieces, line them up how they were originally, and use the same hole to screw the screw back in.
2. Doublette/Double Helices:
To repair a broken double helix/double lock ring, first look at it closely to figure out which way you need to turn it for the broken piece to come off. For some, it might be clockwise; for others, counterclockwise, you need to figure it out based on looking at the locking ring itself. Once you know that, use a pair of pliers and turn the locking ring in one direction until the broken piece comes off.
3. Push on/ Pull-off:
To repair a broken push-on/pull-off, use some pliers and pull the two pieces of the broken lens apart. They should come loose relatively quickly, and once they do, you can take the two pieces, line them up how they were originally, and use the same hole to screw back in.
Some Helpful Tips and Suggestions
Here are some helpful tips on how to repair plastic screw mounts.
- Do some research on what you are about to do. This seems like a simple procedure, but you may break your lens if not done correctly.
- Take your time. Repairing plastic lens mounts takes patience and often several tries to get it right.
- Practice makes perfect. Since the process of repairing plastic mounts can be difficult, sometimes you need to do several to master the technique. Also, if you break one too many lenses, it might be best to take them to a hardware or craft store to have them replaced professionally.
- Clean your lenses. You would not want to add dirt and grime to the new mounts.
- If you do not have replacements, you can use some Sugru (self-setting rubber) on the lens’s mount.
 This is a good substitute for plastic or metal screws, but it can be more difficult to remove than standard screw mounts. It can also add a bit of weight to the lens.
 - Once you have repaired your lens mounts, take care when using them again to make sure you do not break them again.
- If you are repairing a brand new lens mount, be careful not to make it too tight, or else it will snap.
 This is a good substitute for plastic or metal screws, but it can be more difficult to remove than standard screw mounts. It can also add a bit of weight to the lens.
Precautions and Safety Considerations
- This repair is for plastic lenses only. Metal lens mounts should be repaired by a professional.
- The repair involves using very small drill bits. Please be very careful while drilling to avoid injury. Do not secure the camera body with your other hand, but keep it away from the drill bit. If you are left-handed, it may be easier to drill while keeping the camera in your right hand.
- There are very small parts inside of screw mount lenses. If you accidentally drop one on the floor, you must clean it up before reassembly. They are not particularly difficult to lose or expensive, but they are difficult to find.
- Ensure that the lens is clean before attempting this process. A dirty lens mount will hinder your ability to see and grab parts with tweezers and magnets and may interfere with the adhesive you use for reassembly.
- Be sure that the drill bit size corresponds to the screws you are replacing. Usually, small bits correspond to the screws in the lens. However, on some lenses, there are no bits of this size. If this is the case, you will need to purchase a tap and drill set corresponding to the screws’ size.
What Causes Plastic Screw Mounts to Damage
The risk of cosmetic damage to screw mounts on nozzles is most significant during installation and nozzle removal. When you are not using your hot top, top it off by filling the container with air instead of water (this will help maintain your heater/boiler coil). If you do not have enough room for this, lower the temperature on your hot top to help prevent damage and increase the time between using your hot top for coffee and cappuccinos.
If you notice that a screw mount is becoming looser, tighten it before inserting it. If you need to reuse a nozzle that has already damaged screw mounts, remove the damaged screw mounts with pliers and then drill them out with a drill bit of the same size.
You Can Check It Out To Fix a Cracked Plastic Slide
Does Thread Lock Work on Plastic
Thread lock only works on metal, containing a chemical that bonds to the metal. Since plastic is not a metal, it will not work. This means you won’t be able to attach lenses with thread lock alone by applying it to the screw mount.
A possible solution is to apply something like super glue to the threads, but this can cause problems if you ever need to remove the lens (and requires quickly gluing your fingers together). Also, if you reuse a broken lens, the chances are that the threads have worn out of shape, so you don’t want to use super glue.

You Can Check It Out to: Repair Styrofoam
Frequently Asked Questions
Can You Rethread Plastic?
Yes, you can re-thread plastic. However, this may not be a good idea because it is difficult to know what type of chemicals or other particles may have been present in the original plastic and they could potentially end up being released again when the new threading is done.
Additionally, any old hardware that was used to perform the original threading should also be removed before starting the process so as not to contaminate or damage whatever might be left behind.
Which Epoxy Is Best for Plastic?
There are a variety of epoxies that can be used for plastic, and the best one depends on your specific needs. Some of the most popular epoxy resins include E-6000, Duracoat EPOXY®, Epon 816®, and 3M® Performance Adhesive.
Each resin has its own unique properties that make it ideal for different applications. For example, E-6000 is often used as a substrate coating because it has high shear strength and good adhesion to many materials. Duracoat EPOXY® is excellent for covering surfaces quickly and efficiently because it forms hard films that resist moisture absorption and scratching.
Epon 816 offers superior resistance to water exposure due to its tight film formation, low shrinkage rate, fast curing time, ability to adhere over irregular shapes or cavities, non-flammable formula (EPON816_NF), biocompatible property (EPON 816 G2 meets FDA 21CFR Part 373 Category III requirements for medical devices), environmental safety features including platinum cured with no VOCs emissions under normal operating conditions, nontoxic formulation when cured(EPON832 NF).
Which Epoxy Is Best for Plastic?
There are a lot of different types of epoxy, and each has its own specific properties and uses. To get the best results from your epoxy project, you’ll need to choose the right type for the job. Here are a few tips to help you make an informed decision:
- Epoxy for plastic is designed to be strong and durable, making it a good choice for projects that involve plastic materials. It also has a low reactivity, so it is less likely to cause damage when it is cured.
- Epoxy for metal is designed to be rust-resistant and tough, making it a good choice for projects that involve metal materials. It also has good adhesion and corrosion resistance, making it a good choice for projects that involve both metal and plastic materials.
- Epoxy for wood is designed to be water-resistant and flexible, making it a good choice for projects that involve wood materials. It also has good adhesion and flexibility, making it a good choice for projects that involve both wood and plastic materials.
- Epoxy for other materials may have specific properties that make them better suited for certain types of projects than other types of epoxy. Talk to your local epoxy supplier to find out which type of epoxy is best suited for your specific needs.
Is a Helicoil a Permanent Fix?
Unlike a traditional helical coil, which can only be used one time and then needs to be replaced, a Helicoil is designed for long-term use. This type of coil is made with synthetic materials that are resistant to heat and corrosion, making it ideal for high-temperature applications like ovens or air conditioning units.
The main benefit of using a Helicoil over other coils is its longevity. Unlike regular coils, which lose their effectiveness over time due to overheating or rusting, the Helicoil will remain effective even after multiple uses. Additionally, since it’s made from synthetic materials instead of metal, the Helicoil is less likely to cause allergic reactions in people who are sensitive to metals.
Conclusion
The plastic screws are difficult to remove with a conventional screwdriver. You can use various methods, including heat or acetone. However, the best way is with an electric drill and a fair bit for drilling out metal screws in concrete.
With this method, you will easily get all of them off without too much trouble at all! We hope this article has been helpful to you! If you have any questions, please feel free to contact us. Thank you for reading our blog post about how to repair plastic screw mounts!
You Can Check It Out to: Repair Armored Door Rust