There’s nothing more frustrating than spending your hard-earned money on a new toy and then having it break after just a few uses. If you’ve got an ATV that’s developed some cracks in the plastic, don’t worry – there are ways to fix them. We’ll show you how to fix atv plastic cracks in this post. Read on to learn more.

Summary:
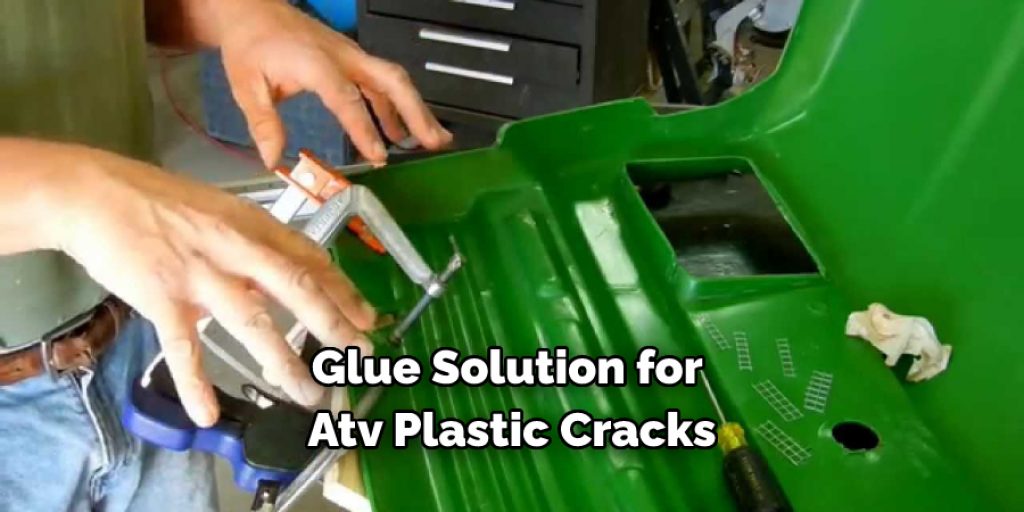
Fixing ATV Plastic Cracks can be a daunting task, but with the right materials and a little bit of patience, it can be done. First, clean the crack thoroughly with rubbing alcohol. Then use a drill to make three holes on either side of the crack.
Fill the holes using plastic epoxy or any other two-part plastic adhesive, making sure not to overfill them or create bulges. Once dried, sand down the area using fine-grit sandpaper until it is smooth. Finish by applying an automotive clear coat so that the surface matches the surrounding materials and provides protection from future wear and tear.
Why Plastic Cracks on ATV?
There are a few reasons why plastic may crack on an ATV. One reason is that the ATV is being ridden over rough terrain, which can cause the plastic to become brittle and crack. Another reason may be that the ATV is not being properly maintained, and as a result, the plastic is becoming worn and cracked.
How to Fix ATV Plastic Cracks Step by Step Guide
Step 1: Gather Necessary Tools and Materials
To fix ATV plastic cracks, you will need the following tools and materials:
- Isopropyl alcohol or plastic cleaner
- Clean, lint-free cloth
- Sandpaper (80, 180, and 320 grit)
- Plastic welder or soldering iron
- Plastic welding rods (compatible with your ATV’s plastic material)
- Heat gun (optional)
- Wire mesh (optional)
- Masking tape
- Plastic filler or epoxy
- Body filler spreader or putty knife
- Primer (plastic-specific)
- Paint (matching the color of your ATV)
- Clear coat spray paint
- Protective gloves and safety goggles
Step 2: Ensure Safety
Before starting the repair process, wear protective gloves and safety goggles to protect yourself from any debris or harmful fumes.
Step 3: Clean the Damaged Area
Clean the area around the crack using isopropyl alcohol or plastic cleaner and a lint-free cloth. This will remove any dirt, grease, or debris, ensuring proper adhesion of the filler and paint.
Step 4: Sand the Damaged Area
Using 80-grit sandpaper, sand the area around the crack to roughen the surface and create a better bond for the plastic weld. Be sure to sand at least one inch beyond the edges of the crack. Wipe away any dust or debris with a clean cloth.
Step 5: Prepare the Plastic Welder or Soldering Iron
Plug in the plastic welder or soldering iron and allow it to heat up according to the manufacturer’s instructions. Make sure you have the appropriate plastic welding rods for the type of plastic used in your ATV.
Step 6: Weld the Crack
Begin by welding the crack from the backside of the plastic, if possible. This will help to maintain the appearance of the front side and provide additional reinforcement. Slowly melt the plastic welding rod into the crack using the plastic welder or soldering iron, ensuring that the rod and the surrounding plastic are fully fused. Allow the plastic to cool and harden before proceeding.
Step 7: Reinforce the Weld (optional)
For larger or more severe cracks, you can use wire mesh to reinforce the weld. Cut a piece of wire mesh slightly larger than the crack and lay it over the welded area. Use the plastic welder or soldering iron to melt the mesh into the plastic, ensuring a strong bond. Allow the plastic to cool and harden before proceeding.
Step 8: Sand the Welded Area
Once the plastic has cooled and hardened, use 180-grit sandpaper to sand the welded area and create a smooth, even surface. This will help to blend the repair with the surrounding plastic and ensure proper adhesion of the filler and paint.
Step 9: Apply Plastic Filler or Epoxy
Mix the plastic filler or epoxy according to the manufacturer’s instructions. Using a body filler spreader or putty knife, apply the filler to the welded area, ensuring that the crack is completely covered and the filler extends slightly beyond the edges of the repair. Allow the filler to cure according to the manufacturer’s instructions.
Step 10: Sand the Filler
Once the filler has cured, use 320-grit sandpaper to sand the filler and create a smooth, even surface. This will help to blend the repair with the surrounding plastic and ensure proper adhesion of the primer and paint. Wipe away any dust or debris with a clean cloth.
Step 11: Mask Off Surrounding Areas
Use masking tape to cover the areas surrounding the repair. This will protect the adjacent surfaces from overspray during the painting process.
Step 12: Apply Primer
Shake the can of plastic-specific primer vigorously for at least one minute to ensure proper mixing. Hold the can approximately 8 to 12 inches away from the repair area and apply a light coat of primer, using smooth, even strokes. Allow the primer to dry according to the manufacturer’s instructions, typically for at least 30 minutes.
Step 13: Sand the Primer (optional)
If necessary, lightly sand the primed area with 320-grit sandpaper to create a smooth, even surface. This will help to ensure proper adhesion of the paint and a seamless appearance. Wipe away any dust or debris with a clean cloth.
Step 14: Apply Paint
Shake the can of matching ATV paint vigorously for at least one minute to ensure proper mixing. Hold the can approximately 8 to 12 inches away from the primed area and apply a light coat of paint, using smooth, even strokes. Allow the paint to dry according to the manufacturer’s instructions, typically for at least 30 minutes.
Step 15: Apply Additional Paint Coats (if necessary)
If the desired color match or coverage is not achieved after the first coat of paint, apply additional coats as needed, allowing each coat to dry according to the manufacturer’s instructions. Be sure to sand the area lightly with 320-grit sandpaper between coats to promote proper adhesion.
Step 16: Apply Clear Coat
Once the desired color match and coverage are achieved, shake the can of clear coat spray paint vigorously for at least one minute to ensure proper mixing. Hold the can approximately 8 to 12 inches away from the painted area and apply a light coat of clear coat, using smooth, even strokes. The clear coat will help protect the paint and provide a glossy, durable finish. Allow the clear coat to dry according to the manufacturer’s instructions, typically for at least 30 minutes.
Step 17: Apply Additional Clear Coat Coats (if necessary)
If the desired glossy finish is not achieved after the first coat of clear coat, apply additional coats as needed, allowing each coat to dry according to the manufacturer’s instructions. Be sure to sand the area lightly with 2000-grit sandpaper between coats to promote proper adhesion.
Step 18: Remove Masking Tape and Clean Up
After the clear coat has dried completely, carefully remove the masking tape and any newspaper or drop cloth used to protect the surrounding areas. Dispose of any paint, primer, and sanding debris in accordance with local regulations.
Step 19: Buff the Repaired Area (optional)
For a seamless and polished appearance, you may choose to buff the repaired area. To do this, use a soft cloth or microfiber towel and a small amount of rubbing compound. Apply the compound to the cloth and gently buff the repaired area in a circular motion, blending the new paint with the surrounding plastic. This step is optional but can help to create a more professional-looking repair.
By following these steps, you can successfully repair ATV plastic cracks and restore the appearance and functionality of your vehicle. Regular maintenance and proper care will help to keep your ATV in good condition and prolong its life, ensuring safe and enjoyable use for years to come.
How To Restore Faded Plastic On ATV?
If the plastic on your ATV is faded or cracked, you can restore it to its original condition by using a few simple methods.
1. Linseed Oil
One of the simplest methods for restoring faded or cracked plastic is to apply a coat of linseed oil. Linseed oil is available at most hardware stores, and it can be applied with a brush or cloth. Be sure to allow the oil to dry completely before using your ATV.
2. Store-bought Plastic Restorer
If you don’t want to use linseed oil, you can also buy a store-bought plastic restorer. These products are available at most auto parts stores, and they come in various colors. Be sure to follow the instructions on the bottle carefully, and apply the restorer in a well-ventilated area.
3. Heat Gun
If the plastic on your ATV is severely cracked or damaged, you may need a heat gun to restore it. Heat guns are available at most hardware stores, and they can be used to melt the plastic and make it pliable again. Be very careful when using a heat gun, as it can easily cause burns.

4. Painting
If you don’t want to use any of the methods listed above, you can always paint the plastic on your ATV. This is a good option if you want to change the color of your ATV or if the plastic is severely damaged. Be sure to use high-quality paint that will withstand outdoor conditions.
No matter which method you choose, test it on a small area first to make sure the plastic doesn’t melt or become brittle. Also, read the instructions carefully before attempting any of these methods. If you want to know more about how to fix ATV plastic cracks, keep reading.
How to Fix Cracks on Plastic and Windshield?
There are a few ways to fix cracks on plastic and windshield:
First, Use a Sealant: A sealant can be used to fill in the cracks and then will need to be trimmed off.
Use Glue: Glue can also fill in the cracks, but it must be the correct type of glue for the plastic material.
Use a Patch: If the crack is small, a patch may be the best option.
Use a Heat Gun: If the crack is large, using a heat gun can help make the plastic more pliable and easier to fix.
Frequently Asked Question
Does Gorilla Glue Work on Plastics?
The answer to this question is yes, Gorilla glue will work on plastics. However, it is important to note that Gorilla glue can cause the plastic to become brittle over time, so it is best to test it out a small amount before using it on a larger area.
Does Super Glue Work on Plastic?
There is no definitive answer to this question, as the adhesive properties of superglue will vary depending on the type of plastic. In general, superglue is an effective adhesive for most plastics, but it is always best to test a small area first to ensure that the adhesive will not damage the plastic.
What Is the Strongest Glue to Use on Plastic?
There are a few different types of glue that can be used to fix ATV plastic cracks. The strongest type of glue is epoxy, which can be found at most hardware stores. If epoxy is not available, a strong adhesive like crazy glue or gorilla glue can also be used.
How Do You Use Loctite Plastic Bonder?
Loctite Plastic Bonder is a two-part adhesive that you use to fix plastic cracks. It is a clear, fast-drying adhesive that can be used on various plastics.
To fix plastic cracks with Loctite Plastic Bonder, you will need:
- Loctite Plastic Bonder adhesive
- A plastic container or bowl
- A toothpick or other pointed object
- Vaseline or another petroleum jelly
Will Jb Weld Work on ATV Plastic?
Atv plastic is notoriously difficult to weld, but JB Weld may work in a pinch. However, if you’re looking for a more permanent fix, fiberglass may be the better option.
Can I Melt Plastic Back Together?
In a word, no. Melting plastic back together will only create a weaker bond that will likely fail again. If you’re looking for a more permanent fix, fiberglass may be better.
You Can Check It Out To Repair Damaged Plastic Pipe Threads
Conclusion
ATVs are a fun way to explore the outdoors, but they can quickly turn into a headache with plastic cracks if you have an ATV. However, fixing ATV plastic cracks is not as hard as you may think and can be done in just a few simple steps. With these instructions, you will be able to fix your ATV’s plastic cracks and get back out on the trails in no time! Thanks for reading our post about how to fix ATV plastic cracks.