When you laminate a document, you want the final product to look as good as possible. Unfortunately, sometimes wrinkles can appear on the finished product. This can be frustrating, but there are ways to fix wrinkled lamination. In this article, we will discuss three methods how to fix wrinkled lamination: using an iron, using a hair dryer, and using tape. We will also provide tips on how to avoid wrinkles in the first place. Keep reading to learn more!
We all know how frustrating it can be to have wrinkles in our lamination. After all, we want our documents to look their best. Lamination is a great way to protect documents and make them last longer, but wrinkles can ruin the aesthetic. Unfortunately, many people don’t know this, but there are ways to fix wrinkled lamination. So when you find yourself in this predicament, don’t fret! There are a few different methods you can use to get rid of those pesky wrinkles.
Summary: If you have wrinkled paper, there are a few ways to fix it. You can try using an iron on a low setting, or using a hair dryer on a cool setting. You can also try using an adhesive that is designed for paper.
Reasons Why Does Lamination Wrinkly
One of the most common reasons lamination gets wrinkled is because of humidity. When the air is humid, the paper inside the laminate pouches absorbs moisture and causes the laminate to wrinkle. Therefore, if you live in a humid climate, it’s essential to store your laminated items in a cool, dry place.
Lamination can become wrinkled if it’s not stored properly. If it’s stored in an area that’s too hot or too cold, the laminate can become warped or wrinkled. To prevent this, store your laminated items in a temperature-controlled environment.
If you don’t use the proper laminating technique, your lamination can become wrinkled. Be sure to follow the instructions on your laminating machine carefully to avoid this problem.
A Detailed Guide on How to Fix Wrinkled Lamination
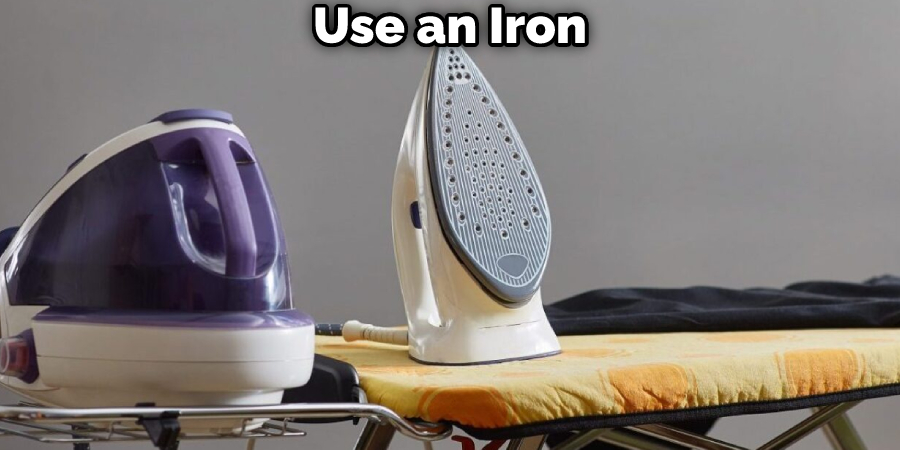
Method 1: Using an Iron
Iron is a great way to quickly and easily remove wrinkles from your lamination. The heat will loosen the adhesive that is holding the laminate to the paper, allowing you to smooth out any wrinkles or creases. You can use an iron to remove wrinkles from your laminated documents. However, you need to take care not to damage the document or the surrounding material.
Things You’ll Need:
- Iron
- Laminated document
- Parchment paper
Step 1: Determine the Heat Setting
The first step is to determine the heat setting of your iron. You’ll need to use a lower heat setting if you’re working with a thinner laminate, such as self-adhesive lamination sheets. A higher heat setting will be necessary for thicker laminates. Place the laminate on your work surface, print side up. The next step is to place the ironing sheet on top of the laminate with the shiny side down. You can find ironing sheets at office supply stores.
Step 2: Prepare the Area
Before you start, you’ll need to prepare your work surface. Place your laminated document on an ironing board or any flat surface, then cover it with a sheet of parchment paper. This will protect your document from any damage that might occur during the ironing process.
Step 3: Apply Heat
Now, it’s time to apply heat to the document. Place your iron on the parchment paper and apply gentle pressure. Slowly move the iron back and forth over the entire document surface until all the wrinkles have been removed.

Step 4: Let the Document Cool
Once the wrinkles have been removed, allow the document to cool completely before handling it. Otherwise, you may accidentally cause new wrinkles to form.
Method 2: Using a Hairdryer
Using a hairdryer is one way that you can fix wrinkled lamination. All you need to do is hold the hairdryer about six inches away from the laminated surface and move it back and forth until the wrinkles start to disappear. Be sure to keep the hairdryer on the cool setting, so you don’t damage the laminate.
Things You’ll Need:
- Hairdryer
- Cool setting
Step 1: Choosing the Right Laminate
There are two types of laminate: self-adhesive and heat-activated. If you’re using a hairdryer to fix wrinkled lamination, you’ll need to choose a heat-activated laminate. This type of laminate is more durable and can withstand the hairdryer’s heat without damage.
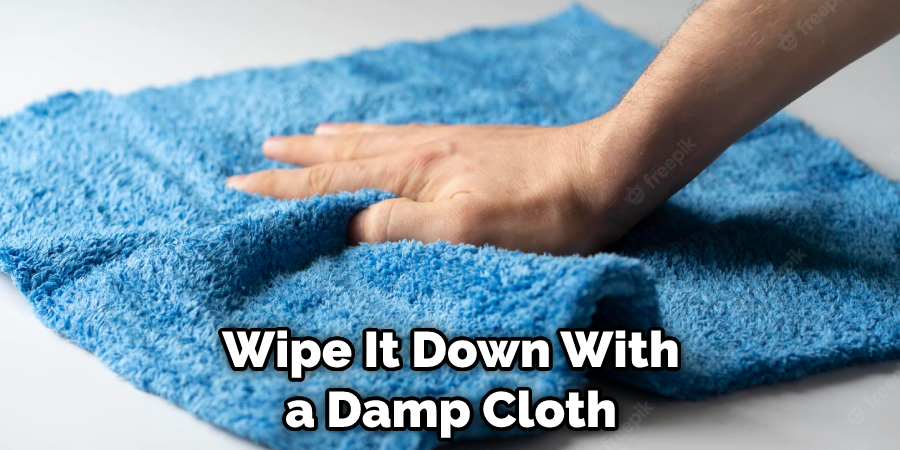
Step 2: Preparing the Surface
Before you start using the hairdryer, you need to ensure that the surface you’re working on is clean and free of any dirt or debris. Otherwise, the hairdryer will blow around the dirt and make the surface even dirtier.
To prepare the surface, wipe it down with a damp cloth. Make sure to get into all the nooks and crannies, so the surface is completely clean.
Step 3: Using the Hairdryer
Now it’s time to start using the hairdryer. Hold it about six inches away from the surface of the laminate and move it back and forth until the wrinkles disappear. Keeping the hairdryer on the cool setting is essential, as too much heat can damage the laminate.
If the wrinkles are still not disappearing, then you can try moving the hairdryer closer to the surface. Just be sure not to get too close, as you don’t want to damage the laminate.
Step 4: Letting the Laminate Cool
Once the wrinkles have disappeared, letting the laminate cool before you touch it is essential. If you try to move it while it’s still hot, you risk damaging the laminate.
Let the laminate cool for at least five minutes before you do anything with it.
Step 5: Enjoy Your Wrinkle-Free Laminate!
Now that your laminate is wrinkle-free, you can enjoy using it! This method is quick and easy to get rid of those pesky wrinkles and make your laminate look new.
Method 3: Using Tape
If you have wrinkles that are close together, using tape can help prevent the spread of the wrinkles and also hold down the laminate so it can bond with the surface beneath it. You will want to use a low-tack tape, so it doesn’t damage your surfaces. Washi tape or painter’s tape works well for this.
Things You’ll Need:
- Tape
- A straightedge
- A laminate roller
Step 1: Before You Start
Make sure you clean the surface that you will be laminating. Any dirt or dust will be trapped under the laminate and create bubbles.
Step 2: Put Down the Tape
Start in one corner of the area that you will be working on and put down a strip of tape. Make sure that the strip of tape is straight by using a straightedge.
Step 3: Put Down the Laminate
Now you can put down your laminate. Start in the same corner as the tape and unroll it over the surface. Try to avoid wrinkles as you go. If you get wrinkles, stop and smooth them out with your hands before continuing.
Step 4: Use a Laminate Roller
Once the laminate is in place, use a laminate roller to smooth out any bubbles and wrinkles. Start from the middle and work your way out to the edges.
Step 5: Remove the Tape
After you have rolled out the laminate, you can remove the tape. If any laminate has lifted with the tape, just put the tape back down and roll over that area again. Once the laminate is fully bonded to the surface, you can trim any excess with a sharp knife.’
You Can Check It Out to Fix Warped Wood Countertop

How to Prevent Wrinkles in Lamination
Preventing wrinkles in your lamination is key to achieving a professional and polished look. There are a few simple tips you can follow to avoid this problem:
- Use fresh laminating sheets. If your laminating sheets are old, they are more likely to wrinkle. Check the expiration date on your laminating sheets before using them.
- Store your laminating sheets in a cool, dry place. Laminating sheets are sensitive to humidity, so storing them in an environment that is too humid can cause them to wrinkle.
- Make sure your documents are clean and free of debris before laminating them. Any dirt or debris on your document will cause the lamination to wrinkle.
- Laminate your documents using a rolling laminator. A rolling laminator evenly distributes the heat, which helps prevent wrinkles.
- Use thin laminating sheets. Thick laminating sheets are more likely to wrinkle than thin sheets.
- Follow the manufacturer’s instructions for your particular type of laminating machine. Each machine is different and has specific guidelines that should be followed to avoid wrinkling.
- Laminate your documents slowly. If you laminate them too quickly, the heat can cause them to wrinkle.
- Let your documents cool completely before handling them. If you handle them too soon, the heat can cause the papers to wrinkle.
Following these simple tips, you can avoid wrinkles in your lamination and achieve a professional and polished look.
Can Hard Lamination Be Removed?
If you have wrinkles in your hard laminate flooring, you may be wondering if there is any way to remove them. Unfortunately, once wrinkles have formed, they cannot be removed. However, you can do a few things to prevent them from getting worse.
One of the best ways to prevent wrinkles from getting worse is to vacuum regularly. dirt and debris can build up on the surface of the laminate and cause the material to become weak and Flexible. When this happens, it is more likely that wrinkles will form. Vacuuming regularly will help keep the surface clean and free of dirt and debris.
Another way to prevent wrinkles from getting worse is to use a humidifier in your home. Humidity can cause the laminate to swell and become misshapen. If you use a humidifier, it will help to keep the laminate from swelling and becoming wrinkled.
Frequently Asked Questions
Can You Get Wrinkles Out of Laminated Paper?
Wrinkles can be tricky to get rid of, but there are a few things that you can do to help. The first step is to avoid the sun and excessive exposure to water or humidity. Next, make sure that your diet is balanced and contains enough vitamins and minerals. Some good sources of these nutrients include collagen-rich foods such as bone broth, seafood, eggs, vegetables, and whole grains. Finally, use wrinkle remover products sparingly in order not to damage your skin further.
Many people find success using retinol or AHAs (hydroquinone acid esters) in conjunction with other anti-aging ingredients like green tea extract or omega fatty acids for optimal results. Soaking sheets in a solution of 1 teaspoon product per cup of warm water before placing them on the face will also help remove any excess oiliness from the surface cells.
Why is My Lamination Wrinkly?
Lamination is a process that essentially coats one side of the paper with adhesive and then binds the other side to it. This creates a smooth finished surface. However, if there are bubbles or wrinkles in the lamination, they will be visible on the stretched-out surface. There are several factors that can contribute to this including air bubbles trapped during manufacturing, inadequate adhesion between layers of paper, or uneven distribution of pressure when laminating.
To combat these wrinkles, you can try using an adhesive spray (which is available online or at most convenience stores), steamroller your document prior to lamination (this will reduce both air and water droplets), and use higher-quality papers that resist wrinkling better than lower-quality papers do, increase the amount of adhesion by prewarming the sheets before applying pressure to them together or use multiple passes instead of just one pass with a roller/adhesive spray gun. Ultimately,.
What Are the Important Precautions to Take for a Successful Lamination?
There are a few important precautions that you should take when laminating anything, whether it’s a document or a large-scale project. Here are the top 3:
- Make sure your equipment is in working order – Equipment can break down during a lamination, which can lead to frustrating delays and even missed deadlines. Always make sure that your laminator is in good working condition and that all of its parts are functioning properly.
- Follow the manufacturer’s instructions – Lamination is a very precise process that requires careful calibration and consistent use of the machine. Always follow the manufacturer’s instructions for laminating documents to ensure the best results.
- Make sure your materials are correctly prepared – When it comes to laminating large-scale projects, it’s important to make sure that your materials are correctly prepped and ready to go. If not, you could run into problems with mistakes during the lamination process or even waste materials.
Do You Flatten Wrinkled Lamination?
Yes, you can flatten wrinkled lamination by using a heat gun. However, it is important to be careful not to overheat the laminate or damage it. You should also wait until the surface of the laminate has cooled before touching it so that you don’t burn your hands.
What Temperature Should Butter Be for Laminating?
In order to laminate correctly, the butter must be at a temperature of approximately 300 degrees Fahrenheit. This is important because it allows the adhesive to set and create a strong bond between the two pieces of paper. If the butter is too cold or hot, the adhesive may not be effective in securing together the sheets.
Conclusion
Lamination wrinkles can be a real eyesore. However, they don’t have to stay that way. There are several ways you can fix wrinkled lamination and make it look new again. This article discussed three of the most popular methods for fixing laminated wrinkles. We hope you find this helpful information on how to fix wrinkled lamination and that it leads to smooth, wrinkle-free lamination for your next project!