If you have a warped kitchen countertop and no matter what you do, it seems to stay that way, don’t worry. You can fix it without having to replace the entire countertop. In this article, we will walk you through the steps on how to fix warped wood countertop. So whether your countertop is made from wood or stone, please keep reading for tips on making it look brand new again. Keep reading to learn more.

Wooden countertops can warp if they are exposed to changes in humidity or temperature. If your countertop has warped, you need to take action to fix it right away. Otherwise, the problem will only get worse and could eventually cause the countertop to break. Many people replace their warped countertops, but this is not always necessary. With a little time and effort, you can fix a warped wood countertop and make it look as good as new.
Summary: If your wood countertop is warped, there are a few things you can do to fix it. You can try using a wooden frame to support the countertop, or you can use a sealer to help the countertop stay flat.
What Are the Causes of a Warped Wood Countertop?
Before discussing fixing a warped wood countertop, we need to understand the causes. There are several reasons why your wood countertop may have become warped. Let’s take a look at a few of the most common causes:
- Humidity
- Temperature changes
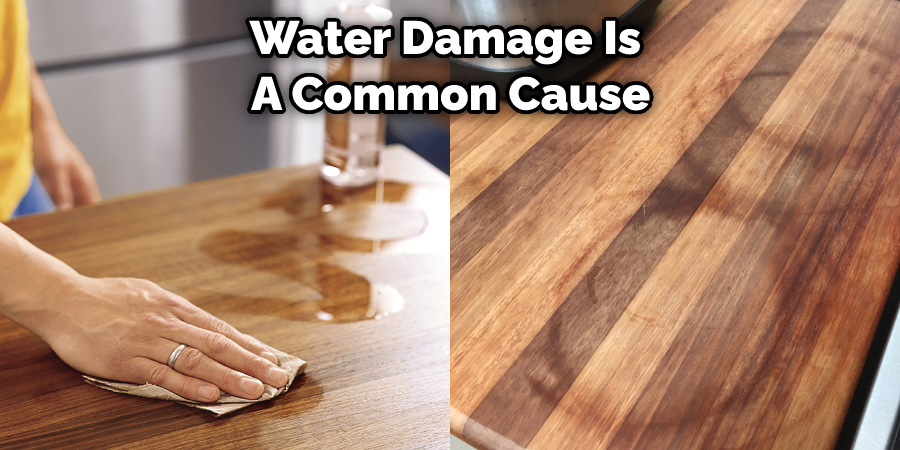
- Water damage
- Improper installation
- Poor quality wood
Any of these factors can cause your wood countertop to warp over time. For example, living in an area with high humidity can cause the wood to swell and eventually warp. Similarly, drastic temperature changes (from hot to cold) can also cause the wood to warp.
Water damage is another common cause of warped wood countertops. If the countertop is not properly sealed, water can seep in and cause the wood to swell and warp. Improper installation can also cause warping, as can using poor quality wood.
Now that we know the causes of warped wood countertops let’s look at how to fix them.
A Detailed Guide on How to Fix Warped Wood Countertop
Method 1: Use a Hand Planer
A hand planer is the perfect tool for creating smooth, level surfaces on wood. It consists of a blade mounted on a handle and pushed along the wood’s surface. With its ability to quickly and easily remove small amounts of material, the hand planer is the ideal tool for fixing warped wood countertops.
A hand planer is a versatile tool that can be used to remove small amounts of wood from a wooden surface, for example, by fixing a warped wood countertop. By removing the warped portion of the wood and evening out the surface, a hand planer can help create a level, smooth surface.
Tools Needed:
- Hand planer
- Ruler or measuring tape
- Chalk line
- Pencil
- Sandpaper (120 grit)
- Wood glue
- Clamps
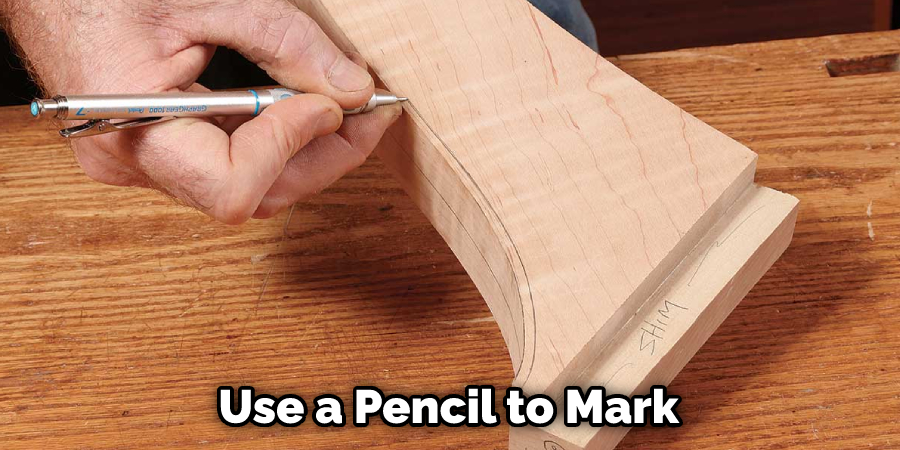
Step 1: Determine What Needs to Be Removed
If your countertop is made of wood and it’s warped, you can try to fix it by removing a thin layer of the material. You’ll need to measure how much needs to be removed, which you can do by using a ruler or measuring tape. Once you know how thick the warp is, use a chalk line or pencil to mark the area that needs to be removed.
Step 2: Set Up the Hand Planer
Once the area that needs to be removed has been marked, set up the hand planer so that the blade barely touches the surface of the wood. The blade should be set at a shallow depth to remove only a tiny amount of material with each pass.
Step 3: Plane the Surface
Slowly push the hand planer along the surface of the wood, following the line you marked in Step 1. Be careful not to remove too much material at once as this can damage the wood. Instead, plane the surface until it is smooth and even. Use a sharp chisel to remove any remaining pieces of wood that your hand planer was unable to reach. Finally, sand the surface until it is completely smooth.
Step 4: Sand the Surface
Once the surface has been planned, use sandpaper to smooth out any rough spots. Start with 120 grit sandpaper and work up to finer grits if necessary.
Step 5: Glue Down Warped Pieces
If you have any pieces of wood that the hand planer has taken off completely, you can glue them back into place using wood glue and clamps. Spread a generous amount of glue on both surfaces and clamp them together until the glue dries.
Method 2: Use a Belt Sander
A belt sander is a powerful tool that uses abrasive belts to grind down and smooth surfaces. It’s a popular tool for sanding wood, but it can also remove paint, varnish, and stains from wood surfaces.
Belt sanders come in various sizes, but the most common are 3-inch and 4-inch models. 3-inch sanders are best for small projects, while 4-inch sanders are better suited for larger projects.
Tools and Materials Needed:
- Belt sander
- Abrasive belts (40, 60, 80, and 100-grit)
- Safety goggles
- Dust mask
- Hearing protection
Step 1: Prepare Yourself and the Area
Put on your safety goggles, dust mask, and hearing protection before you start using the belt sander. Then, clear off the area where you’ll be working to avoid making a mess.

Step 2: Select the Right Abrasive Belt
The type of abrasive belt you’ll need depends on the severity of the warp. For minor warping, use a 40-grit belt. For more severe warping, use a 60- or 80-grit belt. If the warp is severe, you may need to start with a 100-grit belt.
Step 3: Start Sanding
Place the sander on the surface and turn it on. Then, move it back and forth across the surface in long, even strokes.
Keep the sander moving to avoid creating gouges in the wood. If you need to remove a lot of material, make several passes with progressively finer grit belts.
Step 4: Vacuum Up the Dust
After sanding, vacuum up the dust with a shop vac or household vacuum cleaner. Then, wipe down the surface with a damp cloth to remove any remaining dust particles.
Step 5: Apply a Finish (Optional)
If desired, you can apply a finish to the sanded surface. This will help protect the wood and give it a more polished look.
Choose from various finishes, including stains, paints, varnishes, and polyurethanes. Then, follow the instructions on the product label for the best results.
With these easy steps, you can fix a warped wood countertop quickly! Just be sure to take precautions and use the proper safety equipment with power tools.
Method 3: Use a Heat Gun
Fluctuations in temperature and humidity most commonly cause warping. Applying heat to the area of the warped countertop can help to release some of the stress that has built up in the wood.
Tools and Materials Needed:
- Heat gun
- Safety glasses
- Thick gloves
Step 1: Determine the Direction of the Warp
The first step is to determine which way the wood is warped. You can do this by gently running your hand over the countertop’s surface. If the warp is raised, you must apply heat from underneath. If the warp is depressed, you must apply heat from above.
Step 2: Place the Heat Gun on Low Heat
Next, you will need to set your heat gun to low heat and place it on the area of the warped countertop. If you are working with a small area, you can hold the heat gun in one hand and use the other hand to move it around. If you are working with a larger area, you may need both hands to hold the heat gun in place.
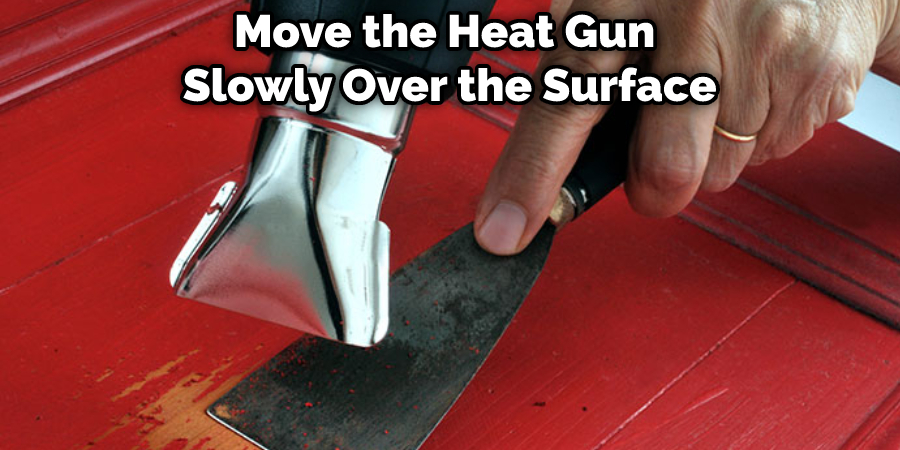
Step 3: Move the Heat Gun Slowly
You will need to move the heat gun slowly over the surface of the wood. Do not stay in one spot for too long, as this can cause damage to the wood. You should also avoid using too much heat, as this can also lead to damage.
Step 4: Check the Progress Regularly
As you are heating the wood, you will need to check on its progress regularly. Once the wood begins to straighten out, you can stop applying heat. However, if the warp is still present, you may need to apply more heat.
Step 5: Allow the Wood to Cool Completely
Once the wood has straightened out, you will need to allow it to cool completely before using it again. This will help to ensure that the warp does not come back.
If your wood countertop is warped, you can try to fix it in a few different ways. One method is to use a heat gun. This method can be effective, but you must be careful not to damage the wood with too much heat. Another option is to use weights or clamps to straighten out the wood.
This option may take longer, but it can be less risky than using a heat gun. Whatever method you choose, ensure you take your time and do not force the wood into place. With patience and care, you should be able to fix your warped wood countertop.
Frequently Asked Questions
Will Warped Wood Go Back to Normal?
Unfortunately, Warped Wood is not something that will go back to normal. This happens when the wood is exposed to moisture and alkaline soils for an extended period of time, which can cause the natural growth rings in the tree’s lumber to become twisted. As a result, the timber becomes less dense and has a poorer appearance.
This defect cannot be reversed and should only be treated if it starts affecting the structural integrity or aesthetic value of your furniture. In most cases, warping will not affect the overall strength or durability of the wood frame. If you are concerned about this issue, you may want to have your furniture inspected by a qualified professional before taking any action.
Can Warped Wood Be Straightened?
Warped wood is a type of wood that has been distorted by the environment or improper treatment. This can include exposure to moisture, extreme temperatures, pests, fungus, or direct sunlight. While warping may be permanent in some cases, there are ways to soften warped wood and restore its original shape.
One way to do this is by soaking the affected area in water for several hours. This will allow unwanted toxins and chemicals to dissipate while also softening the wood fibers. Another option is to use a steamer on low heat; this will help remove any built-up creases and rid the surface of dust mites that could further warp the wood.
What Causes Wood to Warp?
There are a few things that can cause wood to warp. These include insect damage, fungal overgrowth, moisture exposure, and poor construction techniques. Insects can spread fungi and other diseases through their droppings or larva, which leads to the growth of mold. This fungus then attacks the timber cells in the wood, causing it to swell and split.
Moisture exposure also damages timbers as water seeps into the structure of the tree, where it eventually causes decay. Poor construction techniques, such as using substandard boards or inadequate framing, also lead to warping because they do not allow for air circulation within the timber frame.
Once warping has occurred, fixing it usually requires replacing wood parts with new ones since restoring them would only result in further deterioration.. So if you notice any signs of warping on your furniture or building materials, be sure to get them checked out by a professional!
Does Polyurethane Keep Wood From Warping?
Yes, Polyurethane is known to keep wood from warping. It forms a protective seal that prevents moisture and other liquids from seeping into the wood and causing it to rot. Additionally, it can improve the look and feel of the wood by creating a smoother finish.
Do You Flatten a Countertop?
Some tips that might work include using an upside-down bucket or pan, pouring hot water over the top of the countertop, applying pressure with your hand, or spraying it with household cleaning products. Ultimately, it is important to test out different methods before you try anything permanent.
Conclusion
If your wood countertop has warped, there are a few ways how to fix warped wood countertop. The best way to fix warped wood countertops will depend on the severity of the warp and the type of wood you have. If you have a light warp, you may be able to fix it by using a clamp or weights. If your warp is more severe, you may need to sand down the countertop and re-stain or seal it. No matter what method you choose, always follow the manufacturer’s instructions for the proper use and safety precautions.
You Can Check It Out to Fix Holes in Travertine Tile