There’s nothing like a perfectly timed sprinkler system to keep your lawn green and healthy. But, don’t worry; it’s a simple fix. This blog post will show you how to repair cut sprinkler wire in just a few easy steps. So, whether you’re a DIY novice or experienced pro, you can follow along and get your system up and running in no time! Read on for more information.
Even a tiny cut in your sprinkler wire can cause big problems. It will prevent the water from flowing correctly, but it can also damage the entire system. That’s why it’s essential to repair any cuts as soon as possible.
If you’re not comfortable doing the repairs yourself, don’t worry. There are plenty of professional irrigation companies who can help get your system up and running again.
Summary: Repairing a cut sprinkler wire requires the right materials and steps that include finding and marking the spot, cutting and stripping the wires, stripping away insulation, tinning the wires, making wire connections, soldering wires together, soldering to a water pipe and using wire nuts on connections.
A Stepwise Guide on How to Repair Cut Sprinkler Wire
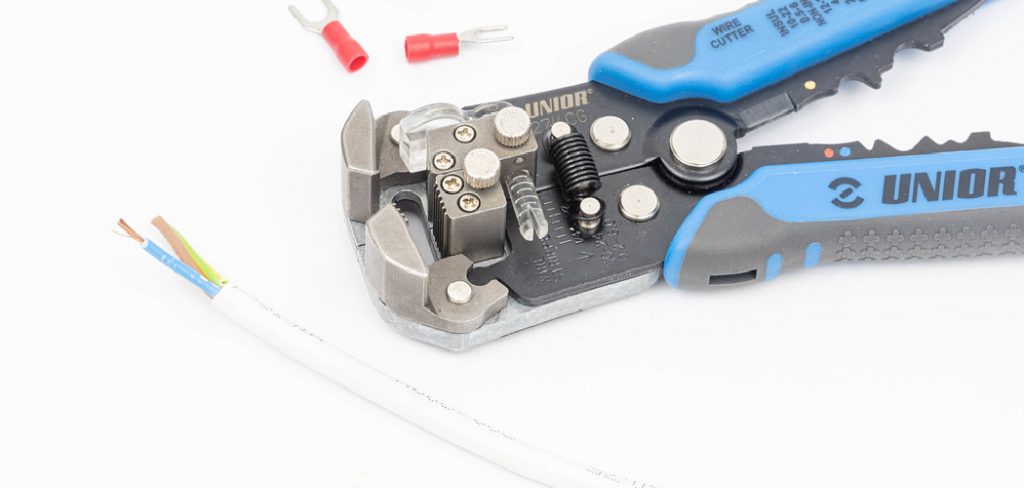
Step 1: Gather Necessary Tools and Materials
Before you begin the process of repairing a cut sprinkler wire, gather the necessary tools and materials.
Tools and materials required:
- Wire strippers
- Utility knife
- Waterproof wire connectors
- Electrical tape
- Shovel
- Multimeter (optional)
- Small piece of plywood or cardboard
Step 2: Locate the Cut Wire
First, identify the location of the cut sprinkler wire.
Procedure:
- Look for signs of damage or digging in the area where your sprinkler wires are buried.
- Use a shovel to carefully dig around the suspected area, being cautious not to cause further damage to the wire or other nearby components.
- Once the damaged wire is exposed, place a small piece of plywood or cardboard underneath it to create a clean workspace.
Step 3: Turn Off the Power
Before working on the sprinkler wire, make sure to turn off the power supply to the irrigation system to avoid the risk of electric shock.
Procedure:
- Locate the main power switch or breaker for your irrigation system.
- Turn off the power to the system to ensure your safety while repairing the wire.
Step 4: Assess the Damage
Inspect the cut wire to determine the extent of the damage.
Procedure:
- Visually inspect the cut sprinkler wire to assess the damage.
- If the wire has been completely severed, you will need to splice the two ends back together. If the wire is only partially cut, you may be able to repair it with a waterproof wire connector and electrical tape.
Step 5: Prepare the Wire Ends
Prepare the cut ends of the wire for splicing or repairing by stripping the insulation.
Tools required:
- Wire strippers
- Utility knife
Procedure:
- Use a utility knife to carefully remove any damaged or frayed sections of the wire.
- Use wire strippers to strip approximately 1/2 inch of insulation from the ends of the cut wire, exposing the copper strands inside.
Step 6: Splice the Wire Ends
Connect the cut ends of the sprinkler wire using a waterproof wire connector.
Tools required:
- Waterproof wire connectors
Procedure:
- Insert the stripped ends of the cut wire into the waterproof wire connector, ensuring that the copper strands are fully inserted into the connector.
- Tighten the connector by twisting it clockwise until it’s secure and the wire ends are tightly held in place.
Step 7: Test the Repair (Optional)
Before burying the repaired wire, you may choose to test the repair to ensure proper function.
Tools required:
- Multimeter
Procedure:
- Turn the power back on to the irrigation system.
- Use a multimeter to test the voltage at the sprinkler controller to ensure that the repaired wire is transmitting power correctly. If the voltage reading is within the expected range, the repair is successful.
Step 8: Secure the Repair
Reinforce the repair by wrapping the connected wires with electrical tape.
Tools required:
- Electrical tape
Procedure:
- Turn off the power to the irrigation system again.
- Wrap the waterproof wire connector and the adjacent sections of wire with electrical tape. This will provide additional protection against moisture and corrosion.
Step 9: Bury the Repaired Wire
With the repair complete, carefully rebury the sprinkler wire.
Tools required:
- Shovel
Procedure:
- Remove the piece of plywood or cardboard from beneath the repaired wire.
- Carefully backfill the hole with the previously excavated soil, ensuring that the wire is not damaged or pinched during the process.
- Tamp down the soil to secure the wire in place and restore the area to its origina condition.
Step 10: Restore Power and Test the System
Once the repaired wire is buried, restore power to the irrigation system and test its functionality.
Procedure:
- Turn the power back on to the irrigation system.
- Run a complete cycle of your irrigation system to ensure that all sprinkler zones are functioning properly. If the sprinklers operate as expected, the repair was successful.
By following these detailed steps and using the appropriate tools and materials, you can effectively repair a cut sprinkler wire and restore the functionality of your irrigation system. Always prioritize safety when working with electrical components, and if you’re unsure about any part of the process or encounter any difficulties, consult a professional for assistance.
You Can Check It Out to Fix a Hot Ground Wire
Frequently Asked Question
How Do I Replace Sprinkler Wires?
There are a few steps you will need to take in order to replace the sprinkler wire. First, cut the wire at the damaged section and strip the insulation off of each end. Next, twist the exposed wires together and screw on a connector. Finally, reattach the sprinkler head to the news wire.
How Do I Find a Broken Sprinkler Wire?
If you are not sure where the break-in your sprinkler wire is, you can use a multimeter to find it. Turn on the water supply to the sprinkler system and test each sprinkler head for resistance. The head with the broken wire will have a much higher resistance than the other heads.
How Do You Fix a Cut Sprinkler Control Wire?
If the wire has been cut, you will need to strip the insulation off of each end and twist the exposed wires together. Next, screw on a connector. Finally, reattach the sprinkler head to the news wire.
Can Sprinkler Wire Go Bad?
Yes, sprinkler wire can go bad over time. If you notice that your sprinkler system is not working properly, it may be due to a break in the wire. To fix the problem, you will need to replace the wire.
What Is the Common Wire on A Sprinkler System?
The common wire on a sprinkler system is the wire that is attached to the “common terminal” on the timer. This wire is always hot, and it is used to power the valves on the system.
What Do Sprinkler Wires Look Like?
Sprinkler wires are usually either red or black, and they are usually covered in insulation. The wire will have a connector on each end, and it will be attached to a sprinkler head.
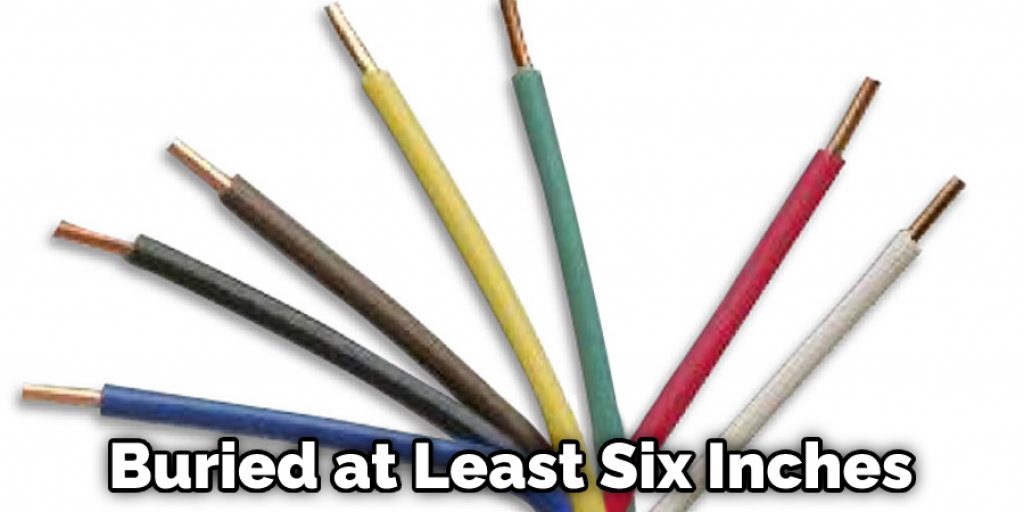
How Deep Should Sprinkler Wire Be Buried?
Sprinkler wire should be buried at least six inches below the surface. If the wire is buried too shallow, it may become damaged by lawn mowers or other equipment.
You Can Check It Out to: Repair Corroded Aluminum Shower Frame
Conclusion
You are repairing cut sprinkler wire. Now that you know how to repair cut sprinkler wire, it’s time to learn how to fix a cut wire. When improving a sprinkler system, always use crimp-on connectors. These connectors are designed for underground use and can be found at most hardware stores. To repair a cut wire, remove the insulation from the end of the cable using your stripping tool.
Next, twist on a connector (or “crimp”) onto the exposed wires until it is fully seated against the insulation. Finally, use pliers to crimp down on top of the connector until it snaps tightly in place – Congratulations, you have just repaired a cut sprinkler wire!
You Can Check It Out to: Repair Led Light Driver