If you’re the proud owner of a Dodge Ram, you know that there’s nothing quite like it. Whether you use your truck for work or fun, you take pride in keeping it in great condition. But unfortunately, one issue that can be difficult to tackle is rust on the wheel well.
Fortunately, you can do a few things to fix this problem and keep your Ram looking great. In this blog post, we’ll provide some tips on how to fix rust on wheel well dodge ram and restore your truck to its former glory. So keep reading till the end of this blog post.
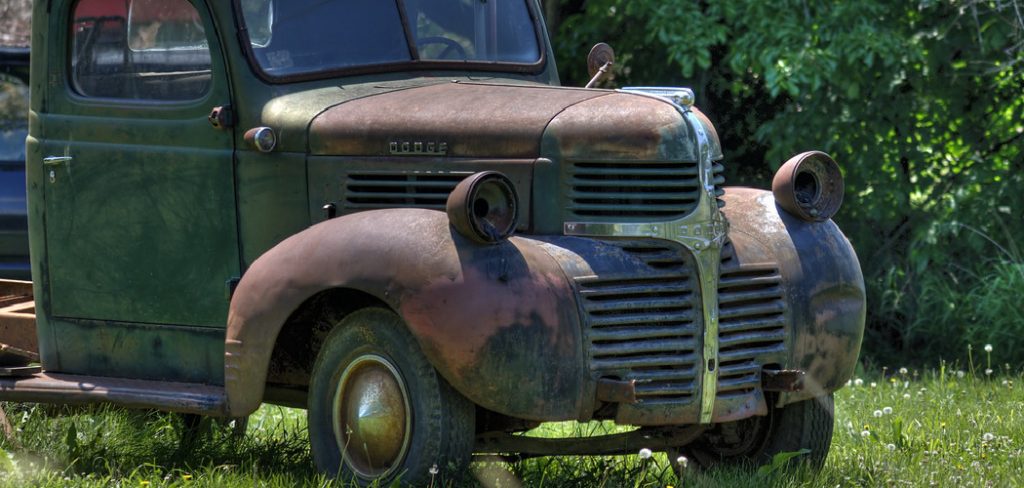
Summary: Rust on a wheel well of a Dodge Ram needs to be addressed quickly, as it can spread and cause further damage. The affected area should be cleaned with a wire brush or abrasive cleaner to remove any loose rust particles, followed by an application of rust-inhibiting primer.
After the primer has dried, a coat of matching paint should be applied, followed by multiple layers of clear coat that will protect the underlying paint from further damage. Finally, a sealant such as wax should be applied to guard against future rusting.
Seven Reasons That Causes Rust on Wheel Well Dodge Ram
- The Chassis Wire Harness attaches to the front of the inside front fender, and this process causes metal fatigue where it’s attached.
- Due to rust, The impact sensors become loose and fall off, causing an annoying beep every time you set the parking brake.
- Water makes its way into your car interior through a hole in the bottom of the fender.
- The Black trim piece on the edge of your wheel wells is held down with plastic push-pins and may become loose over time.
- Water may accumulate in the space between the inner and outer fenders, which causes rust along the entire length of your wheel well edges.
- Moisture causes the powder coating on your wheel wells to break down, which causes rust.
- Resale value is reduced because the rust makes the car look ugly.
18 Steps on How to Fix Rust on Wheel Well Dodge Ram
Step 1: Gather Necessary Tools and Materials
Before you begin, collect the following tools and materials to ensure a smooth and efficient process:
- Safety glasses
- Gloves
- Mask or respirator
- Wire brush
- Sandpaper (80, 120, and 220-grit)
- Rust converter
- Body filler
- Putty knife
- Primer
- Paint (matching your vehicle’s color)
- Clear coat
- Automotive masking tape
- Automotive masking paper or plastic sheeting
- Clean cloth or microfiber towel
- Rubbing alcohol
Step 2: Safety Precautions
Before starting the repair process, put on safety glasses, gloves, and a mask or respirator to protect yourself from dust and chemicals. Make sure to work in a well-ventilated area to avoid inhaling harmful fumes.
Step 3: Remove Loose Rust and Paint
Using a wire brush, remove any loose rust and paint from the affected area on the wheel well. This will expose the rusted metal beneath and provide a clean surface for further treatment.
Step 4: Sand the Affected Area
Start with 80-grit sandpaper and sand the rusted area down to bare metal. Be sure to sand at least 1-2 inches around the rusted area to ensure all affected material is removed. After the rust is removed, switch to 120-grit sandpaper to smooth the surface further, followed by 220-grit sandpaper for a final, smooth finish.
Step 5: Apply Rust Converter
Following the manufacturer’s instructions, apply a rust converter to the sanded area. This will help neutralize any remaining rust and prevent it from spreading. Allow the rust converter to dry according to the recommended drying time.
Step 6: Apply Body Filler
Mix the body filler according to the manufacturer’s instructions, and apply it to the treated area using a putty knife. Be sure to feather the edges of the filler to blend it seamlessly with the surrounding surface. Allow the body filler to dry according to the recommended drying time.
Step 7: Sand the Body Filler
Once the body filler is dry, use 120-grit sandpaper to sand the surface until it is smooth and level with the surrounding area. Follow up with 220-grit sandpaper for a smoother finish.
Step 8: Clean the Surface
Using a clean cloth or microfiber towel, wipe down the repaired area to remove any dust or debris. Dampen the cloth with rubbing alcohol to ensure a clean surface for primer and paint application.
Step 9: Mask the Surrounding Area
Using automotive masking tape and masking paper or plastic sheeting, mask off the area around the wheel well to protect it from overspray during primer and paint application.
Step 10: Apply Primer
Following the manufacturer’s instructions, apply a coat of primer to the repaired area. This will help the paint adhere better and provide a uniform surface for painting. Allow the primer to dry according to the recommended drying time.
Step 11: Sand the Primer
Once the primer is dry, use 220-grit sandpaper to lightly sand the surface, ensuring a smooth finish for paint application. Wipe down the area with a clean cloth dampened with rubbing alcohol to remove any dust.
Step 12: Apply Paint
Shake the paint can well, and following the manufacturer’s instructions, apply thin, even coats of paint to the repaired area. Allow each coat to dry according to the recommended drying time before applying the next coat. Apply as many coats as necessary to achieve a color match with the surrounding area.
Step 13: Apply Clear Coat
After the final coat of paint has dried, apply a clear coat to protect the paint and provide a glossy finish. Follow the Step 14: Wet Sand the Clear Coat (Optional)
For a professional-looking finish, you can choose to wet sand the clear coat once it is fully cured. This step is optional but can result in a smoother and more polished appearance. Using 1000-grit sandpaper and a spray bottle filled with water, lightly wet sand the surface in circular motions, keeping the sandpaper wet throughout the process. Be careful not to sand through the clear coat.
Step 15: Polish the Repaired Area
After wet sanding (if performed), use a polishing compound and a clean cloth or microfiber towel to polish the repaired area, removing any sanding marks and restoring the gloss to the clear coat. Follow the manufacturer’s instructions for the polishing compound.
Step 16: Remove Masking Tape and Paper
Once the clear coat is dry and the area has been polished, carefully remove the masking tape and paper or plastic sheeting from around the wheel well. Be sure to remove the tape slowly to avoid lifting any paint or clear coat.
Step 17: Inspect the Repaired Area
Inspect the repaired wheel well to ensure the rust has been properly addressed and that the paint and clear coat have been applied smoothly and evenly. The repaired area should blend seamlessly with the surrounding surface and match the vehicle’s color.
Step 18: Reinstall Wheel and Lower Vehicle (If Applicable)
If you removed the wheel to access the rusted area, reinstall it now, ensuring the lug nuts are tightened to the manufacturer’s specifications. Lower the vehicle from any jack stands or ramps used during the repair process.
By following these steps, you can effectively repair rust on a wheel well of a Dodge Ram and restore the appearance and integrity of your vehicle. Properly treating and sealing the rusted area with rust converter, body filler, primer, paint, and clear coat will not only improve the appearance but also help prevent future rust from forming.
You Can Check It Out to: Fix Rust Around Windshield
Rust Prevention Measures
1. Wash Your Car Often
Washing your car regularly will prevent debris and other particles from rusting the wheel wells. Even if you have dirt on your car, a quick rinse will take it off and prevent the particles from rusting your vehicle.
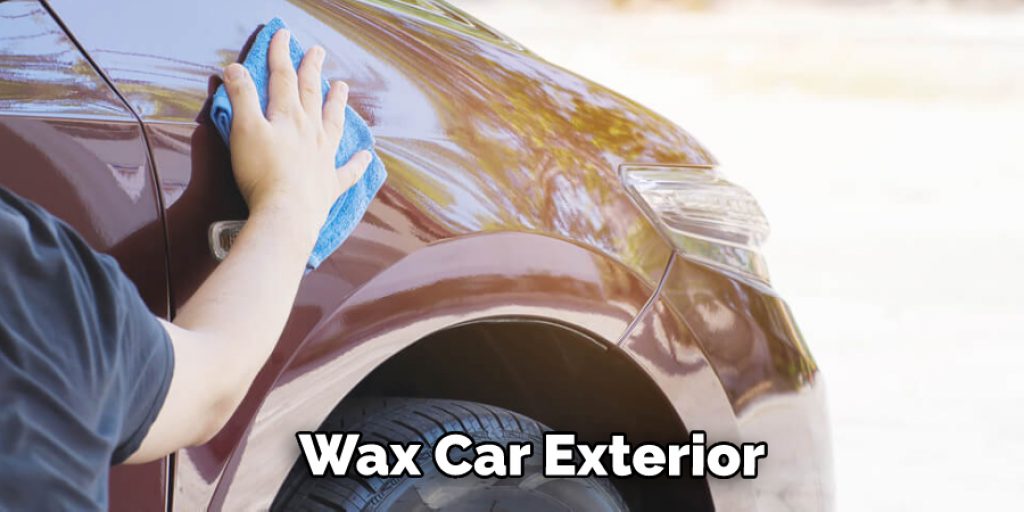
2. Wax Your Car Regularly
A clear coat of wax will keep small debris from rusting your wheel wells. The wax also keeps chemicals off it, so rust doesn’t form as much. This is not a 100% effective method It will still rust somewhat, but it prevents the wheel wells from rusting quickly.
3. Avoid Leaving Your Car Without Running The A/C
When your car sits around without running, moisture forms inside the car. This causes rust to form on the metal components, which is bad news for your wheel wells. Leaving the windows down when you park will allow some moisture to escape, but leave the A/C on if you’re going to be gone briefly.
4. Wax The Interior Metal Parts
Just like how waxing your car’s exterior keeps chemicals off metal surfaces, so does waxing the interior. If you have a plastic or rubber surface that will get hot when the sun shines on it, then waxing it will prevent rust from forming.
5. Spray Oil On Your Undercarriage
Spraying oil in a light mist on your undercarriage will keep water from sinking in and rusting your components. Please don’t go crazy with the oil, and you don’t want it to be dripping! Just enough to keep water out will prevent rust.
6. Dry Thoroughly To Keep Water From Causing Oxidation
When your car sits in water, rust starts to form. Not only do you have to worry about the water staying still and causing rusting on the inside of the car, but it can cause oxidation on your metal components. If you get a little water under your car while driving or parking, dry off any excess picked up before it dries.
7. Use A De-Icer To Remove Ice
Regular ice melts quickly, but if you live somewhere where they use salt on the roads to keep the ice from forming, then even brushing off the car won’t get rid of it all. Putting some de-icer on the underside of your car will prevent rust from forming on the metal components.
You Can Check It Out To Fix Hazy Window Tint
Frequently Asked Questions
Can Rust Around Wheel Wells Be Fixed?
Rust around wheel wells can be a common issue that results in decreased airflow and increased fuel consumption. If you are experiencing this problem, there are several steps that you can take to resolve it. First, clean the area where the rust is presently using a degreaser out-Oleum cleaner. Once the surface is free of contaminants, apply a thin layer of sealant to prevent future rusting.
What Causes Rust on Wheel Hubs?
Wheel hubs can rust if they are not properly cared for. Rust is a natural process that occurs when metal reacts with oxygen and water. It can cause the hub to corrode, which will eventually cause it to fail. To prevent wheel hubs from rusting, make sure to keep them clean and dry. Also, be sure to apply a protective coating if necessary.
Is Fixing Rust on a Car Worth It?
Rust is a problem that many people experience at some point in their lives. It’s caused by the oxidation of iron, which leaves marks on metal surfaces. While it may be easy to fix with rust-proofing spray or paint, this may not always be the best solution and could actually lead to more problems down the line.
Some factors you should consider when deciding whether fixing the rust on a car is worth it include: how severe the rust is; if any parts of the car are damaged because of Rust; what kind of repairs will need to be made (e.g., painting vs replacing); and whether fixing Rust would conflict with other maintenance goals like regular oil changes or tire rotation.
Ultimately, it’s important to consult with a qualified mechanic who can help you decide if repairing or replacing rusty areas on your car is really necessary and affordable given all these factors.
Do You Deal With Rust on Wheel Wells?
Rust on wheel wells can be a common problem, and it’s important to address it as soon as possible. Rust is an oxide that forms when iron oxidizes (rusts) in soil or water. This occurs from the release of oxygen and other chemicals from metal particles within the soil or water. The result? A black coloration, corrosion, and swelling of metal surfaces.
It’s important to identify the source of your rusting so that you can take appropriate action. Wheel wells are usually one of the first places where rust appears because they’re constantly exposed to moisture and air pollution. If this is your case, it is recommended that you seal off any openings around your wheel well with caulk or weatherproofing material to prevent further oxidation/corrosion.
Why is There Rust on My Brake Rotors?
Rust is a natural by-product of the oxidation process that happens when metal rusts. This process is caused by exposure to air, moisture, and other elements. When these elements come into contact with the metal, they start to break it down into small pieces. This process is called corrosion, and it can happen anywhere on the metal – from the surface down to the core.
The brake rotors are particularly susceptible to corrosion because they are exposed to moisture and air on a daily basis. When these elements come into contact with the rust, they cause even more damage. In addition, brake fluid contains inhibitors that can also help to accelerate the corrosion process.
If you notice rust on your brake rotors, there is no need to panic. Just take a look at the condition of your brakes and see if any of them seem damaged or rusty in any way. If so, it might be a good idea to have them replaced as soon as possible. In the meantime, you can try using a cleaner or coating that will help protect your rotors from corrosion.
Conclusion
There are several potential solutions if you are experiencing rust on your Dodge Ram’s wheel well. First, we recommend cleaning and painting the area or applying a protective coating. Whichever solution you choose, take care to protect the underlying metal from further corrosion. Although rust can cause extensive damage to the wheel well of a Dodge Ram, it is possible to fix this problem by following some simple steps.
To properly repair the rust on your vehicle, you will need to purchase a few supplies and have some basic knowledge about car repair. After reading this blog post on how to fix rust on wheel well dodge ram, we hope you can restore your wheel well and keep your Dodge Ram looking great. If you have any questions or want to know more, then feel free to comment below!
You Can Check It Out To Fix a Rusted Car Roof