Have you ever broken a nail and had no one to help you fix it? Nails can break for a number of reasons: they can be hit with a hammer, they can be bitten down too low, or they can become brittle and snap.

When this happens, it’s important to know how to fix a broken nail with toilet paper so that you don’t damage the nail bed. This blog post will show you how to fix a broken nail using toilet paper. It is a quick, easy, and cheap way to fix your nails. Keep reading for more information!
Summary:
To repair a broken nail, all you need is a piece of toilet paper and something to shape the nail with (like a spoon or butter knife). First, cut out a small piece of toilet paper that will fit over the damage.
Next, wet the paper and place it over the broken area, ensuring it covers the tip of your nail. Hold it in place until it sticks to your nail by itself. Then, use your shaping tool to press down gently on the covered area for about 30 seconds.
Instructions: How to Fix a Broken Nail With Toilet Paper
Step 1: Assess the Damage
Examine the broken nail to determine the extent of the damage. If the break is clean and not too far down the nail bed, it can likely be repaired using the toilet paper method. If the nail is severely damaged or causing pain, it’s best to seek professional help from a nail technician or a medical professional.
Step 2: Gather Necessary Supplies
To fix a broken nail with toilet paper, you will need the following supplies:
- Toilet paper or tissue paper
- Scissors
- Tweezers
- Nail file
- Nail buffer
- Nail glue or clear nail polish
- A toothpick or orange stick
- A small bowl of warm, soapy water
- A clean towel
Step 3: Prepare Your Work Area
Choose a clean, well-lit area to work on your broken nail. Lay down a clean towel or paper towel to protect your work surface from spills and to make cleanup easier.
Step 4: Clean and Dry Your Nail
Before starting the repair, it’s important to clean and dry your nail thoroughly. Soak your finger in a small bowl of warm, soapy water for a few minutes to soften and clean the nail. Gently dry your nail and the surrounding skin with a clean towel, making sure there is no moisture left.
Step 5: Cut a Small Piece of Toilet Paper
Using scissors, cut a small piece of toilet paper or tissue paper slightly larger than the size of the break in your nail. It should be large enough to cover the entire break and overlap the surrounding nail area slightly. Separate the layers of the toilet paper to make it thinner, if necessary.
Step 6: Apply Nail Glue or Clear Nail Polish
Using a toothpick or an orange stick, apply a thin layer of nail glue or clear nail polish to the broken area of the nail. Be sure to cover the entire break, as well as a small area surrounding it, to create a strong bond.
Step 7: Attach the Toilet Paper to the Nail
Using tweezers, carefully pick up the small piece of toilet paper and place it over the break in your nail. Make sure it is positioned correctly, covering the entire break and overlapping the surrounding nail slightly. Press down gently with the tweezers or your finger to smooth out any wrinkles or air bubbles.
Step 8: Apply Another Layer of Nail Glue or Clear Nail Polish
Once the toilet paper is in place, apply another thin layer of nail glue or clear nail polish over the top of it. This will help to seal and reinforce the repair, ensuring that it lasts as long as possible.
Step 9: Allow the Repair to Dry
Allow the nail glue or clear nail polish to dry completely. This can take anywhere from a few minutes to an hour, depending on the product you are using. Be patient and avoid touching or disturbing the repair during this time, as this can cause it to weaken or come apart.
Step 10: Trim Excess Toilet Paper
Once the glue or polish has dried, use your scissors to carefully trim away any excess toilet paper that is sticking out from the edge of your nail. Be careful not to cut into the nail itself or disturb the repair.
Step 11: File and Buff Your Nail
Using a nail file, gently smooth the edge of the repaired nail to create an even, natural shape. Follow up with a nail buffer to further smooth and blend the repair into the surrounding nail. Be gentle during this step, as applying too much pressure can cause the repair to come apart.
Step 12: Apply a Protective Top Coat
After your nail has been filed and buffed, apply a protective top coat of clear nail polish to help seal and strengthen the repair. This will also help to create a smooth, glossy finish, making the repair less noticeable. Allow the top coat to dry completely before moving on to the next step.
Step 13: Clean Your Work Area
Once your nail is repaired and the top coat is dry, clean your work area. Dispose of any used toilet paper, nail glue or polish, and other materials. Wipe down your work surface with a damp cloth or paper towel to remove any residue or spills.
Step 14: Maintain Your Nails
To prevent further breakage and keep your nails looking their best, practice good nail care habits. Keep your nails clean, moisturized, and well-trimmed, and avoid using them as tools to open or pry objects. Additionally, consider using a nail strengthener or fortifying nail polish to help reinforce your nails and prevent future breaks.
Step 15: Monitor the Repair
Keep an eye on your repaired nail over the next few days to ensure that the repair is holding up. If you notice any lifting, peeling, or weakening of the repair, you may need to repeat the process or seek help from a professional nail technician.
Step 16: Know When to Seek Professional Help
While the toilet paper method can be an effective way to repair a broken nail, it’s not suitable for all types of breaks or damage. If your nail is severely damaged, causing pain, or if you’re experiencing an infection, it’s important to seek help from a professional nail technician or a medical professional to ensure proper treatment and care.
By following these steps, you can effectively fix a broken nail with toilet paper, restoring its appearance and function. This method can be a quick, cost-effective solution for minor nail breaks, allowing you to maintain your nail health and appearance without the need for professional intervention. Just remember to practice good nail care habits and monitor the repair to ensure it lasts as long as possible.
Other Alternative Methods to Fix a Broken Nail
1. Using Nail Glue:
If you have some nail glue available, then you can use that to fix your broken nail. First, apply a small amount of glue to the broken edge of your nail and then press the two pieces together. Hold it for a few seconds until the glue dries, and your nail should be as good as new.
2. Using tape:
If you don’t have any nail glue, then you can try using tape. First, put a small piece of tape over the broken part of your nail and then press the two pieces together. Hold it in place for a few seconds until the tape adheres, and your nail should be repaired.
3. Using Fiberglass Strip:
If you have a fiberglass strip available, then you can use that to fix your broken nail. First, cut a small strip piece and then bend it into a U-shape. Next, apply the strip to the broken edge of your nail and hold it in place for a few seconds until it adheres.

4. Using Superglue:
Superglue can also be used to fix a broken nail. Apply a small amount of glue to the broken edge of your nail, and then press the two pieces together. Hold it in place for a few seconds until the glue dries and your nail should be repaired.
5. Using a Tea Bag:
If you don’t have any of the above supplies available, then you can try using a teabag. Put a wet tea bag over the broken part of your nail and hold it in place for a few minutes until the teabag dries. The tannic acid in the tea will help to mend the break.
6. Using a Straw:
If you’re in a pinch and don’t have any of the above supplies, then you can try using a straw. Cut a small piece of the straw and then hold it against the broken edge of your nail. Blow into the straw until the air pressure pops the straw onto your nail. Hold it in place for a few seconds until the straw adheres, and your nail should be fixed.
7. Using a Cotton:
If you have a cotton ball available, then you can use that to fix your broken nail. First, put the cotton over the broken part of your nail and then hold it in place for a few minutes until the cotton dries. The pressure from the cotton will help to mend the break.
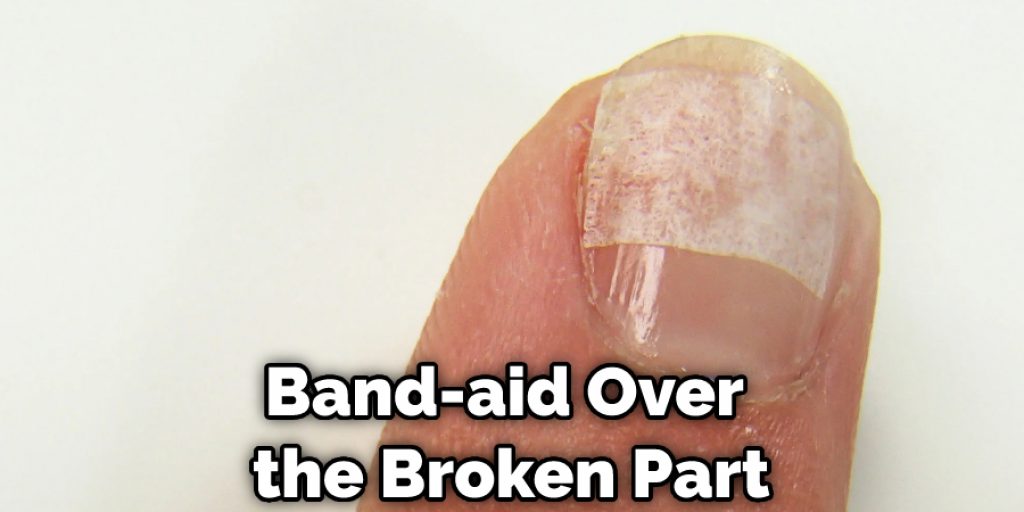
8. Using a Band-Aid:
If you have a band-aid available, then you can use that to fix your broken nail. First, place the band-aid over the broken part of your nail and hold it in place for a few minutes until the band-aid dries. The adhesive on the band-aid will help to keep the two pieces together.
Some Helpful Tips to Care For Your Nail
- Keep your nails short. Long nails are more likely to break.
- Be careful with your nails. Avoid activities that could stress your nails, such as typing on a keyboard or opening a can with your fingers.
- Keep your nails clean and well-groomed. Regularly trim your nails and use a nail file to smooth any sharp edges.
- Moisturize your nails and cuticles. This will help to keep your nails healthy and strong.
- Apply a base coat of nail polish to your nails before painting them. A base coat will help protect your nails from staining and make the nail polish last longer.
- Apply a top coat of nail polish to your nails after painting them. A top coat will help seal the nail polish and give your nails a shiny finish.
What Causes a Broken Nail?
Many things can cause a fingernail to break, such as:
1. Biting or Picking at the Nails:
This is a common cause of fingernail breakage. When you bite or pick at your nails, you put stress on the nail, which can cause them to break.
2. Using Your Nails as Tools:
Another common cause of fingernail breakage is using your nails as tools. For example, if you use your nails to open a can, the pressure can cause the nail to break.
3. Using Nail Hardeners:
Nail hardeners can also cause fingernails to break. If you use a nail hardener that is too strong, it can damage the nail and cause it to break.
4. Wearing Fake Nails:
Wearing fake nails can also cause your natural nails to break. This is because the fake nails can put pressure on your natural nails, which can cause them to break.
5. Exposure to Harsh Chemicals:
Exposure to harsh chemicals can also cause fingernails to break. For example, if you work with cleaning products or other harsh chemicals, the chemicals can damage your nails and cause them to break.
How Do You Fix a Broken Nail Without Glue?
There is still hope if you find yourself without nail glue and with a broken nail! One way to fix a broken nail without glue is by using toilet paper. Toilet paper can act as a temporary fix for a broken nail.
Take a small piece of toilet paper and place it over your nail. Use a bobby pin or hairpin to hold the toilet paper in place. Please wait until the toilet paper dries and then paint over it with clear nail polish. You can also use this method to fix a broken nail while on vacation and don’t have your nail glue.

You Can Check It Out to: Fix Brad Nails Sticking Out
Frequently Asked Questions
Should I Go to the Hospital if My Nail Ripped Off?
If you are able to get a hold of the ripped-off nail and it is not too deep or embedded in the skin, you may be able to fix it at home. Start by soaking the ripened nail in cool water for 15 minutes, then remove any debris with a gentle soap solution. Finally, fill a small bowl with warm water and put your soaked finger into it. Gently stirring will help dissolve any build-up on the nail surface that may have caused the tear. After 20 minutes, pull out your finger and gently dry it before applying an amino acid cream or ointment to the healing areas. If there is significant damage or infection present, seek professional medical assistance.
Can a Ripped Nail Repair Itself?
It depends on the severity of the rip and the nail itself. In most cases, a rip that is less than two inches long can be repaired by simply filing it down and reapplying a sealant. More serious rips or tears may require a professional repair.
Is Nail Glue the Same as Super Glue?
While both nails and superglue are adhesive, nail glue is generally weaker and designed for smaller repairs. Superglue, on the other hand, is a more permanent solution that can be used to fix larger cracks or splits in your nails. It also works well as an invisible sealant that prevents dirt and debris from getting stuck in between the nail and the acrylic layer below it.
If you’re looking for a quick fix that won’t damage your nails, then use nail glue instead of superglue. If you need something more durable or want to make larger repairs, then superglue will be a better option.
Can You Put a Tip on a Broken Nail?
The answer, unfortunately, is that it’s not really possible to do that. Broken nails are not strong enough to support even a small amount of weight, let alone a tip. In fact, if you try to do this, you’re likely to cause further damage and possibly even more nails to break. Sorry about that!
Conclusion
Although it may be an unconventional method, using toilet paper to fix a broken nail is a simple and easy way to mend the issue until you get to a salon. If you are without a band-aid or other supplies, temporarily use some toilet paper to fix your broken nail. Be sure to clean and disinfect the area before applying any adhesive bandage.
Hopefully, this article on how to fix a broken nail with toilet paper has shown you that there are many ways to take care of your nails and that even if something goes wrong, there is usually a solution. Have you ever used toilet paper to fix your nails? If so, tell us about your experience in the comments below!
You May Also Read: How to Fix Sticky Clear Coat