If you own a Ford tractor, it’s essential to know how to fix wet brakes. Wet brakes can cause your tractor to lose its braking power, leading to accidents or injuries. This article will show you how to repair wet brakes on Ford tractor.

We’ll also provide some tips on preventing brake problems in the future. Thanks for reading! With just a little bit of effort, you can save yourself some money and get your tractor back up and running. So let’s get started!
Summary: Fiberglass ladders are a great option for many tasks due to their lightweight construction and durability. However, they can still suffer damage over time. If you’re dealing with a broken fiberglass ladder, the good news is that you can often repair it yourself with minimal cost and effort.
Start by using sandpaper to remove any cracked or chipped paint around the damage then, mix resin and hardener according to the instructions on the packaging, apply it to the affected area, allow it to dry and sand down any rough edges.
What Are Wet Brakes
When a tractor’s brakes are wet, it means the fluid is old and needs to be changed out frequently. This is for both safety and appearance reasons. The main reason being safety; if there is debris or contaminants in the brake fluid, it could result in poor braking performance or even power loss.
You might notice that your tractor is not stopping as quickly as usual, or that the brakes seem to be dragging. This could be because the brake fluid is contaminated with debris. Old brake fluid has a brownish color, and this color will get progressively darker over time, especially on farm equipment used frequently. Older fluids also tend to resemble molasses in consistency, thus the term molasses fluid.
10 Reasons That Causes Oil Leaks on Ford Tractors
1. Failing to Change Oil Regularly:
When changing oil, be sure to use the proper oil filter. Always use a quality brand name filter. Check your owner’s manual for the proper filter. Dirty oil will cause your tractor to consume oil. This is not good for the engine or tranny, and can also contaminate the hydraulic fluid.
2. Clutch Drag:
If the clutch on a Ford is not set correctly or if it is too tight, this can cause a loss in engine power and excessive oil consumption. An adjustment can be made by turning a screw, which increases or decreases the clutch’s engagement.
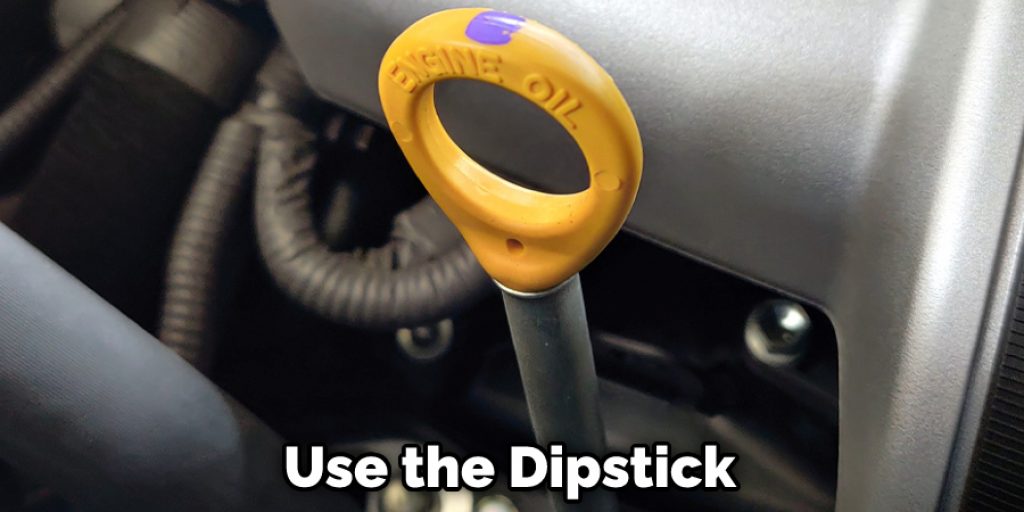
3. Incorrect Oil Level:
To operate at peak performance, your tractor needs to have the proper amount of oil in it. Make sure you use the dipstick to check the oil level after you warm up the engine and shut it off. Set your tractor to the proper level by adjusting the oil dipstick; never overfill it.
4. Overfilling with Low Weight Oil:
The owner’s manual recommends a certain weight oil for your engine. Using a lighter or heavier grade will cause your engine to consume oil as it is not as well-lubricated as the proper weight oil.
5. Inferior Oil Filter:
A quality, name-brand filter will protect your engine and transmission from contaminants. Unfortunately, cheap filters allow contaminants in because they are cheaply made and lack the fine filtering capabilities of more expensive filters.
6. Failing to Clean Oil Filters:
Wet oil filters will cause a loss of engine power, cause excessive oil usage, and lead to blown head gaskets if not changed out in time. Be sure to change the filter every 3-4 hours or before each use.
7. Electrical Smoke:
Electrical smoke is a symptom of a loose nut behind the dash. By that, I mean someone who did not know what they were doing installed something on the tractor and didn’t do a good job of it.
If you have electrical smoke coming from under your dashboard or by your brake pedal, the best bet is to check all bolts and screws for tightness. This will save you headaches in the future when your tractor catches on fire because of electrical smoke.
8. PTO Problems:
If the PTO (power take-off) does not engage or disengage properly, it can cause belt slippage and excessive oil usage. If this happens, the first thing to check is the PTO switch. If it’s ok, replace the shear pin or pressure lever.
9. Clogged Air Intake:
Your air intake and filter should be checked and cleaned regularly. If this is not done, the engine will run inefficiently and not have enough horsepower.
10. Ignition System Problems:
When the points and spark plugs are not properly set up, they can cause a loss in engine power and moisture to be drawn into your engine, which will cause a great deal of damage over time. So check these parts often to make sure they are adjusted properly.

8 Steps to Follow: How to Repair Wet Brakes on Ford Tractor
Step 1: Identify the Symptoms of Wet Brakes
Wet brakes on a Ford tractor may exhibit various symptoms, including:
- Reduced braking efficiency
- Spongy brake pedal feel
- Brake pedal sinking to the floor
- Unusual noises when braking (e.g., squeaking, grinding, or scraping)
If you observe any of these symptoms, it may be necessary to repair the wet brakes on your Ford tractor to ensure optimal performance and safety.
Step 2: Gather Necessary Tools and Materials
To repair wet brakes on a Ford tractor, you will need the following tools and materials:
- Jack and jack stands
- Wheel chocks
- Wrench or socket set
- Screwdrivers
- Brake cleaner
- Clean rags or shop towels
- Rubber gloves
- Protective eyewear
- Brake fluid (if necessary)
- Replacement brake components (if necessary)
Step 3: Prepare the Tractor for Brake Inspection
Before inspecting the brakes, take the following steps to ensure the tractor is secure:
a. Park the tractor on a level surface and turn off the engine.
b. Apply the parking brake and place wheel chocks in front of and behind the wheels to prevent the tractor from rolling.
c. Use a jack to lift the tractor, following the manufacturer’s guidelines for proper jacking points. Place jack stands under the tractor’s frame to support it securely.
Step 4: Remove the Wheels and Brake Components
Once the tractor is safely supported, remove the wheels to access the brake components. Consult the owner’s manual or a repair guide for specific instructions on removing the wheels and brake components for your Ford tractor model. In general, this process may involve:
a. Removing lug nuts or bolts from the wheel with a wrench or socket set.
b. Pulling the wheel off the axle.
c. Removing any brake components, such as the brake drum, caliper, or pads, depending on your tractor’s braking system.
Step 5: Inspect the Brake Components for Moisture
With the brake components exposed, check for any signs of moisture, such as dampness, rust, or discoloration. If you find moisture on the brake components, identify the source of the water intrusion, such as a damaged seal, a leaking brake line, or exposure to water during operation.
Step 6: Dry the Brake Components
If the brake components are wet, dry them thoroughly using clean rags or shop towels. Ensure that all moisture is removed from the components before reassembling the brakes.
Step 7: Clean the Brake Components
Using brake cleaner, spray the brake components to remove any dirt, grease, or contaminants that may contribute to reduced braking efficiency. Allow the brake cleaner to evaporate fully before reassembling the brakes.
Step 8: Replace Damaged or Worn Components
If you find any damaged or worn brake components during the inspection, such as a leaking brake line, a damaged seal, or worn brake pads, replace them with new parts. Consult the owner’s manual or a repair guide for specific instructions on replacing these components for your Ford tractor model.
Step 9: Reassemble the Brakes and Wheels
Once the brake components are dry, clean, and in good condition, reassemble the brakes and reinstall the wheels on your Ford tractor. This process typically involves:
a. Reinstalling the brake components, such as the brake drum, caliper, or pads, depending on your tractor’s braking system.
b. Positioning the wheel back onto the axle and tightening the lug nuts or bolts with a wrench or socket set.
c. Lowering the tractor onto the ground by carefully removing the jack stands and lowering the jack.
Step 10: Bleed the Brake System (If Necessary)
If you replaced any brake components or suspect that air has entered the brake system, you may need to bleed the brakes to ensure optimal performance. Bleeding the brakes involves removing air bubbles from the brake lines to restore proper brake fluid pressure. Consult your owner’s manual or a repair guide for specific instructions on bleeding the brakes for your Ford tractor model. Generally, this process involves:
a. Locating the brake bleeder valves on the brake calipers or wheel cylinders.
b. Filling the brake fluid reservoir with the appropriate brake fluid if the level is low.
c. Attaching a clear tube to the bleeder valve and placing the other end of the tube into a container to collect the expelled fluid.
d. Having an assistant pump the brake pedal several times and then hold it down while you open the bleeder valve. This will force any air bubbles and old fluid out of the brake system.
e. Closing the bleeder valve before the assistant releases the brake pedal to prevent air from re-entering the system.
f. Repeating this process until no air bubbles are visible in the expelled fluid and the brake pedal feels firm when pressed.
g. Ensuring that the brake fluid reservoir remains full throughout the process to avoid introducing air into the system.
Step 11: Test the Brakes
After completing the repair, start the tractor and test the brakes to ensure they are functioning properly. Press the brake pedal several times to confirm that it feels firm and that the tractor stops smoothly and efficiently. If the brakes still exhibit symptoms of wetness, reevaluate your repair methods and consider consulting a professional mechanic for further assistance.
Step 12: Monitor the Brakes for Future Issues
Following the repair, regularly monitor the condition of your Ford tractor’s brakes to prevent future issues with wetness. Inspect the brake components for signs of moisture or damage, check the brake fluid level, and ensure that all seals and brake lines are in good condition. Address any concerns promptly to maintain the performance and safety of your tractor’s braking system.
By following these steps, you can effectively repair wet brakes on a Ford tractor, ensuring optimal performance and safety during operation. Always consult your owner’s manual or a repair guide for specific instructions and recommendations related to your Ford tractor model. Regular inspections and maintenance can help prevent future issues with wet brakes and extend the life of your tractor’s braking system.
You Can Check It Out to: Repair Small Tear in Car Headliner
Frequently Asked Questions
What Do Wet Brakes Mean on a Tractor?
When you hit a wet spot on the road, your tractor’s brakes may not work as well. Wet spots are areas of water that have soaked into the pavement and mud, which can cause your tires to lose traction. When this happens, you’ll need to use more effort to stop your tractor.
Wet brakes also lead to lower efficiency in the engine because the oil gets slicked up and becomes less effective at transferring power from the engine to the wheels.
Which Brake Is Best for the Tractor?
There are many different types of brakes that can be used on a tractor, and it is important to choose the right one for your specific needs. The three main types of brakes are friction brake, hydraulic brake, and electro-mechanical brake.
Friction braking systems use pads or discs that rub together to stop the vehicle. Hydraulic braking systems use pressurized fluid to stop the vehicle. Electro-mechanical braking systems use an electric current (or vice versa) to stop the vehicle.
Each type has its own benefits and drawbacks, so it is important to decide which one will work best for your application. Additionally, make sure you have enough knowledge about how each system works in order not to damage your equipment or injury yourself while working on your tractor!
Do Tractors Have Drum Brakes?
tractors can have a variety of types of brakes. However, the most common type of tractor brake is the drum brake. Drum brakes work by using a large drum or disk that sits on the road and is connected to the tractor’s engine. When the tractor starts, the drum spins quickly and this causes the tractor to stop.
Are Disc Brakes Better in the Wet?
The short answer is that disc brakes may be better in the wet, but this depends on a number of factors. For example, if your caliper has enough stopping power or you have good braking performance when dry, then they’ll perform well in the wet too. However, if either of these are not true, then disc brakes might wear more quickly or become less effective over time.
Overall, it’s important to test your brake system regularly and adjust any settings as needed so that you get optimum braking performance no matter what conditions prevail.
You Can Check It Out To Fix Uneven Brake Pad Wear
Conclusion
The brake system on a Ford tractor comprises three main parts: the hydraulic brake pedal, brake fluid, and brake pads. If any one of these components is not working correctly, it can cause the brakes to fail. Therefore, it’s important to get your brakes fixed as soon as possible. The longer you wait, the more likely your brakes will fail and cause an accident.

If your brakes have been wet from rainwater, you’ll need to replace any worn-out components before attempting a repair. Also, be sure not to install new parts without knowing if there is any leakage around the cylinder because this could cause further damage that would require even more repairs down the line! We hope this blog post on how to repair wet brakes on ford tractor has been helpful. If you have any questions or want to know more, then feel free to comment below!
You Can Check It Out to: Repair Armored Door Rust