When it comes to repairing PVC pipe, there are a few things you need to take into account. The repair can be done relatively easily in some cases, while it can be more challenging in other cases. One thing to keep in mind is that PVC pipe is often used in tight spaces, so you may have to get creative when it comes to making the repair. In this article, we will share some tips on how to repair PVC pipe in tight spaces.

One of the most common problems with PVC pipe is that it can develop leaks. If you have a leak in your PVC pipe, the first thing you need to do is determine the size of the leak. Once you know the leak’s size, you can decide whether you can repair it yourself or if you need to call in a professional.
If the leak is small, then you may be able to repair it yourself. With the right tools and some patience, you can fix PVC pipe in even the tightest spaces. Here is a guide on how to repair pvc pipe in tight spaces.
Summary: Repairing a rim blow steering wheel is an easy process that requires some basic tools. First, you’ll need to identify the problem and remove the old wheel. Next, clean the wheel, repair any minor damage, and paint it. Finally, reassemble and install the wheel before testing it for proper operation.
What Is PVC Pipe?
PVC pipe is a type of plastic piping that is used for a variety of applications. It is made from a mix of polyvinyl chloride and plasticizers and is often used in plumbing and construction. PVC pipe can be brittle and prone to breaking, but it can be repaired with the right tools and techniques. PVC pipe is often used in tight spaces, so it is important to know how to repair it in these situations.
15 Steps on How to Repair PVC Pipe in Tight Spaces
Step 1: Assess the damage
Before starting any repairs, inspect the PVC pipe to determine the extent of the damage. Look for cracks, leaks, or other issues that need to be addressed. Make a note of the problems you find, as this will help you decide which repair method to use and which tools and materials you will need.
Step 2: Gather Necessary Tools and Materials
To repair PVC pipe in tight spaces, you will need various tools and materials, including:
- PVC pipe cutter or hacksaw
- Replacement PVC pipe
- PVC couplings or slip couplings
- PVC primer and cement
- Clean, damp cloth
- Tape measure
- Marker or pencil
- Protective gloves
- Safety goggles
Step 3: Turn Off the Water Supply
Before starting any repairs, ensure that the water supply to the damaged pipe is turned off. Locate the main water shut-off valve for your property and turn it off to prevent water from flowing through the pipe while you work.
Step 4: Cut Out the Damaged Section of Pipe
Using a PVC pipe cutter or hacksaw, carefully cut out the damaged section of the pipe. If you’re working in a tight space, a PVC pipe cutter may be easier to maneuver than a hacksaw. Cut as close to the damaged area as possible, ensuring that you leave enough undamaged pipe on either side to attach the replacement section.
Step 5: Clean and Prepare the Pipe Ends
After removing the damaged section, use a clean, damp cloth to wipe down the ends of the remaining pipe. This will remove any dirt, debris, or residue that may be present. Be sure to also remove any burrs or rough edges from the cut ends, as these can interfere with a secure connection.
Step 6: Measure and Cut the Replacement Pipe
Measure the gap between the two remaining pipe ends and cut a new piece of PVC pipe to the same length. Use a PVC pipe cutter or hacksaw to make the cut, ensuring that the ends of the replacement pipe are straight and clean.
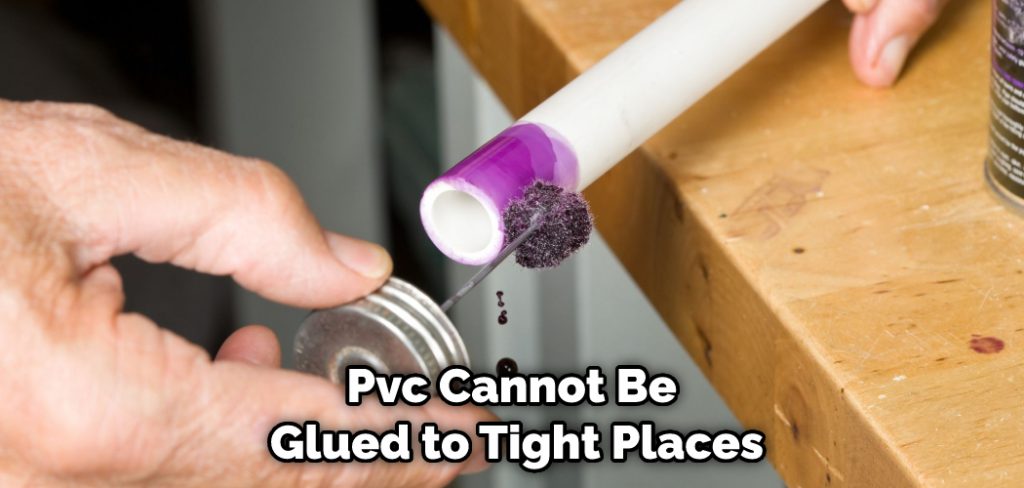
Step 7: Apply PVC Primer
Put on protective gloves and safety goggles before using PVC primer. Apply a generous amount of PVC primer to the outside ends of the remaining pipe and the inside ends of the PVC couplings or slip couplings. The primer softens the pipe’s surface, allowing for a better bond when using PVC cement. Allow the primer to dry for a few seconds, or as directed by the manufacturer.
Step 8: Apply PVC Cement
Apply a liberal amount of PVC cement to the primed areas on both the remaining pipe ends and the inside ends of the couplings or slip couplings. Be sure to follow the manufacturer’s instructions for the proper application and drying time.
Step 9: Attach the Replacement Pipe
Slide the couplings or slip couplings onto the ends of the remaining pipe, ensuring that they are evenly aligned. Then, insert the replacement pipe into the couplings, pressing firmly to create a secure connection. Hold the pipe and couplings in place for a few seconds, or as directed by the manufacturer, to allow the cement to set.
If you’re using slip couplings, slide the coupling over one end of the remaining pipe, insert the replacement pipe, and then slide the coupling back to cover the joint.
Step 10: Allow the Cement to Cure
Once the PVC cement has been applied and the replacement pipe is in place, allow the cement to cure for the recommended amount of time, as directed by the manufacturer. This will ensure a strong, watertight bond between the pipe sections.
Step 11: Turn the Water Supply Back on
After the PVC cement has fully cured, turn the water supply back on and inspect the repaired pipe for any leaks. If no leaks are present, the repair is successful, and the pipe is now ready for regular use. If you notice any leaks or issues, turn off the water supply and repeat the necessary steps to correct the problem.
Step 12: Inspect Your Work
Once the repair is complete and the water supply has been turned back on, take a moment to inspect your work. Ensure that the repaired section of the pipe is securely connected and that there are no visible leaks or signs of stress. Address any remaining issues or imperfections as needed.
Step 13: Clean up
After the repair is complete, clean up your work area by disposing of any leftover materials, debris, or tools. Store any unused PVC cement and primer in a cool, dry place, away from heat sources or open flames, as these materials can be flammable.
Step 14: Monitor the Repaired Pipe
Periodically check the repaired section of the PVC pipe to ensure that it remains in good condition and free from leaks. Regularly inspect the pipe for any signs of wear or damage, addressing any issues as soon as they arise.
Step 15: Prevent Future Damage
To prevent further damage to the PVC pipe, take steps to protect the pipe from excessive pressure, temperature fluctuations, or other potential sources of damage. Ensure that the pipe is properly supported and insulated, if necessary, to reduce the risk of damage due to freezing or overheating.
By following these steps, you can successfully repair PVC pipe in tight spaces, restoring the pipe’s functionality and preventing further damage or leaks. With proper care and maintenance, your repaired PVC pipe can continue to serve its intended purpose for years to come. Remember to exercise caution when working with PVC pipe, especially when cutting or using primer and cement, as these materials can be hazardous if not handled correctly. Always consult a professional plumber if you are unsure about any aspect of the repair process.
Frequently Asked Questions
Can You Use Silicone on PVC Pipe?
While silicone may be able to coat PVC pipe, it is not recommended for two primary reasons. First, silicone is a petroleum-based product and can cause environmental damage if left on the pipe for an extended period of time. Second, the layer of silicone that coats the PVC pipe can eventually peel off and lead to leaks or other problems down the line. If you do choose to use silicon on your PVC pipes, make sure to apply it correctly and regularly inspect your work for signs of deterioration.
Does Flex Seal Work on PVC Water Pipes?
Flex Seal is a sealant that can be used to seal water pipes. It is safe to use on PVC water pipes, and the product has been approved by the EPA. Flex Seal will help protect the pipe from leaks and other damage, and it can also prolong the life of the pipe.
Can You Stop a Leak With PVC Glue?
Leaks can be a major headache, and if they’re not fixed as soon as possible, they can lead to water damage and costly repairs. Fortunately, there are many ways to stop a leak without needing professional help. One of the most common is using PVC glue to seal leaks in ceiling tiles or joints in walls or floors. Simply apply the glue around the perimeter of the leak and allow it to dry completely before proceeding with any other repairs.
This type of fix is relatively easy and quick, so it’s perfect for emergencies or when you don’t have time to wait for more permanent solutions like replacement panels or patching up holes. Additionally, PVC glue is waterproof so it will hold even during heavy rains or snowstorms. So if you notice a slow-changing drip on your property that seems headed for disaster, try spraying some adhesive down into the crack before calling an expert!
Do You Glue PVC to Tight Places?
No, PVC cannot be glued to tight places. While it may seem like a convenient way to fix things quickly, using PVC glue would ultimately result in disastrous consequences. As the adhesive dries, it can pull away from the underlying materials and cause them to fail or crack. In addition, if water gets into the glue joint, you could end up with serious structural problems down the line.
Conclusion
Repairing PVC pipe in tight spaces can be a daunting task, but it can be done with the right tools and some patience. We hope you found this guide helpful and that it gave you the information about how to repair pvc pipe in tight spaces. If you have any questions or feedback, please let us know in the comments section below.