There’s no doubt that the Nintendo Switch is a console phenomenon. However, even the best things have their flaws, and for Switch users, one of those flaws is the Zr button. The Nintendo Switch’s Zr button isn’t working properly for some users. This can be a major problem, as the Zr button takes screenshots in-game.
Luckily, there are a few ways to fix this issue. In this blog post, we will explore how to fix zr button on nintendo switch and help you get your Zr button back up and running! Keep in mind that this may not work for everyone, but it is worth a try. So follow these simple steps, and you should be up and gaming in no time!
Summary: If your Nintendo Switch Zr button is not working, there are a few steps you can take to try and fix the issue. First, make sure that the button is actually broken. If it’s just dirty or difficult to press, you can try a cleaning process or try a replacement button. If the button is broken, you can also replace the button.
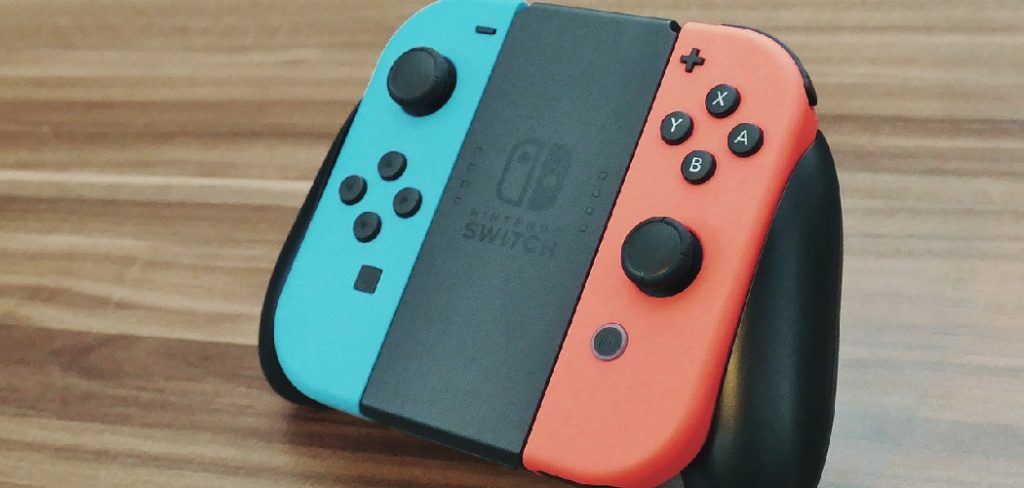
What Button Is Zr on the Nintendo Switch
The ZR button, located on the top right of the controller when attached to the console, is the rightmost trigger button on the Nintendo Switch’s Joy-Con controllers. It is used for various purposes, most notably aiming and firing in shooter games. Additionally, the button can be used to take screenshots in-game.
Seven Common Zr Button Problems Found on Nintendo Switch
1. Button Is Not Clicking Properly:
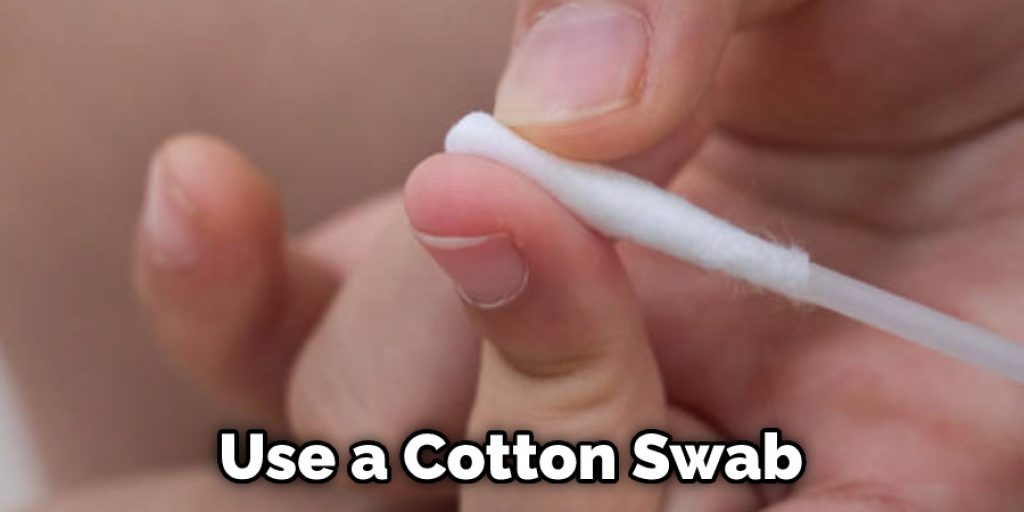
If the Zr button on your Switch is not clicking properly, it could be due to dirt or debris build-up. To clean the button, use a cotton swab dipped in alcohol. Then, gently rub the button until it is clean. If the button is still not clicking properly, you may need to replace it.
2. Button Is Stuck:
If your Zr button is stuck and won’t pop back into place, you can try gently pushing on the back of the button until it pops back into place. Be careful not to use too much force, as this could damage the button further. If the button appears to be held in place by something else, such as a piece of dirt or lint, you can try to remove it with a small object like a toothpick.
3. Button Is Unresponsive:
If your Zr button isn’t responding when you press it, there are a few things you can try. First, make sure the button is clean and free of any dirt or debris. If the button is still unresponsive, try restarting your Switch. If the button continues to be unresponsive, you may need to replace it.
4. Button Is Stuck in the Down Position:
If your Zr button is stuck in the down position, it is likely due to dirt or debris build-up. To clean the button, use a cotton swab dipped in alcohol. Then, gently rub the button until the dirt or debris is removed. If the button is still not functioning properly, you may need to replace it.
5. The Button Feels Loose or Mushy:
The button on your shirt may feel loose or mushy if there is something caught under it or if the button is worn down. First, try to look at the button to see if there is anything caught under it. If there is, then clean it out. If the button is worn down, you can try using a small piece of sandpaper to make it smoother. If neither of these solutions works, you may need to replace the button.
6. The Button Is Making a Squeaking Noise:
If the button is making a squeaking noise, it is likely due to a build-up of dirt and grime. First, clean the button with a cotton swab soaked in rubbing alcohol. If the button is still making noise, try replacing the button with a new one. If the button is not responding, it is likely due to a build-up of dirt and grime. First, clean the button with a cotton swab soaked in rubbing alcohol. If the button is still unresponsive, try replacing the button with a new one.
7. Button Is Not Functioning Properly:
If your Zr button is not functioning properly, it could be due to several reasons. First, check to see if the button is jammed or stuck. If so, try gently pressing and releasing the button to see if it will unstick. If the button appears to be physically damaged, you may need to replace it.

If the button appears fine, the problem could be with the button itself or the console. If you have another Switch controller, try using it to see if the button works properly. If not, the problem is most likely with the console and will require a repair by Nintendo.
Step by Step Guide: How to Fix Zr Button on Nintendo Switch
Step 1: Gather Necessary Tools and Materials
Before starting the repair process, gather the necessary tools and materials, including:
- Tri-wing Y00 screwdriver
- Phillips #00 screwdriver
- Tweezers or plastic spudger
- Replacement ZR button or switch (if needed)
- Compressed air or a soft-bristled brush
- Clean cloth or paper towel
- Small container for holding screws and other small parts
Step 2: Power Off the Nintendo Switch
Ensure that your Nintendo Switch is powered off and disconnected from any power source or accessories to prevent any electrical issues or damage during the repair process.
Step 3: Remove the Joy-Con
Detach the Joy-Con containing the ZR button from the Nintendo Switch console by pressing the small release button on the back of the Joy-Con and sliding it upward.
Step 4: Remove the Rear Cover Screws
Using the Tri-wing Y00 screwdriver, remove the four screws located on the rear cover of the Joy-Con. Place the screws in a small container to avoid losing them.
Step 5: Remove the Rear Cover
Carefully lift the rear cover away from the Joy-Con, taking care not to damage any internal components. If the cover is difficult to remove, use a plastic spudger or your fingernail to gently pry it open along the seam.
Step 6: Remove the Battery
Using tweezers or a plastic spudger, carefully lift the battery out of the Joy-Con. Be cautious not to puncture or damage the battery, as this could create a potential safety hazard.
Step 7: Remove the Midframe Screws
Using the Phillips #00 screwdriver, remove the three screws securing the midframe to the Joy-Con. Place the screws in a small container to avoid losing them.
Step 8: Remove the Midframe
Carefully lift the midframe away from the Joy-Con, taking care not to damage any internal components. If the midframe is difficult to remove, use a plastic spudger or your fingernail to gently pry it open along the seam.
Step 9: Inspect the ZR Button
Examine the ZR button and its surrounding area for any signs of damage, debris, or wear. Common issues include stuck buttons, misaligned parts, and broken or damaged components.
Step 10: Clean the ZR Button
Using compressed air or a soft-bristled brush, gently clean the ZR button and its surrounding area to remove any dirt, debris, or residue. This may help resolve issues with stuck or unresponsive buttons.
Step 11: Realign the ZR Button
If the ZR button is misaligned, carefully realign it within its designated slot. Ensure that the button moves freely and does not catch on any surrounding components.
Step 12: Replace the ZR Button or Switch (if needed)
If the ZR button or its associated switch is damaged or nonfunctional, you may need to replace it with a new part. Purchase a replacement button or switch from the manufacturer or a trusted supplier. To replace the button or switch:
- Use tweezers or a plastic spudger to carefully remove the damaged button or switch from the Joy-Con.
- Install the new button or switch by carefully positioning it in the appropriate slot and securing any necessary connections.
Step 13: Reassemble the Joy-Con
With the ZR button repaired or replaced, it’s time to reassemble the Joy-Con. Follow these steps in reverse order:
- Replace the midframe and secure it with the three Phillips #00 screws.
- Reinstall the battery, ensuring that it is properly connected and seated within the Joy-Con.
- Replace the rear cover and secure it with the four Tri-wing Y00 screws.
Step 14: Test the Repaired ZR Button
After reassembling the Joy-Con, test the functionality of the repaired ZR button by attaching it to the Nintendo Switch console and powering it on. Ensure that the button responds correctly and consistently during gameplay. If you encounter any issues, disassemble the Joy-Con and address the problem before reassembling and testing again.
Step 15: Maintain Your Nintendo Switch
To prolong the life of your Nintendo Switch and prevent future issues, regularly inspect and maintain the device. Keep it clean and free of debris, and address any signs of wear or damage promptly. Store the console and its accessories properly when not in use to minimize potential damage.
Step 16: Troubleshoot Any Ongoing Issues
If your ZR button continues to have problems after completing the repair process, it may be necessary to troubleshoot further. Consult the Nintendo Switch user manual or contact Nintendo customer support for guidance. In some cases, it may be more cost-effective to replace the entire Joy-Con rather than attempting additional repairs.
Step 17: Consider Upgrading Your Nintendo Switch Accessories
If you find that your Joy-Con requires frequent repairs or is no longer providing the desired level of satisfaction, consider upgrading to higher-quality or more durable accessories. Research different options and read customer reviews to find accessories that best meet your needs and preferences.
Step 18: Share Your Repair Experience
Once you’ve successfully repaired the ZR button on your Nintendo Switch, consider sharing your experience with others. Posting a tutorial or writing about the process can help others facing similar issues, and you may even learn new tips or tricks from the community’s feedback.
Step 19: Develop Your Repair Skills
By repairing the ZR button on your Nintendo Switch, you’ve gained valuable experience and developed problem-solving skills that can be applied to other projects or situations. Continue to hone your repair skills by tackling other challenges and learning from each experience.
Step 20: Prevent Future Issues
Take steps to prevent future issues with your Nintendo Switch by handling it with care, avoiding exposure to extreme temperatures or moisture, and storing it properly when not in use. Regular maintenance and prompt attention to any signs of wear or damage will also help ensure the console’s continued performance.
By following these steps, you can successfully repair the ZR button on your Nintendo Switch and restore its functionality and enjoyment. Regular maintenance, preventative measures, and developing your repair skills will help prolong the life of your Nintendo Switch and ensure its continued performance. If you encounter any difficulties or uncertainties during the repair process, seeking guidance from the manufacturer or experienced users can help ensure a successful outcome.
You Can Check It Out To Fix a Badge Reel
Tips to Care For Your Nintendo Switch
- Handle your Switch with care.
- Avoid exposing your Switch to extreme temperatures or direct sunlight.
- Do not force the Joy-Con controllers onto the console.
- Keep food and drinks away from your Switch.
- Clean your Switch with a soft, dry cloth.
- Do not use any cleaning solution on your Switch.
- If something does spill onto your Switch, immediately power it off and unplug all cables.
- Allow the console to dry completely before powering it back on.
Troubleshooting Zr Button on Nintendo Switch:
If your Nintendo Switch’s Zr button isn’t working properly, there are a few things you can try to fix the issue. First, make sure that the button is not obstructed by anything. If something is blocking the button, it may not be able to depress fully and will not work properly. If the button is clear, try pressing it a few times to see if it starts working.
If the button still isn’t working, you can try resetting the Switch by holding down the power button for 12 seconds. This will turn off the console and may fix the issue. However, if the button still isn’t working after resetting, you may need to take the Switch to a repair shop to have it looked at.
Frequently Asked Questions
Can Light Switches Drift?
There is a lot of misinformation online regarding light switches, and this can be dangerous. So, to help clarify the situation, here are four facts about light switches that you need to know:
- LightSwitch will not drift if installed by a professional electrician.
- If your home was built after 1976, your wiring may not have enough voltage for light switch installation. Check with an electrician before attempting installation yourself.
- Even if your wiring does have enough voltage for installation, there is still a risk of wire breakage during installation. Always contact an electrician prior to attempted self-installation in order to avoid any potential accidents.
What Is the Zr Button on Nintendo Switch?
The Zr button is a dedicated button on the Nintendo Switch that is used to help players with disabilities play the game conveniently. When players hold down the Zr button and select an assist mode, they are then able to use the controller’s touchscreen to control various aspects of gameplay. This includes things like moving, shooting, and interacting with objects.
Why Does Z Not Work on Nintendo Switch?
Z is an app that lets you play games on your Nintendo Switch by streaming them from a computer. However, this feature does not work on the Nintendo Switch because it requires a dedicated graphics card and port that are not included in the console’s hardware.
What Is Z Trigger Nintendo 64?
Z Trigger is a Japanese action game for the Nintendo 64 that was released in 2000. It was developed by Capcom and published by Nintendo. The game is a spin-off of the Street Fighter series and stars Ryu and Ken as they battle their way through various martial arts tournaments to become the world’s greatest fighter.
Final Words
The Nintendo Switch’s Zr button is located in an awkward place and it can be hard to reach. This guide has shown you how to fix the Zr button on your Nintendo Switch. First, you need to remove the back cover of the console. There are six screws that need to be removed in order to do this. Once the screws have been removed, the back cover can be pulled off. You will then see two Phillips head screws that need to be removed in order to take out the motherboard.
The motherboard can now be lifted out of the console. If the button is not working, something may prevent it from depressing. Gently insert a small flathead screwdriver under the edge of the button and apply pressure until you feel the button depress. After reading this blog post, we hope you have some idea about how to fix zr button on nintendo switch. If you have any questions or want to know more, then feel free to comment below!
You Can Check It Out to: Fix a Broken Button on Jeans