Is your vinyl floor looking a little worse for wear? Has it been water damaged, or is it just starting to look a little old and faded? Fear not – there are plenty of ways to fix and restore your vinyl flooring!
Few things are more frustrating than dealing with a water-damaged floor. If you’ve discovered that your vinyl floor has been damaged by water, don’t worry – there is hope!
In this blog post, we will outline the steps needed to know how to fix water damaged vinyl floors. Keep in mind that the process may vary depending on the extent of the damage, so be sure to consult a professional if necessary. With that said, let’s get started!
Summary: If your vinyl flooring has been damaged by water, you can find a solution to fix it. Start by finding the source of the water and removing it from the area. Once the water is gone, clean up any dirt or debris left behind. Use a damp cloth to wipe down the affected area and let it dry completely before proceeding to repair. If there is staining, use an appropriate cleaner to tackle any discoloration.
What Are the Reasons Behind Water Damaged Vinyl Floor?
There are several reasons why your vinyl floor might become water damaged. The most common reason is a leaky pipe or appliance. If a pipe in your home bursts or an appliance leaks, the water can seep through the cracks and crevices in your floor, causing damage.
Another common cause of water damage is flooding. If your home floods, the water can quickly soak through your flooring and cause damage.
Finally, heavy rains can also lead to water damage. If rainwater seeps through cracks in your foundation or walls, it can saturate your flooring and cause damage.
What Are the Signs of Water Damaged Vinyl Floor?
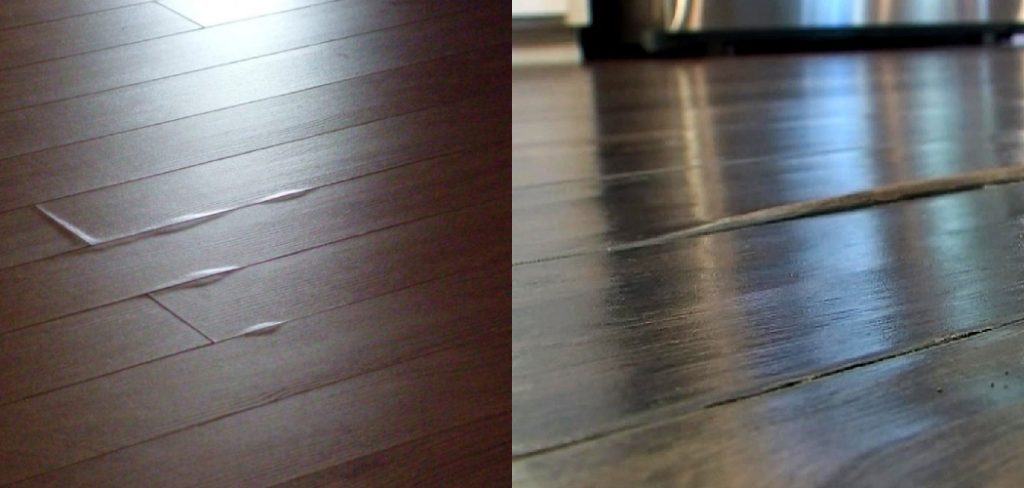
If you think your vinyl floor might be water damaged, there are a few signs to look for. One of the most obvious signs is warping or buckling in the flooring. If the vinyl is warped or buckled, it’s a sure sign that water has seeped through and caused damage.
Another sign to look for is discoloration. If the vinyl is discolored, it’s a good indication that water has seeped through and caused damage.
Finally, if your floor feels spongy or soft, it’s a sign that water has seeped through and caused damage.
If you notice any of these signs, it’s important to take action immediately. The longer you wait, the more damage will be done.
10 Steps on How to Fix Water Damaged Vinyl Floor:
There are a few different ways to fix the water-damaged vinyl floors. The most important thing is to take action quickly. The longer you wait, the more damage will be done.
1. Remove All Furniture and Appliances:

The first step is to remove all furniture and appliances from the room. This will give you access to the floor so that you can begin the repair process. Be careful when moving furniture and appliances, as you don’t want to cause further damage. This step is important because you need to have a clear working space.
2. Locate the Source of the Leak:
Once all of the furniture and appliances have been removed, it’s time to locate the source of the leak. If you can’t find the source of the leak, it’s a good idea to call a professional. They will be able to locate the source and make the necessary repairs.
3. Stop the Leak:
Once you’ve located the source of the leak, it’s time to stop it. This step is important because continuing to allow water to seep onto your vinyl floor will only worsen the damage. If the leak is coming from a broken appliance or plumbing fixture, you’ll need to shut off the water at the main valve.
If the leak is due to heavy rain or melting snow, you’ll need to take measures to keep water from entering your home, such as covering cracked windows or doors with plastic sheeting. If you can’t stop the leak yourself, it’s a good idea to call a professional. They will be able to make the necessary repairs and stop the leak.
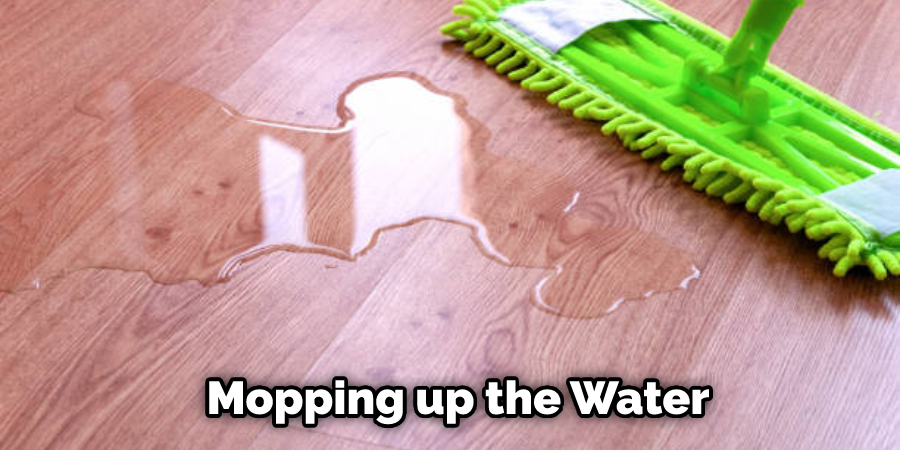
4. Remove Water from the Floor:
Once you’ve stopped the leak, it’s time to start removing water from the floor. This can be done with a wet/dry vacuum or by mopping up the water with towels. Be sure to work from the edges of the room towards the center so that you don’t spread the water around.
5. Clean the Floor:
Once all of the water has been removed from the floor, it’s time to clean it. This is important because any dirt or debris on the floor can further damage the vinyl. Begin by sweeping or vacuuming the floor to remove any loose dirt. Then, clean the floor with a bar of mild soap and warm water. Be sure to rinse the floor well after cleaning.
6. Dry the Floor:
After cleaning, it’s important to dry the floor completely. This can be done with towels or a wet/dry vacuum. Once the floor is dry, open windows and doors to allow for air circulation. If possible, use a fan or dehumidifier to speed up the drying process.
7. Inspect the Floor:
Once the floor is dry, take a close look at it to check for any damage. If there are any cracks, scratches, or holes in the vinyl, you’ll need to repair them before continuing. If the damage is extensive, you may need to replace the vinyl floor altogether.
8. Apply a Sealant:
Once the floor is dry and repaired, it’s time to apply a sealant. This will help protect the vinyl from future damage. Choose a sealant that is specifically designed for use on vinyl floors. Then, apply the sealant according to the manufacturer’s instructions.
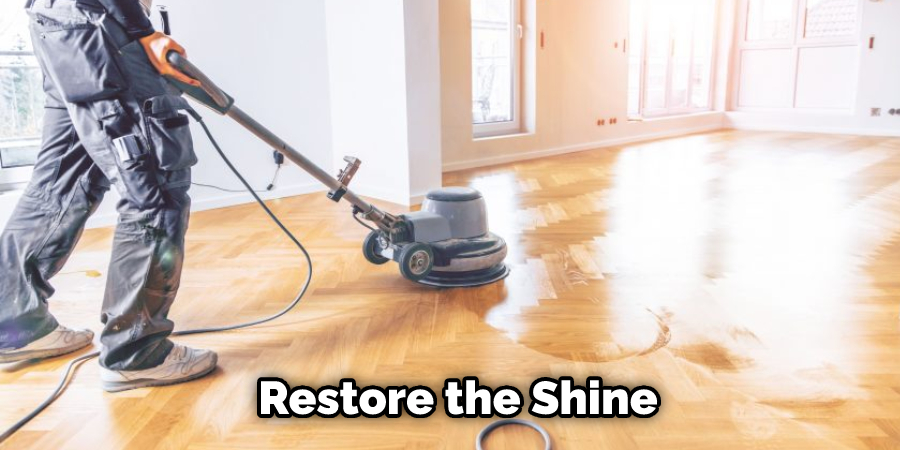
9. Polish the Floor:
After applying the sealant, you may want to polish the floor to restore its shine. Use a high-quality floor polish and follow the manufacturer’s instructions. Apply the polish with a soft cloth or mop, working in small sections. Allow the polish to dry completely before walking on the floor.
10. Apply a Finishing Coat:
After polishing, you may want to apply a finishing coat. This will help protect the vinyl from wear and tear. Apply the finishing coat with a soft cloth or mop, working in small sections. Allow the coat to dry completely before walking on the floor.
Once you’ve followed these steps, your vinyl floor should be as good as new! Enjoy your beautiful floor, and take care to keep it looking its best.
Additional Tips and Tricks
- You can use a hairdryer on a low setting to help dry out the area.
- If you have a wet/dry vacuum, you can use it to suck up any excess water.
- You can also blot the area with a towel to soak up water.
- Once the area is dry, you can apply a sealant to help protect the floor from future water damage.
- If the damage is severe, you may need to replace the vinyl flooring.
I hope these tips help you if you ever have to deal with water damage to your vinyl floor!
Take Precautionary Steps to Prevent Water Damage
- Use rugs or mats at all entrances to your home. This will help to prevent water from being tracked.
- Wipe up any spills immediately.
- Keep potted plants well-watered so they don’t leak onto the floor.
- Place a water-resistant mat under your washing machine and dryer.
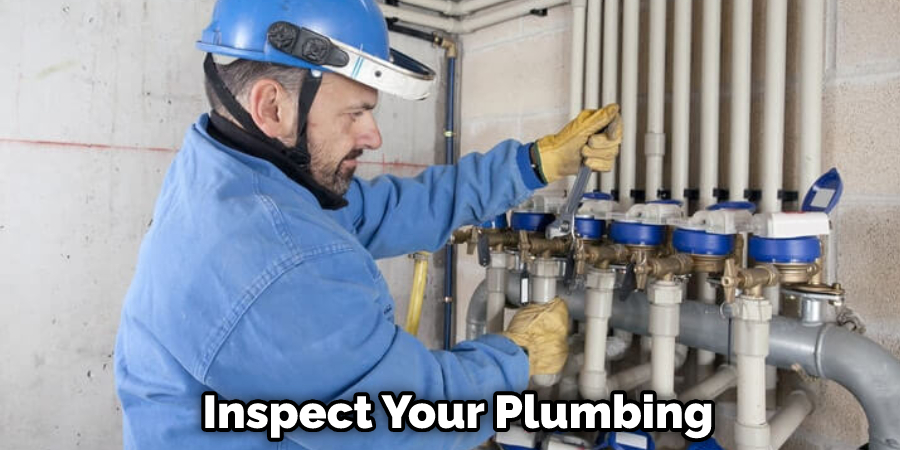
- Inspect your plumbing regularly for leaks.
- Store any cleaning products that contain bleach in a safe place away from children and pets.
- Never leave a mop or bucket of water unattended.
- Use caution when using any appliances that use water, such as dishwashers and washing machines.
By taking these precautionary steps, you can help to prevent water damage to your vinyl floor.
Is fixing water damaged vinyl floor difficult?
Fixing water-damaged vinyl floors is not difficult, but it does require some time and effort. If the damage is severe, you may need to replace the flooring altogether. However, if the damage is not too bad, you can fix it yourself. But, it’s essential to take your time and do the job right so that your floor will last for many years to come. Thanks for reading! I hope this helps.
When Should You Call a Professional?
You may need to call a professional if the water damage is extensive. Extensive damage may require the replacement of the vinyl flooring. A professional will also be able to repair any cracks, scratches, or holes in the floor. If you’re not sure whether or not you can handle the job yourself, it’s always best to call a professional. Otherwise, you may end up causing more damage to your floor. I hope this works.
Conclusion
Vinyl flooring is a popular option because it’s affordable and easy to maintain. However, if your vinyl floor becomes water damaged, there are ways to fix it. In this article, we have outlined the steps you need to take to repair your vinyl floor and make it look new. If you follow these instructions, you should be able to restore your vinyl floor without too much trouble.
This blog post has looked at how to fix water damaged vinyl floor. We have also looked at some tips and tricks that you can use to prevent water damage in the future.
Have you ever had to fix water damage on vinyl flooring? What was the outcome? Let us know in the comments section below.