If you’re like me, you enjoy relaxing in a hot shower at the end of a long day. But if your shower door leaks water all over the floor, that relaxation can quickly become a headache.

If your shower door frame leaks, there are a few things you can do to fix it. This blog post will discuss some of the most effective steps and methods on how to fix leaking shower door frames. We will also provide safety precautions on how to prevent future leaks. Keep reading to learn more!
Summary: If you have a leaking shower door frame, there are some steps you can take to repair the problem. Firstly, identify where the water is coming from – it could be a crack or gap in the frame, or leakage from around the edges. Then seal any gaps with caulking or rubber inserts. Finally, you may need to replace seals or gaskets if they are damaged. These steps should help solve your problem and prevent further water damage.
What Causes Leaking Shower Door Frame?
There are a few reasons that your shower door frame could be leaking.
The first reason is that the sealant around the door frame has worn away. Over time, the sealant will degrade and allow water to seep through. Another reason for a leaky shower door frame is if there is any damage to the frame itself. Cracks or holes in the frame can also let water through.
The last common reason for a leaking shower door frame is if the doors are not installed properly. If the doors are not flush with the frame, there can be gaps that allow water to escape.
6 Steps on How to Fix Leaking Shower Door Frame
Step 1: Inspect the Entire Shower Door Frame
First, you need to look at the shower door frame as a whole. Look for any cracks, holes, or other damage. If you find any, then that is likely your problem area. You need to look closely at the problem area to determine how best to fix it. Otherwise, you may just be able to caulk the whole frame to prevent future leaks.
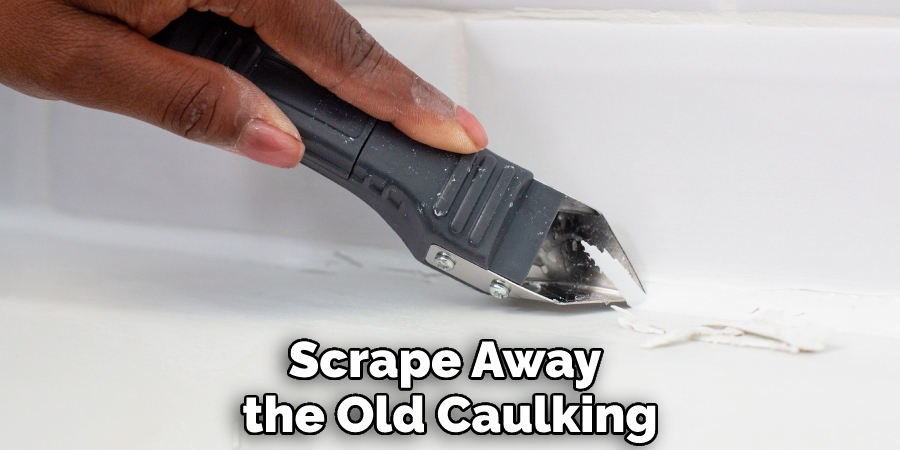
Step 2: Remove All Damaged caulking
If you find any damaged caulking, then you need to remove it. Use a utility knife or putty knife to scrape away the old caulking. Be careful not to damage the shower door frame itself. Once you have removed all the damaged caulking, you must clean the area well. While doing this, also check to make sure that the shower door frame is not warped or bowed. If it is, then you will need to replace the frame.
Step 3: Apply New Caulking
Once you have a clean surface, you can apply new caulking. Use a caulk gun to apply a bead of caulk around the entire shower door frame. Make sure that the caulk bead is even and smooth. You don’t want any gaps in the caulking, as this will lead to more leaks.
Step 4: Smooth Out the Caulk
After you have applied the caulk, you need to smooth it out. Use your finger or a putty knife to smooth out the caulk. Make sure that there are no gaps or air pockets in the caulking. Ensure the caulking is smooth and even all around. No need to worry about making it perfect, as you will be painting over it anyway.
Step 5: Allow the Caulk to Dry
After you have smoothed out the caulk, let it dry. The time it takes for the caulk to dry will depend on the type of caulk that you use. Read the instructions on the caulk tube to find out how long it should take to dry. Once the caulk is dry, you can move on to painting the frame.
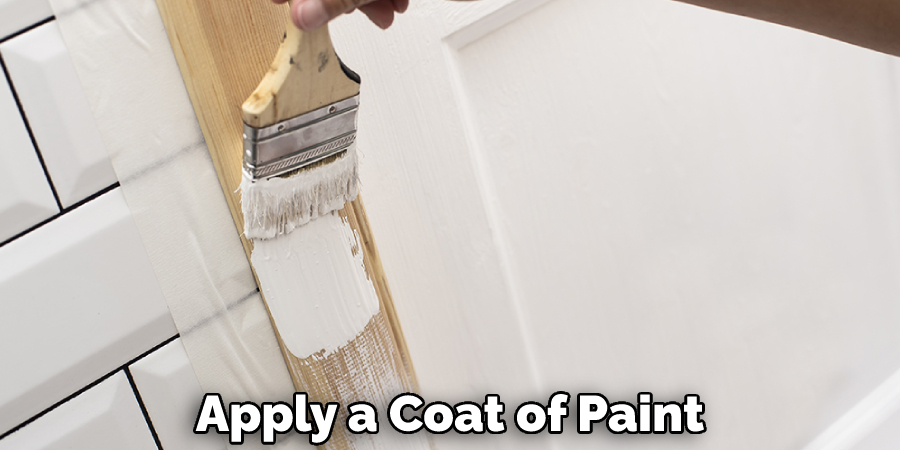
Step 6: Paint the Door Frame
The final step is to paint the door frame. This will help to protect the caulking and make your shower door frame look new again. Use a paintbrush to apply a coat of paint to the door frame. Allow the paint to dry completely before using the shower. Be careful with the paint fumes. Make sure to ventilate the area well.
There you have it! These are the steps that you need to take in order to fix a leaking shower door frame. By following these steps, you should be able to stop your shower door from leaking. If you find that your shower door frame is too damaged, then you may need to replace it. Otherwise, just follow these steps, and you should be able to fix the problem.
6 Effective Methods to Fix Leaking Shower Door Frame
Method 1: Use Caulking to Fix Minor Leaks
If you have a small leak in your shower door frame, caulking may be all that is needed to fix the problem. You can purchase caulk at any hardware store. Be sure to choose a caulk that is specifically designed for use in wet areas like showers.
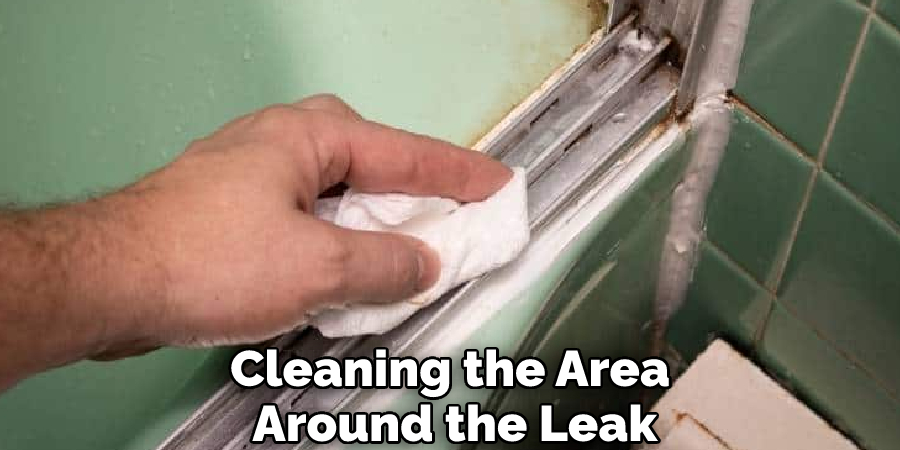
To apply caulk, clean the area around the leak with a cloth soaked in rubbing alcohol. This will help the caulk to adhere better. Then, cut the tip of the caulk tube at a 45-degree angle. Apply the caulk to the crack using a smooth, even motion. Wipe away any excess caulk with a damp cloth.
Method 2: Use Epoxy to Fix Larger Leaks
If you have a more significant leak in your shower door frame, epoxy may be a better option than caulking. You can purchase epoxy at any hardware store. This is very easy to apply, but it will take a few hours to set properly.
Start by cleaning the area around the leak with a damp cloth. Then, mix the epoxy according to the package directions. After that, apply the epoxy to the leak using a putty knife or other similar tool.
Allow the epoxy to set for at least 3 hours before using the shower.
Method 3: Use a Shower Door Sealant
If you have leaks in your shower door frame, a sealant may be the best option. You can purchase a shower door sealant at most hardware stores. This is applied in much the same way as caulking, but it is specifically designed for use on shower doors.
Most people find that a sealant is the best way to fix a leaky shower door frame. It is easy to apply and can be found at most hardware stores.
Method 4: Use a Shower Door Gasket
Using a shower door gasket is another way to fix a leaking shower door frame. This is a simple and effective method that can be done in a matter of minutes. All you need is a new shower door gasket and some silicone caulk.
Start by removing the old shower door gasket. You can do this by prying it off with a putty knife or a flathead screwdriver. Be careful not to damage the door frame.
Once the old gasket is removed, clean the area around the door frame with a clean cloth. This will help the new gasket adhere better.
Method 5: Use Shower Door Tape
If you have a shower door not sealing properly, shower door tape may be the solution. For an easy fix, all you need is some clear silicone sealant and a utility knife.
Remove any old caulk or sealant around the shower door frame with a putty knife. Be sure to get all of the old material off so that the new tape will adhere properly. Then, cut a piece of shower door tape to size and apply it to the door frame.
Method 6: Use Weather Stripping
If you have a shower door that is not sealing properly, weatherstripping may be the solution. For an easy fix, all you need is some clear silicone sealant and a utility knife. It is very easy to apply and is effective in keeping water from seeping through the cracks.
Cut a piece of weatherstripping to fit the length of the shower door frame. Make sure that it is slightly longer than the width of the door so that it can be easily installed. Apply a generous amount of silicone sealant to the back of the weatherstripping. Peel off the backing and press the weatherstripping into place. Use a utility knife to trim off any excess.
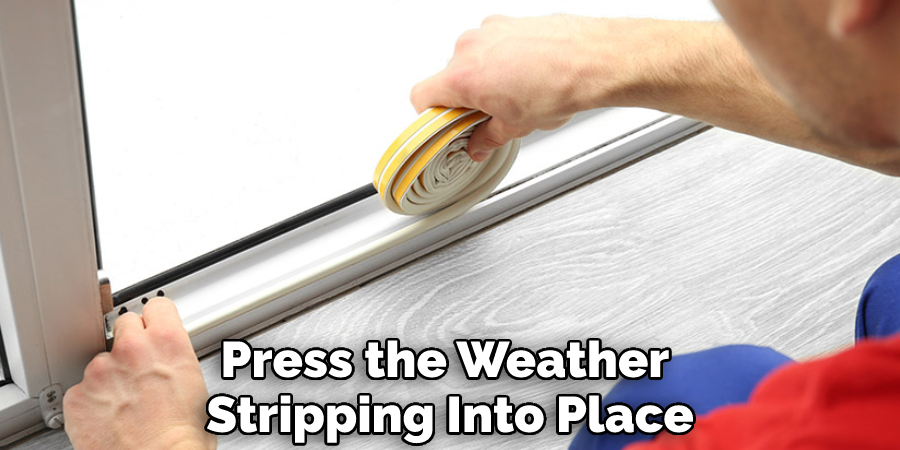
Test the seal by closing the door and running your finger along the edge. If there is any gap, add more silicone sealant until it is sealed. This is a quick and easy fix that will keep your shower door from leaking.
If you have a more severe problem, such as a hole in the frame, you may need to replace the entire shower door. This is a more complicated repair and should be done by a professional.
Safety Precautions You Need to Know Before Fixing a Leaking Shower Door Frame
- Make sure you have the right tools for the job. Otherwise, you may end up causing more damage than you fix.
- Shut off the water to your shower before beginning any repairs. Otherwise, you risk being sprayed with cold water or scalding yourself.
- Do not try to fix the door frame while the shower is in use. This could be extremely dangerous.
- If the damage is extensive, it may be best to replace the entire door frame rather than try to fix it.
- Be careful not to over-tighten screws or nails when reattaching the door frame. This could strip the threads or damage the wood.
- Ensure the door frame is adequately sealed before using the shower again. Otherwise, you risk further damage or leaks.
- Inspect the door frame regularly to make sure it remains in good condition. This will help you catch any problems before they become more serious.
Conclusion
Fixing a leaking shower door frame is a simple repair that can be done in a matter of minutes. All you need is a little silicone sealant and some basic tools. If the damage is more extensive, you may need to replace the entire door frame. Regular inspections will help you catch any problems early on so they can be fixed before they become more serious.

We’ve outlined the steps on how to fix leaking shower door frame, so be sure to follow them closely. Have any questions? Give us a call, and we will be happy to help.