It’s not uncommon for homes to have at least one brick wall. These walls can be beautiful and add character to a home, but they can also be quite challenging to fix if something goes wrong. In this blog post, we’ll show you how to fix brick wall the right way. Follow these steps, and you’ll be able to repair your wall in no time!
Summary: Fixing a brick wall requires the right tools, materials, and knowledge. First, inspect the wall to identify what kind of repair is needed. Depending on the extent of the damage, you may need to remove broken bricks or mortar with a chisel and hammer, or use an electric grinder. Once the old material is removed, mix a new mortar and apply it to create a strong bond between each brick. Finally, let the wall dry for at least 24 hours before applying any finishing touches.
What Is a Brick Wall?
A brick wall is a wall made of bricks, which are small, hard blocks of ceramic or stone. Brick walls are often used to build houses and other buildings. They also create barriers, such as fences, around properties. Brick walls are strong and durable, and they can last for centuries if they are properly constructed and maintained.
In addition to their practical applications, brick walls also have an aesthetic appeal. The uniformity of the bricks can create a pleasing visual effect, and the different colors and textures of bricks can add interest to a wall.
Why Might You Need to Fix a Brick Wall?
There are many reasons why you might need to fix a brick wall. The most common reason is that the bricks have begun to crumble or break down. This can be caused by several things, including weathering, animal activity, or simply the age of the bricks.
Whatever the cause, crumbling bricks can create gaps in the wall that allow water and pests to enter your home. In addition, they can pose a safety hazard if they fall and hit someone. If you notice any cracks or damage to your brick wall, it’s important to have it repaired as soon as possible.
How to Fix Brick Wall Step by Step Guide
Step 1: Identify the Problem
Before starting any repair work on a brick wall, first identify the specific issue(s) that need to be addressed. Common brick wall problems include cracked or broken bricks, crumbling mortar, and water damage.
Step 2: Gather Necessary Tools and Materials
For a successful brick wall repair, you will need the following tools and materials:
- Protective gloves and eyewear
- Brick trowel
- Pointing trowel
- Hammer and chisel
- Stiff-bristled brush
- Mortar mix
- Replacement bricks (if needed)
- Bucket and water
- Mortarboard or flat surface for mixing mortar
- Jointer or round metal rod
Step 3: Remove Damaged Bricks
If your brick wall has damaged bricks that need to be replaced, start by carefully removing them. Use a hammer and chisel to chip away at the mortar around the damaged bricks, working from the outside edge inward. Once the mortar has been removed, gently lift out the damaged bricks and set them aside.
Step 4: Clean the Area
Use a stiff-bristled brush to clean away any loose mortar, debris, or dust from the area where the damaged bricks were removed. This will ensure a strong bond when new mortar is applied.
Step 5: Prepare Mortar Mix
In a bucket or on a mortarboard, mix the mortar according to the manufacturer’s instructions. The consistency should be thick enough to hold its shape but still pliable enough to work with. Make sure not to mix too much mortar at once, as it will start to harden after a short period.
Step 6: Install Replacement Bricks
If you removed damaged bricks, you will now need to install their replacements. Apply a layer of mortar to the bottom and sides of the open space in the wall, and then slide the replacement brick into place. Tap it gently with the handle of your trowel to set it securely. Use your pointing trowel to remove any excess mortar and create clean, even mortar joints.
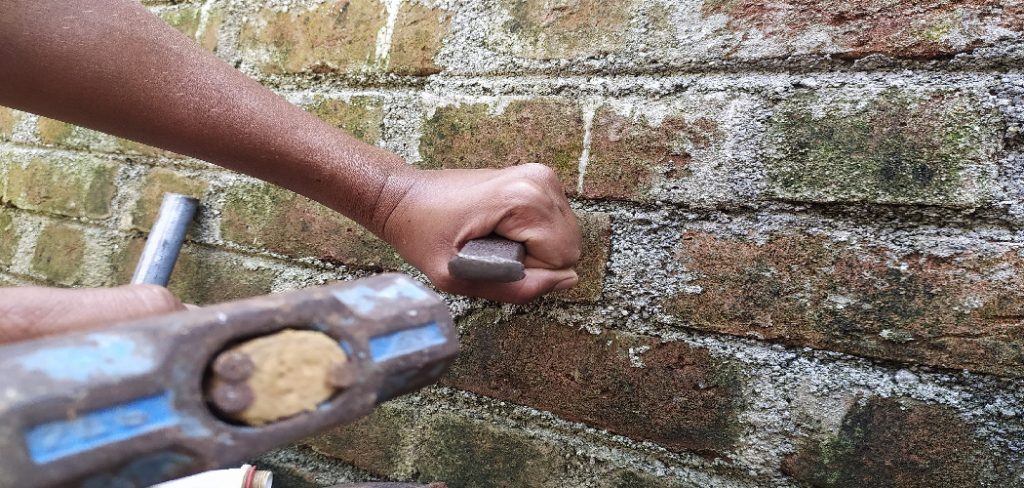
Step 7: Re-point Mortar Joints
If the mortar joints in your brick wall are crumbling or damaged, they will need to be re-pointed. Begin by using a hammer and chisel to carefully remove the old mortar from the joints, taking care not to damage the surrounding bricks. Clean out the joints with a stiff-bristled brush, removing any loose debris or dust.
Step 8: Apply New Mortar to Joints
Using your pointing trowel, scoop up a small amount of mortar and press it into the cleaned-out mortar joints. Make sure to fully fill the joints and remove any excess mortar. Continue this process along the entire length of the damaged joints.
Step 9: Shape the Mortar Joints
Once the mortar has been applied to the joints, use a jointer or round metal rod to shape the mortar and create a smooth, even surface. This will not only improve the appearance of the wall but also help to create a stronger bond between the bricks and mortar.
Step 10: Allow Mortar to Set
Let the mortar set and cure for the recommended time specified by the mortar mix manufacturer. This can range from a few hours to several days, depending on the specific product used and the environmental conditions.
Step 11: Clean the Brick Surface
After the mortar has set, use a stiff-bristled brush to gently remove any remaining mortar residue from the surface of the bricks. If necessary, use a damp cloth or sponge to wipe away any stubborn spots.
Step 12: Seal the Wall (Optional)
If your brick wall is susceptible to water damage, you may want to consider applying a waterproof sealant to protect it. Follow the manufacturer’s instructions for the specific sealant product you choose, making sure to apply it evenly and in the recommended number of coats.
Step 13: Inspect Your Work
Once the mortar has fully cured and the wall is clean, inspect your work to ensure that all damaged areas have been properly repaired. Check for any cracks or gaps in the mortar joints and make sure the replacement bricks are securely in place.
Step 14: Monitor the Wall for Future Issues
Regularly inspect your brick wall for any signs of damage or deterioration. Addressing minor issues as they arise can help prevent more extensive and costly repairs in the future.
Step 15: Perform Routine Maintenance
To keep your brick wall in good condition, perform routine maintenance tasks such as cleaning, re-pointing, and sealing as needed. This will help to extend the life of your wall and maintain its appearance.
Step 16: Consult a Professional if Necessary
If you encounter any issues during your brick wall repair that you are unsure about, or if you believe the damage is beyond your skill level to repair, consult a professional masonry contractor for assistance. They will be able to assess the situation and recommend the best course of action for your specific needs.
By following these steps and using the appropriate tools and techniques, you can effectively repair a damaged brick wall and restore its strength, stability, and appearance. Regular inspections and maintenance will help to ensure that your wall remains in good condition for years to come, protecting your property and enhancing its curb appeal.
How to Fix a Hole in A Brick Wall
Fixing a hole in a brick wall is not as difficult as it may seem. First, gather the supplies you will need: a small piece of plywood, a hammer, some nails, and some mortar mix. Next, cut the plywood to fit snugly over the hole in the wall. Finally, attach the plywood to the wall using nails or screws.
Be sure to sink the nails or screws below the surface of the plywood so the mortar will hide them. Once the plywood is in place, mix up a small batch of mortar and use it to fill in the space around the plywood. Be sure to smooth out the mortar so that it is flush with the rest of the wall.
Allow the mortar to dry for at least 24 hours before removing the plywood. Now you have successfully repaired your hole in the brick wall!
How to Fix a Chipped Brick Wall
A chipped brick wall can be unsightly, but it is also a potentially dangerous hazard. Loose bricks can cause serious injury if they fall, and exposed edges can cut skin. Fortunately, repairing a chipped brick wall is relatively easy and only requires a few tools.
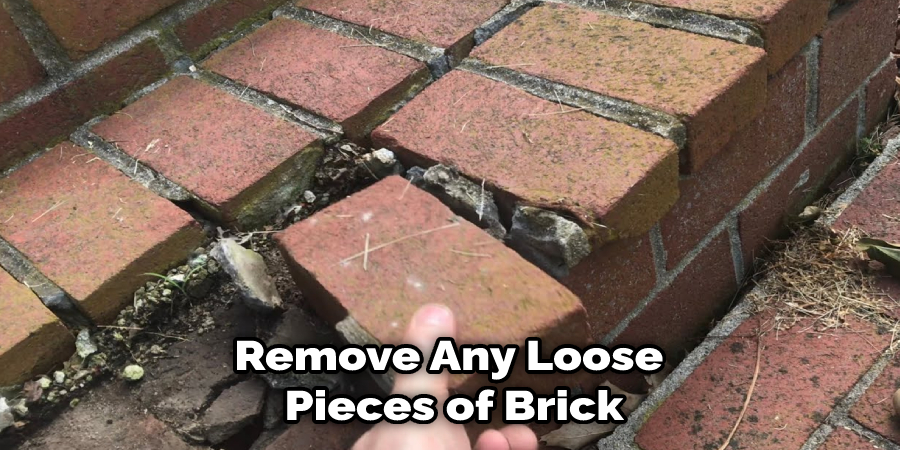
First, use a chisel to remove any loose pieces of brick from the wall. Next, use a hammer to tap the chisel until the exposed edge is smooth. Finally, use mortar to fill in any gaps and secure the loose bricks. With some time and effort, you can make your brick wall look new again.
How to Fix a Crumbling Brick Wall
Crumbling brick walls are unsightly and can pose a safety hazard. However, they can be easily repaired with little time and effort. The first step is to remove any loose or damaged bricks. Once the area is clean, apply a layer of mortar to the exposed brickwork.
Next, carefully insert new bricks into the mortar, taking care to ensure that they are level and flush with the surrounding bricks. Finally, apply a second layer of mortar over the new bricks and allow them to dry. With patience and attention to detail, it is possible to repair even the most badly crumbled brick wall.
How to Prevent Water Damage in a Brick Wall
Brick walls are a popular choice for both indoor and outdoor spaces because of their durability and classic good looks. However, bricks are porous materials that can absorb water from rain, melting snow, or even high humidity. When water gets inside the bricks, it can cause the structure to weaken and deteriorate over time.
Fortunately, you can take steps to prevent water damage in a brick wall. First, make sure the bricks are properly sealed with a waterproofing sealer. This will create a barrier against moisture. Secondly, repair any cracks or holes in the wall as soon as possible. Even small openings can allow water to enter and cause damage.
Finally, keep an eye on the condition of the wall and have it inspected regularly by a professional. By taking these preventive measures, you can help extend the life of your brick wall and keep it looking its best for years to come.
How to Paint a Brick Wall
Painting a brick wall can be a daunting task, but with the right preparation and technique, it can be easily accomplished. First, you will need to gather your supplies. You will need a ladder, bucket of soapy water, stiff brush, primer, paint, and drop cloths. Once you have all of your materials, you are ready to begin.

Begin by wetting down the entire wall with soapy water. This will help to loosen any dirt or grime that is on the bricks. Next, use the brush to scrub the entire wall. Be sure to get into all of the crevices and corners. Finally, rinse the wall off with a hose and allow it to dry completely. Once the wall is dry, apply a coat of primer.
When the primer is dry, you are ready to start painting. Be sure to use even strokes and take your time. It may take several coats of paint to achieve full coverage. Once you are finished painting, allow the wall to dry completely before removing the drop cloths. Congrats! You have successfully painted a brick wall!
Frequently Asked Questions
Can a Brick Wall Be Repaired?
As every wall is different and may require a different approach in order to be repaired. However, some general tips that could help include using sealant or stucco on the exterior of the brick wall, injecting water into the cracks and crevices with an air pump or vacuum cleaner, and inserting mesh reinforcement into any joints that appear weak. If you are unsure whether or not your brick wall can be repaired, it’s always best to contact a professional!
Why is My Brick Wall Crumbling?
Brick walls are typically made of clay and bricks, which when combined create a strong and sturdy wall. However, over time the bricks can start to wear down from moisture (leaking water), traffic, or other elements that might damage them. When this happens, the brick wall starts to crumble because the bricks no longer have enough strength to keep it together.
If you notice your brick wall crumbling or starting to come undone, there are several things you can do to restore its integrity: repointing it with new mortar; replacing damaged/eroding bricks with fresh ones; repairing cracks and holes in between bricks using adhesives or sealants, and re-painting if necessary.
When Should I Be Worried About Cracks in Brick?
Cracks in brick can typically be caused by several factors, but the most common are water infiltration and thermal expansion. When water infiltrates into the mortar between bricks, it causes a bulge that can eventually lead to cracks. Similarly, if temperature extremes occur (such as during a heat wave), the bricks may expand faster than they contract and cause microfractures in the mortar.
If you notice any of these signs or suspect that your cracked brick is getting worse, it’s important to have it inspected by a professional. Not only will this help resolve the issue quickly and cost-effectively, but also proper repairs could prevent more serious damage from happening down the line.
Why is My Brick Wall Bulging?
If it’s just starting to swell, then you may need to repoint the mortar or apply new bricks. If there’s water seeping in through the cracks, you may need to seal them up with caulk or silicone. And finally, if the brick walls are slanted inward, due to an incorrect foundation structure or uneven construction techniques, they may eventually collapse under their own weight.
In all cases, it is important to get professional help so that proper repairs can be made and your building remains structurally sound for years to come.
Conclusion
Brick walls are a popular choice for both indoor and outdoor spaces because of their durability and classic good looks. However, they require some special care to keep them looking their best. Nevertheless, with proper sealing, repair of cracks and holes, and regular cleaning, brick walls can last for many years.
When it comes time to paint a brick wall, use even strokes and take your time. It may take several coats of paint to achieve full coverage. But, with a little effort, you can have a beautiful brick wall that will last for years. Thanks for reading our post about how to fix brick wall.
You Can Check It Out to Fix Paint Streaks on Walls