In this article, we are going to show you how to fix a push button toilet. Push button toilets are standard in many homes, and they can often stop working correctly. This article will show you how to troubleshoot and fix the problem. We will also provide tips on preventing this problem from happening again. So, if your push button toilet is not working correctly, keep reading!

We all know how important it is to have a working toilet. After all, it is one of the most used appliances in our homes. But, when push button toilets stop working, it can be a real pain. Many people think they need to call a plumber to fix the problem. However, this is not always the case. You can often fix the problem yourself with a few simple tools.
Summary: It seems that one of the buttons on your toilet has stopped working. There’s no telling how long it’s been like this, but it’s time to take care of it. There are a few things you can do to fix the button: – Check the wiring. If the button is connected to the plumbing somehow, there’s a good chance the wiring is damaged and needs to be replaced. – Clean the button. If it’s dirty, the button may not work as well as it should. Use a soft cloth to clean it off. – Replace the button. If the button is worn out or broken, it needs to be replaced. There are a variety of options available, so choose one that best suits your needs.
What Is a Toilet Flush Button?
A toilet flush button is a small button located on the top of a toilet’s tank. When pushed, this button releases a lever inside the tank that allows water to flow from the tank and into the toilet bowl, flushing wastes away.
The flush button is designed to provide an easy way to flush the toilet without having to lift the lid off the tank and press down on the handle connected to the flapper valve. The button is usually made of plastic and is connected to the lever with a metal rod.
There are two types of flush buttons: those operated with your finger and those operated with a plunger. Plunger-type buttons are generally found on commercial toilets, while finger-type buttons are more common in residential settings.
What Causes a Toilet Flush Button to Stop Working?
The flush button on a toilet can stop working for several reasons, but the most common one is that the button is worn out or damaged. Over time, the button can become cracked, chipped, or otherwise damaged, which will prevent it from working properly. In some cases, the damage may be minor, and you may be able to repair it yourself. However, you’ll need to replace the button if the damage is severe.
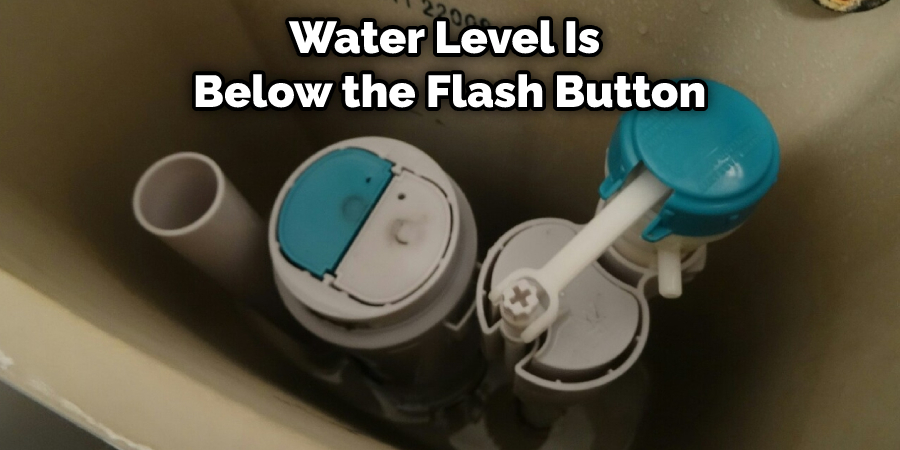
Another common reason a toilet flush button stops working is that the water level in the tank is too low. If the water level is below the button, it won’t be able to push up on the float and trigger the flush. To fix this problem, adjust the water level in the tank so that it’s above the button.
The third possibility is that something is preventing the button from moving up when you press it. This could be a piece of debris, a build-up of mineral deposits, or anything else blocking the button from moving freely. If you suspect this is the problem, take a look inside the tank and see if you can identify the obstruction. You may need to call a plumber if you can’t remove it yourself.
Finally, the flush valve itself may be damaged or malfunctioning. Again, this is a more serious problem that will require professional assistance to fix.
Tools and Materials Needed
- Phillips head screwdriver
- Flat head screwdriver
- Socket wrench set
- Adjustable pliers
- Plunger
- Toilet brush
- Bucket
- Garden hose (optional)
A Step by Step Guide on How to Fix a Push Button Toilet
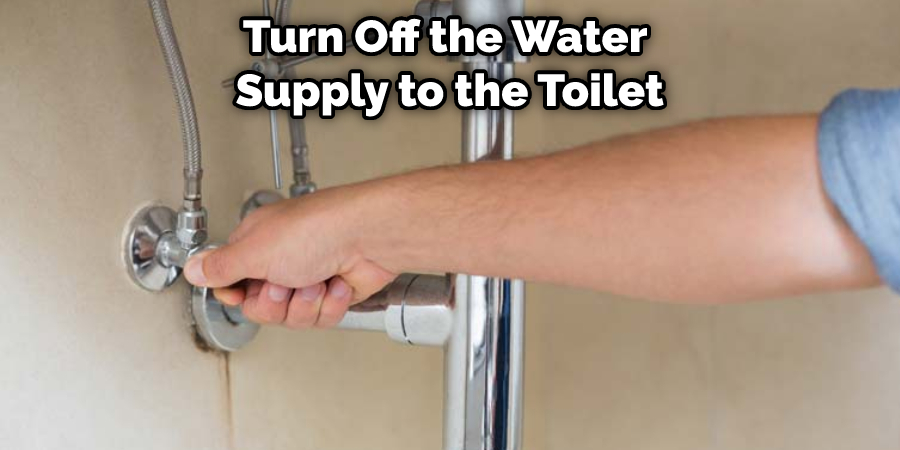
Step 1: Turn Off the Water Supply to the Toilet
Before you disassemble your toilet, you must turn off the water supply to the toilet. This will prevent any further damage from occurring and make repairs much easier.
Step 2: Prepare the Area
Wear gloves and clear the area around the toilet once the water is shut off. Remove any objects that could get in the way and cover the floor with a towel or tarp to catch any water or debris that may fall.
Step 3: Flush the Toilet
This may seem like an odd step, but it is essential to flush the toilet before making any repairs. This will help to identify what specific issue you are dealing with. If the toilet flushes properly, you know the problem is not with the flushing mechanism itself. The problem may be with the shut-off valve, the supply line, the fill valve, or the float cup.
Step 4: Disassemble the Toilet
Now it is time to start taking apart your toilet. Begin by removing the tank lid and setting it aside. Then, flush the bathroom again and hold down the handle to keep the water from draining out of the tank. Using a Phillips head screwdriver, remove the two bolts that secure the tank to the bowl. Once the tank is terminated, you can access the flush valve assembly.
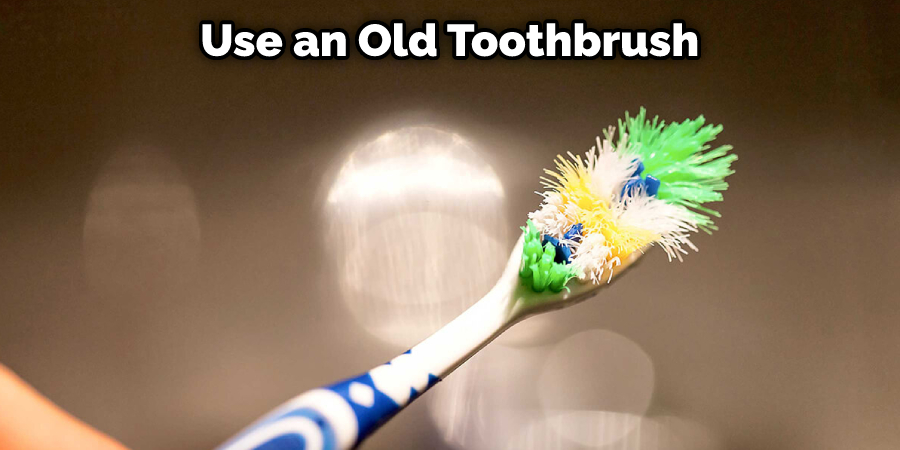
Step 5: Clean the Flush Valve Assembly
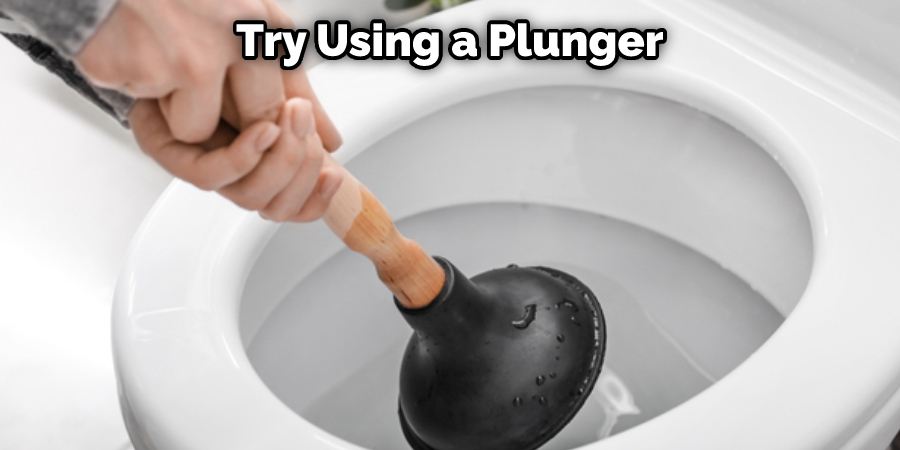
The flush valve assembly is located inside the tank and is what controls the flow of water into the bowl when you flush the toilet. Over time, this assembly can become clogged with sediment and debris, which can cause problems with flushing. Use a plunger to dislodge any debris blocking the valve, and then use an old toothbrush to scrub away any buildup.
Step 6: Replace the Flush Valve Assembly
If the flush valve assembly is damaged, it must be replaced. This is a relatively simple process, but you will need to purchase a new assembly from a hardware store. To install the new assembly, reverse the steps you used to remove the old one.
Step 7: Reassemble the Toilet
Once the flush valve assembly has been replaced, you can begin to reassemble your toilet. Start by attaching the tank to the bowl and then replacing the bolts that secure it in place. Next, put the tank lid back on and give the toilet a flush to test it out. If everything is working correctly, then you are finished!
Precautions
- Always turn off the water supply before starting any repairs.
- Be careful not to over-tighten any fittings or nuts, as this could damage the toilet.
- When removing old parts, take a picture or note how they were attached, so you can correctly install the new ones.
- Make sure all new parts are compatible with your toilet model.
Tips for Preventing Future Problems
- If a worn-out flush valve causes your problem, it’s time to replace it. You can find replacement valves at most hardware stores.
- If you have a clogged toilet, try using a plunger before you call a plumber.
- Regularly check your toilets for leaks and drips. Fix any leaks as soon as possible to prevent water damage.
- Inspect your toilets regularly for signs of wear and tear. Replace any parts that are worn out or broken.
- If you have a problem with your toilet, don’t hesitate to call a plumber. Waiting too long to fix an issue can often make it worse.
If you follow these tips, you can avoid many common toilet problems. If you have a problem, though, don’t hesitate to call a plumber. They can usually fix the problem quickly and efficiently.
Why Is the Button on My Toilet Not Working?
There are a few reasons why the push button on your toilet might not be working. The most common reason is that the flush valve inside the toilet tank is not opening when you press the button. This can be caused by a build-up of sediment in the valve or simply because the rubber seal has worn out and needs to be replaced.
If you suspect that the valve is the problem, you can try cleaning it out with a vinegar solution. Mix equal vinegar and water, and pour it into the toilet bowl. Let it sit for an hour, then flush the toilet to see if this solves the problem.
If the valve appears clean and functioning correctly, the next step is to check the flapper. The flapper is a rubber stopper that covers the opening of the flush valve. Over time, it can become brittle and crack, preventing it from sealing correctly. However, replacing the flapper is a relatively easy repair that you can do yourself.
If neither of these solutions solves the problem, there may be an issue with the float assembly. This is a small plastic float that sits on top of the water in the tank and signals when the tank needs to be refilled. If the float becomes stuck or jammed, it can prevent the toilet from flushing correctly.
How Does Push Button Toilet Work?
Push button toilets are becoming increasingly popular in both commercial and residential settings. But how does a push-button toilet work?
A push-button toilet has a small tank behind the toilet bowl. This tank is connected to the water supply line. When you flush the bathroom, the tank will fill with water. The water will then flow into the bowl and down the drain.
The push-button toilet has a few different parts that work together to make it function properly. These parts include:
The fill valve
This is what controls the amount of water that flows into the tank.
The flush valve
This is what allows water to flow from the tank into the bowl.
The flapper
This small valve is located at the bottom of the tank. The flapper opens and closes to allow water to flow into the bowl.
If any of these parts are not working correctly, it can cause your push-button toilet to malfunction. Luckily, there are some easy ways to fix a push-button toilet.
Frequently Asked Questions
Why is My Toilet Flush Button Not Working?
If your toilet flush button doesn’t seem to be working, there are a few things that you can do in order to troubleshoot the issue. First, check if the water is turned on and flowing through the pipe properly. Next, try flushing the toilet once or twice with cold water just to see if that fixes the problem. If both of these methods fail to fix the issue, then it may be time for a professional assessment.
Do You Have to Hold Down Push Button Flush?
No, you don’t have to hold down the push button flush. This is a myth that has been perpetuated over time by both home improvement professionals and the general public. In reality, there are multiple ways to handle this situation, depending on what type of toilet it is and how old it is. If your toilet has a lever or knob on the side, simply turn it off and then back on again in order to activate the flush function. If your toilet has a digital control panel, press the button next to “Flush” until water starts flowing; release when complete. And if you’re still unable to flush after trying these methods, call an expert!
Can a Phantom Flush Be Fixed Without Calling a Plumber?
A phantom flush is a common problem that can be caused by a variety of issues, including blocked toilets, low water pressure, and faulty plumbing. Unfortunately, it is often difficult to fix these problems yourself without calling a plumber.
If you’re experiencing frequent flushes or your toilet seems to be overflowing more frequently than usual, the first step is to check for blockages. If there are any debris build-ups in the pipes near the toilet bowl or if there is something blocking the flow of water towards the drainpipe (such as leaves), then this will need to be cleared before anything else can be done. Low water pressure may also cause repeated flushes because it makes drainage slower and harder. In cases like this, you may need to call an engineer who can rectify the issue with upgraded plumbing fixtures or even replace entire sections of piping altogether.
What Are the 2 Buttons on Top of Toilet?
The first button is called a “toilet seat release.” This button is used to release the seat from the toilet bowl. The second button is called a “toilet flush.” This button is used to activate the water flow in the toilet and clean it.
Are Push Button Toilets Reliable?
Push Button Toilets are becoming more and more popular, but there is still some concern about their reliability. Some people believe that they may not flush properly, which could lead to dangerous bacteria growth. Additionally, sensor problems have been reported where the toilet will refuse to function unless you enter a specific sequence of keystrokes.
So while push-button toilets are definitely convenient, it’s important to be aware of the potential risks involved and make sure that your installation is done by an experienced technician.
Conclusion
If your push-button toilet is not flushing correctly, there are a few things you can do to troubleshoot the problem. In this article, we’ve outlined some of the most common issues and how to fix a push button toilet. Hopefully, this information will help you get your toilet up and running again in no time.