In the world of sneakers, there are few things more disheartening than having a beloved pair of shoes pop a bubble. While it might seem like a minor issue, popped bubbles can quickly lead to long-term damage and drastically reduce your shoes’ lifespan.
So, it’s natural to want to take care of them and make sure they last as long as possible. Unfortunately, a popped bubble is one of the most common problems with Vapormax shoes. If you’re experiencing this issue with your Vapormax shoes, don’t worry – we’ve got you covered. In this post, we’ll show you how to fix a popped Vapormax bubble in no time. Keep reading for all the details!
Summary: If you have a popped bubble on your Vapormax shoes, there are several steps you can take to fix them. Start by releasing the air pressure from the shoe and cleaning it. Apply heat to the area and use a pin or needle to pop the bubble back into place.
If needed, you can use a sewing kit to reattach the upper rubber layer of the shoe. Super glue or transparent silicone may also work. Alternatively, you can try using heat, a sharp knife, or taking them to a shoe repair shop for professional help.
What Causes Problems on Vapormax Air Bubble?
The shoes are made up of several layers, with the air bubble being the outermost layer. Over time, the air bubble can become damaged and start to leak. This can happen for several reasons, such as:
1. Walking or Running on Hard Surfaces:
Over time, walking or running on hard surfaces can damage the air bubble and cause it to pop. If you live in an area with lots of concrete or asphalt, try to avoid walking on these surfaces as much as possible. Instead, walk on softer surfaces like grass or dirt. If your shoes are starting to feel a little stiff, it might be time to replace them. Walking and running shoes lose their cushioning after about six months of regular use. After that, they can cause foot pain or other issues.
2. Wearing the Shoes Without Socks:
Wearing shoes without socks can also damage the air bubble over time. The socks help protect the air bubble from rubbing against your skin, which can cause it to pop. So make sure always to wear socks with your Vapormax shoes. If you’re someone who wears their Vapormax shoes without socks, it may be time to change your habit. At least if you want your shoes to last for a long time! You can find lots of cute Nike socks online or in your local store.
3. Poor Quality Air Bubble:
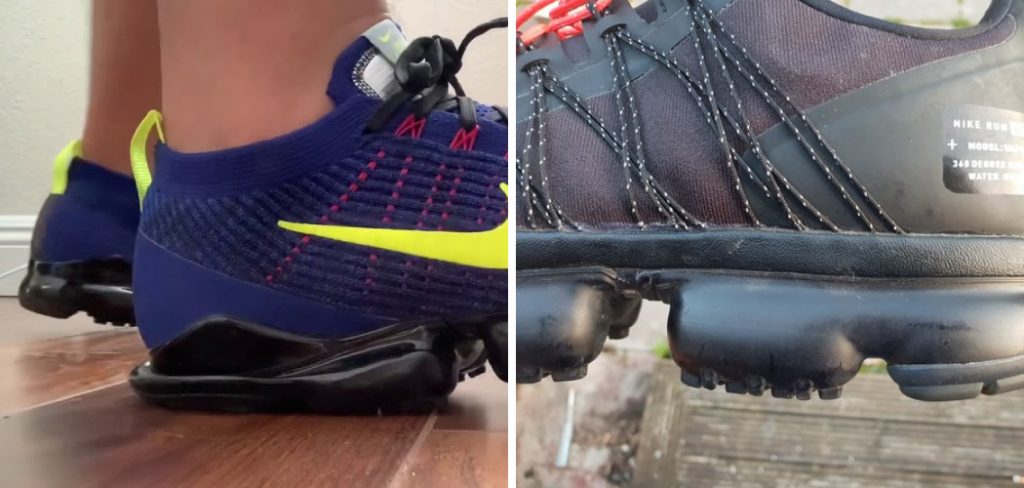
If you buy a pair of fake Vapormax shoes, the air bubble is likely to be poor quality and more prone to popping. Only buy Vapormax shoes from authorized retailers to avoid getting fake shoes.
4. Kicking or Stepping on Something Sharp:
If you accidentally kick or step on something sharp, it can puncture the air bubble and cause it to leak. Be careful when walking around in areas where there might be sharp objects on the ground.
5. Exposing the Shoes to Extreme Heat or Cold:
Subjecting your Vapormax shoes to extreme temperatures can be damaging to the air bubble. The air bubble can become brittle and crack if exposed to cold temperatures, and can melt and become misshapen if exposed to hot temperatures. Try to avoid exposing your shoes to extreme temperatures to prevent damage.
6. Overinflated Air Bubble:
If the air bubble is overinflated, it can put too much pressure on the sides of the bubble and cause it to pop. So make sure to release some air from the bubble if it seems to be overinflated. If the air bubble is not inflated properly, it will not be able to provide enough support and comfort. So make sure to inflate it completely before using it.
12 Easy Steps on How to Fix a Popped Vapormax Bubble
Step 1: Gather Necessary Tools and Materials
Before starting the repair process, ensure you have the following tools and materials:
- A hairdryer or heat gun
- Clear adhesive sealant (e.g., E6000, Shoe Goo, or a similar flexible adhesive)
- Toothpick or small applicator
- Rubbing alcohol
- Cotton swabs or lint-free cloth
- Masking tape
- Fine-grit sandpaper (optional)
- Small clamp or heavy object (optional)
Step 2: Inspect the Damage
Closely examine the damaged Vapormax bubble to determine the size and location of the puncture or leak. Take note of any additional damage that may require repair or reinforcement during the process.
Step 3: Clean the Affected Area
Clean the area around the puncture or leak using rubbing alcohol and a cotton swab or lint-free cloth. This will remove any dirt, oil, or debris that may interfere with the adhesive’s ability to bond with the material. Allow the area to dry completely before proceeding.
Step 4: Heat the Damaged Area
Using a hairdryer or heat gun, gently heat the area around the puncture or leak. The heat will make the material more pliable and help the adhesive bond more effectively. Be cautious not to overheat the area, as excessive heat can damage the surrounding material.
Step 5: Apply the Adhesive
Select a clear adhesive sealant designed for flexible materials, such as E6000 or Shoe Goo. Using a toothpick or small applicator, carefully apply a small amount of adhesive to the puncture or leak. Ensure the adhesive covers the entire damaged area and extends slightly beyond its edges. Be cautious not to apply too much adhesive, as it may seep out and create a visible bulge on the shoe’s surface.
Step 6: Apply Pressure to the Repair Area
If necessary, use a small clamp or heavy object to apply pressure to the repair area while the adhesive cures. This will help ensure a strong bond between the adhesive and the material. Be cautious not to apply too much pressure, as this can cause the adhesive to seep out or create a visible bulge.
Step 7: Allow the Adhesive to Cure
Refer to the adhesive manufacturer’s instructions for the recommended curing time. Typically, this will be between 24 and 72 hours. During this time, do not wear the shoes or apply pressure to the repaired area.
Step 8: Remove Excess Adhesive
After the adhesive has fully cured, inspect the repair area for any excess adhesive that may have seeped out during the curing process. If necessary, use fine-grit sandpaper to gently remove any excess adhesive and smooth the repair area’s surface.
Step 9: Reinforce the Repair Area (Optional)
If the puncture or leak is in a high-stress area or if the material surrounding the damage appears weak, consider reinforcing the repair area with an additional layer of adhesive. Apply a thin layer of adhesive around the repair area’s perimeter, extending it slightly beyond the original repair. Allow this additional layer of adhesive to cure fully before wearing the shoes.
Step 10: Test the Repair
Once the adhesive has fully cured, test the repair by gently pressing on the Vapormax bubble. It should feel firm and no air should escape. Additionally, wear the shoesfor a short period to ensure the repair holds up under normal use. Pay attention to any discomfort or changes in the shoe’s performance, as this may indicate the need for further repair or reinforcement.
Step 11: Maintain and Monitor the Repair
Regularly inspect the repaired area for any signs of wear, tear, or further damage. If necessary, repeat the repair process to address any new or recurring issues. Proper maintenance will help extend the life of your Vapormax shoes and ensure they remain comfortable and functional.
Step 12: Preventative Care
To minimize the risk of future punctures or leaks, avoid exposing your Vapormax shoes to sharp objects, excessive heat, or extreme cold. Additionally, regularly clean your shoes to prevent the buildup of dirt, debris, and oils that can weaken the material over time.
By following these steps, you can effectively repair a damaged Vapormax bubble and extend the life of your favorite shoes. Always consult the manufacturer’s guidelines for care and maintenance, and when in doubt, seek professional assistance for more complex repairs.
You Can Check It Out to Fix Disney Bubble Wand
Some Helpful Tips and Suggestions
- Try to avoid getting the bubble wet.
- Use a hairdryer on low heat to slowly and carefully remove the bubble.
- If the above doesn’t work, use a needle or pin to puncture the bubble, then use the hairdryer on low heat.
- Try to avoid putting your Vapormax in situations that could get damaged or wet. Keep it in a safe place when not in use.
- If you have tried all of the above methods and the bubble still won’t stay down, take it to a shoe repair shop.
- Be careful not to puncture the entire Air unit when using a sharp knife.
- Use clear nail polish around the edges of any cuts to help seal the opening and prevent further air leaks.
- Take your shoes to a Nike store or authorized retailer and see if they can help you fix the problem.
How Long Does a Vapormax Last?
The Nike Vapormax is one of the most popular sneakers on the market right now. They are very comfortable and have a stylish design. Unfortunately, they are also quite expensive. If you are the proud owner of a pair of Vapormax sneakers, you may be wondering how long they will last. Nike claims that their Vapormax sneakers have a lifespan of about two years. However, many people have reported that their Vapormax sneakers have only lasted for about one year.

If you are experiencing problems with your Vapormax sneakers, such as the infamous “bubble” issue, you may be wondering how to fix them. If you’ve had your Vapormax for a while and you’re starting to notice that the bubbles are popping, don’t worry, there’s an easy fix. In this article, we have already discussed how to fix a popped vapormax bubble. So be sure to check them out.
Frequently Asked Questions
What Is so Special about Nike Vapormax?
Nike Vapormax is a revolutionary new running shoe that was designed with runners in mind. It features an innovative Flywire technology that helps to reduce weight and contributes to better flexibility and support. This technology combines synthetic materials with mesh fabric for air permeability and breathability, which allows your feet to stay cooler and drier during intense workouts.
Another unique feature of the Nike Vapormax is its rubber outsole, which provides superior traction while minimizing wear on the ground. The Nike Vapormax also has excellent cushioning properties so you can run smoothly without feeling any discomfort or pain. In addition, the shoe comes in both men’s and women’s sizes, so it fits most people well.
So why wait? Get yourself a pair of Nike Vapormax sneakers today!
Is Nike Vapormax Good for Gym?
Nike Vapormax is a running shoe that has been designed with an innovative air-infused system. This system allows the shoe to be breathable and lightweight, allowing runners to feel the cushioning and support they need while retaining the stability they desire.
Some people who have tried Nike Vapormax say that it is a great shoe for gym use. They say that it provides good cushioning and support, making it perfect for running on hard surfaces. Others say it is not as breathable as some other running shoes, so users may get sweaty in hot weather conditions.
Does Nike Have a 2 Year Return Policy?
Nike does not have a specific return policy, but they do offer a 30-day money-back guarantee. This means that you can try on Nike products, and if for any reason you are not happy with them, you can simply return them within the first 30 days and receive your full purchase price back. After the first 30 days, returns must be made in accordance with Nike’s standard policies.
Should You Run in Vapormax?
While the jury is still out on whether or not running in Vapormax shoes is a good idea, there are some things that you should keep in mind before making any decisions. First and foremost, make sure your feet are properly fitted for these shoes. They tend to be snugger than other models, so they may be difficult to put on if you have larger feet or if your footwear size isn’t standard. Additionally, it’s important to note that Vapormax shoes perform best when runnable surfaces are available (ie., pavement). If this isn’t the case where you live, then running them on grass may result in discomfort or injuries.
Conclusion
If you have a popped Vapormax bubble, there are a few ways to fix it. The first way is to use an adhesive and the second way is to use heat. We suggest using the adhesive method because it is easier and faster. However, if you have a large bubble, we suggest using the heat method.
Whichever method you choose, make sure that the area around the bubble is clean and dry before applying any type of adhesive or heat. We hope this blog post on how to fix a popped vapormax bubble has been helpful. If you have any questions or want to know more, then feel free to comment below!
You May Also Read: How to Fix a Bent Knife Tip