Door panels are kicked in every day. It’s an unfortunate reality, but it happens. If your door panel is kicked in and you don’t know how to fix it, you’re in trouble. In this blog post, we’ll teach you how to fix a kicked in door panel so that you can avoid the hassle and expense of having to replace the entire door. Keep reading to learn more.
Summary: Having a kicked-in door panel can cause a lot of headaches and inconvenience. The good news is that it can be fixed with some basic tools and materials. First, inspect the door panel. Then, remove it using a hammer or a pry bar. Next, shim the panel with nails if necessary. Secure the frame with screws, L brackets or glue as needed. Finally, hang a new door panel in its place.
Why You Should Fix a Kicked-In Door Panel
A kicked-in door panel is not only unsightly, but it can also be dangerous. A door that is not properly functioning can be a security risk, as well as a liability. For example, if someone kicks in your door and it falls off its hinges, you could be held responsible. This is why it’s important to fix a kicked-in door panel as soon as possible. It’s also important to note that a door that is not functioning properly can void your homeowner’s insurance policy.
15 Steps How to Fix a Kicked in Door Panel
Step 1: Gather Necessary Tools and Materials
Before starting the repair process, gather all the necessary tools and materials, including:
- Screwdriver
- Hammer
- Wood glue
- Wood filler
- Sandpaper (80-grit, 180-grit, and 400-grit)
- Wood clamps
- Replacement door panel (if needed)
- Replacement door trim or molding (if needed)
- Paint or stain (to match the existing door color)
- Paintbrush or foam brush
- Carpenter’s square
- Utility knife
- Wood chisel
- Wood screws or nails
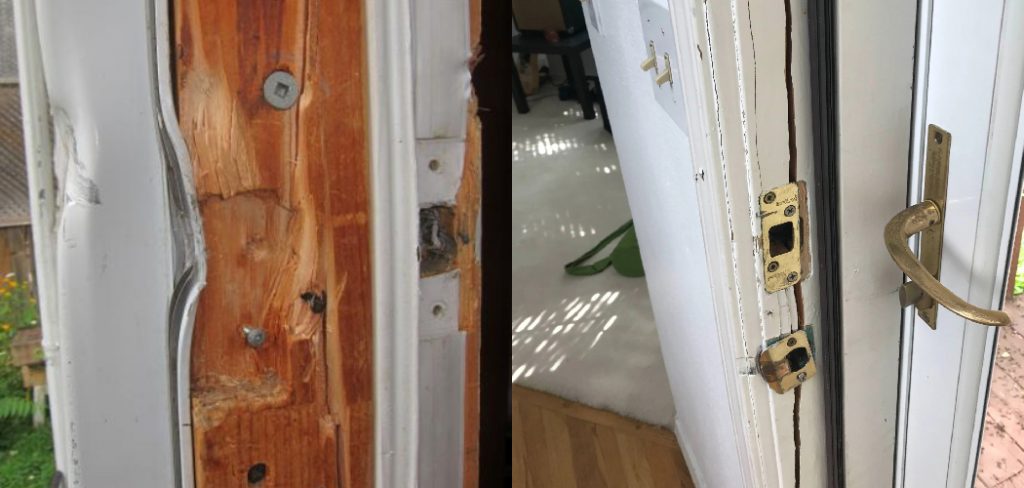
Step 2: Assess the Damage
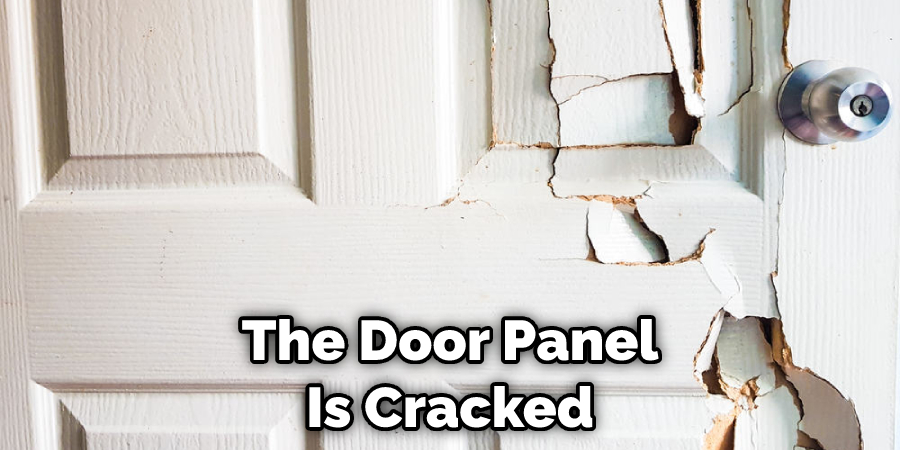
Inspect the kicked-in door panel to determine the extent of the damage. If the door panel is only slightly damaged or cracked, it can likely be repaired without replacement. However, if the door panel is severely damaged, splintered, or broken, you may need to replace it with a new panel.
Step 3: Remove the Damaged Door Trim or Molding
If the door trim or molding is damaged, use a utility knife to cut through the paint or caulk around the trim. Gently pry the trim away from the door with a wood chisel or flat-head screwdriver, taking care not to damage the surrounding door or wall.
Step 4: Repair Cracks and Small Damages
If the door panel has minor cracks or damage, use wood glue to bond the broken pieces together. Apply the glue to the damaged area, press the pieces together, and use wood clamps to hold them in place until the glue dries. Follow the manufacturer’s instructions for proper drying times.
Step 5: Fill Larger Damages with Wood Filler
For larger damages, apply wood filler to the affected area. Use a putty knife to spread the filler evenly over the damaged area, ensuring that it is level with the surrounding door panel. Allow the filler to dry and harden according to the manufacturer’s instructions.
Step 6: Sand the Repaired Area
Once the wood glue or filler has dried, use 80-grit sandpaper to sand the repaired area until it is smooth and even with the surrounding door panel. After achieving a smooth surface, switch to 180-grit sandpaper for a finer sanding, followed by 400-grit sandpaper for an even smoother finish.
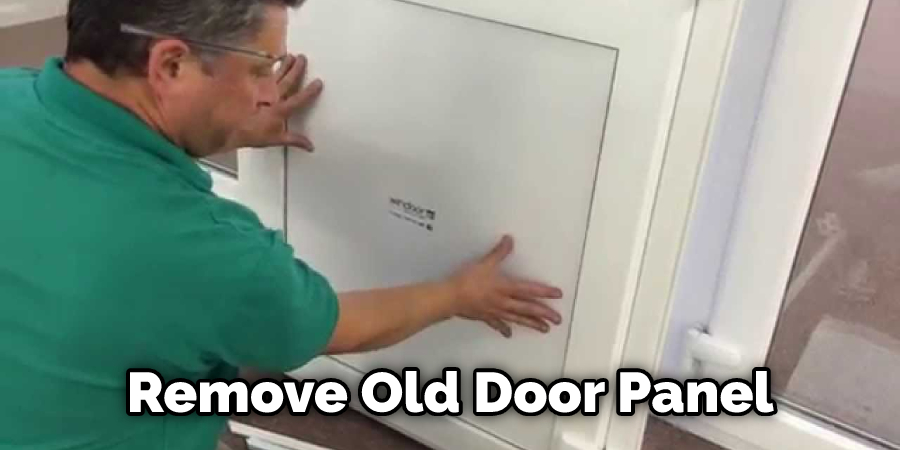
Step 7: Install a Replacement Door Panel (If Needed)
If the door panel is severely damaged and requires replacement, measure the existing panel and purchase a new one of the same size. Use a carpenter’s square to ensure that the new panel is square and level before installation. Attach the new panel to the door frame using wood screws or nails, following the manufacturer’s instructions for proper installation.
Step 8: Reinstall or Replace Door Trim or Molding
If the original door trim or molding is in good condition, reinstall it around the door panel using wood screws or nails. If the trim is damaged or needs to be replaced, measure and cut new trim pieces to fit around the door panel. Attach the new trim using wood screws or nails, ensuring that it is level and flush with the door panel.
Step 9: Paint or Stain the Repaired Area
Paint or stain the repaired area to match the existing door color. Be sure to apply the paint or stain evenly and allow it to dry according to the manufacturer’s instructions. Apply additional coats if necessary to achieve the desired color and finish.
Step 10: Reattach Door Hardware
Reattach any door hardware, such as handles or locks, that was removed during the repair process. Use a screwdriver to tighten the screws securely.
Step 11: Inspect the Door Alignment
Close the door and inspect its alignment within the door frame. If the door does not close properly or appears uneven, make any necessary adjustments to the hinges, door panel, or trim to ensure a proper fit and smooth operation.
Step 12: Check Door Security
Test the door’s security by locking and unlocking it, ensuring that the lock functions correctly and the door remains securely closed. If the door still appears vulnerable or insecure, consider reinforcing the door frame, installing a security plate, or upgrading the lock to improve overall security.
Step 13: Maintain Your Door
Regularly inspect and maintain your door to prevent future damage. Keep the door clean and free of debris, and promptly address any signs of wear, damage, or structural issues. Proper door maintenance can help extend the life of the door and prevent the need for future repairs.
Step 14: Educate Yourself on Door Security Best Practices
Stay informed about best practices for door security, such as proper door and frame installation, reinforcement techniques, and the use of high-quality locks and security devices. By taking proactive steps to protect your door, you can help prevent future break-ins and damage.
Step 15: Share Your Knowledge and Experience
Share your knowledge and experience with others who may be facing similar issues with their doors. Educating others about proper door repair and security techniques can help promote safer homes and communities.
By following these steps, you can successfully repair a kicked-in door panel and restore your door’s appearance and functionality. Regular maintenance and proactive door security measures can help protect your door from future damage and extend its life. If you are unsure about any aspect of the door repair process or need assistance, consult a professional carpenter or door installation specialist for guidance.
How Much Does It Cost to Fix a Kicked-In Door Panel?
The cost of repairing a kicked-in door panel will vary depending on the extent of the damage. Usually, it will cost between $5 and $50 to repair a kicked-in door panel. If the door panel is only slightly damaged, you may be able to repair it yourself for free. However, if the door panel is severely damaged, you may need to replace it. The cost of replacing a door panel will vary depending on the size and material of the panel. Typically range from $50 to $200.
How Often Should You Replace Your Door Panels?
It is typically recommended that you replace your door panels every 3-5 years. However, this will vary depending on the type of door panel and how often it is used. For example, if you have a steel door panel, it will likely last longer than a wood door panel. If you have a door panel that is used frequently, it will also need to be replaced more often.
What Are the Warning Signs That a Door Panel Needs to Be Replaced?
There are several warning signs that a door panel needs to be replaced. If the door panel is cracked, warped, or otherwise damaged, it needs to be replaced. It also needs to be replaced if the door panel is loose or does not fit snugly in the door frame. Additionally, if the door panel is difficult to open or close, it needs to be replaced.
How To Prevent a Door Panel From Being Kicked In?
There are several ways to prevent a door panel from being kicked in. First, you can install a door reinforcement kit. These kits typically cost between $25 and $50 and can be found at most hardware stores. Second, you can install a deadbolt lock. Deadbolt locks are one of the most effective ways to prevent a door from being kicked in. Third, you can install a strike plate.
This is a metal plate that is installed over the door jamb. The strike plate will help distribute any impact force and prevent the door from being kicked in. Finally, you can install a security camera. This will deter potential burglars from kicking in your door as they will know that they are being monitored.
Tips and Warnings on How to Fix a Kicked in Door Panel
Tips:
- Be sure to wear gloves when working with any type of wood paneling.
- Use a putty knife to spread the wood filler evenly over the damage.
- Use sandpaper to smooth out the area once the wood filler has dried.
- Be sure to apply a sealant or varnish to the repaired area to protect it from further damage.
Warnings:
- Do not try to repair the door panel if it is severely damaged. This could result in further damage and injury.
- Be sure to dispose of any wood shards or debris properly. Failure to do so could result in cuts or punctures.
- Do not use any type of power tool to sand the door panel. This could result in damage to the door panel or injury to yourself.
- Be sure to read the instructions on the wood filler carefully before use. Some types of wood filler require a different application process than others.
Frequently Asked Questions
Do You Have to Have a Strike Plate for a Door?
The short answer is no, you don’t have to have a strike plate for a door. In the United States, doors are typically considered hardware and not architectural features. Therefore, most building codes do not require that strike plates be installed on doors.
What Is a Striker Plate on a Car Door?
Striker plates are a type of safety equipment that car owners can install on their door to prevent kids and pets from entering the vehicle. When activated, they make an intimidating noise that will scare away intruders. They come in different shapes and sizes, so you can find one that best suits your needs.
Striker plates work by using sound waves to create a loud noise that is above normal speech levels but below the threshold at which people or animals startle easily. This prevents unauthorized access into vehicles without your permission and protects you and those inside from potential injury or damage caused by an intruder.
Installation is easy – all you need is a Phillips screwdriver –and it doesn’t require any modifications to your vehicle’s exterior appearance.. Once installed, Striker plates should be checked regularly for signs of wear or tear as this may impact their effectiveness.
Can You Replace Door without Replacing Frame?
The short answer is no, you cannot replace a door without replacing the frame. A door is a hinge-and- Rail system that opens and closes with the use of a handle. The hinge attaches to the rail, which is then fastened to the door frame. When the handle is turned, the hinge moves up and down, which in turn opens and closes the door. To replace a door, you would need to replace both the hinge and rail.
What Is a Jimmy Plate?
A Jimmy Plate is a unique and fun way to get your creative juices flowing. It’s essentially a plate that allows you to create art using food as your medium. The idea behind it is simple: put any type of food on the plate and then use your imagination to come up with an interesting design.
You can either do this alone or with a group, and the best part is that there are no rules! All you need are some edible paints, paper plates, utensils, and other materials (bathroom sink optional). Once you have everything set up, let loose and see what amazing creations you can come up with!
Conclusion
So, there you have it, our guide on how to fix a kicked in door panel. It’s not as daunting as it may seem, and with a little effort, you can fix the problem and have your door look good as new in no time. Have you tried any of these methods? Let us know how they worked for you in the comments below!
You May Also read: How to Fix Metal Panel on Storm Door