
Doorknob holes can be a pain. They’re usually too big, making it difficult to find a doorknob that will fit. But don’t worry, there is a way to fix this problem. In this blog post, we will show you how to fix a door knob hole that is too big. Follow these steps, and you’ll have a perfectly sized door knob hole!
Summary: If your door knob hole is too big, you can take a few steps to repair the issue. Start by measuring the hole size and finding a piece of wood that fits. Cut the piece of wood to fit the hole, then glue it into place. Screw the piece of wood into the hole for extra reinforcement, then paint or stain it as desired for finishing touches.
Why It’s Important to Fix a Door Knob Hole that Is Too Big
At first glance, a doorknob hole that is too big may not seem like a big deal. However, several reasons why it is important to fix this problem as soon as possible.
The size of a doorknob hole can pose a security risk if it is too large. Someone could reach through and unlock the door from the inside. A doorknob hole that is too big can also affect the door’s functionality. If the hole is not properly sealed, air can escape, making it more difficult to open and close the door.
Finally, a doorknob hole that is too big can be an eyesore. If you are trying to sell your home or want to maintain a tidy appearance, a large hole in the door is not ideal.
If you want to avoid this problem, make sure to measure your door knob before drilling. This way, you can drill a smaller hole if necessary.
Fortunately, there are a few different ways to fix a doorknob hole too big. Below, we will discuss some of the most popular methods. Repair a Doorknob Hole With Epoxy Putty
One way to fix a doorknob hole that is too big is to use epoxy putty. Before you get started, you will want to clean the surface of the door around the hole that is too big with a wet cloth.
How to Fix a Door Knob Hole that Is Too Big Step by Step Guide
Step 1: Gather the Necessary Tools and Materials
Before you begin, gather the following tools and materials to ensure a smooth and efficient process:
- Wood filler or epoxy putty
- Sandpaper (coarse, medium, and fine-grit)
- Utility knife
- Pencil
- Wood chisel
- Hammer
- Screwdriver
- Measuring tape or ruler
- New door knob with latch assembly (if needed)
- Paint or stain (to match the door’s color)
Step 2: Remove the Door Knob and Latch Assembly
Using a screwdriver, remove the screws securing the door knob and latch assembly to the door. Gently pull the door knob and latch assembly out of the hole, taking care not to damage the door’s surface.
Step 3: Clean and Prepare the Hole
Using a utility knife, carefully remove any rough or splintered edges from the hole. Ensure the hole is clean and free of any debris before proceeding.
Step 4: Measure the Hole
Use a measuring tape or ruler to measure the diameter of the hole. Record the measurement for future reference when selecting a new door knob or latch assembly.
Step 5: Fill the Hole with Wood Filler or Epoxy Putty
Select a suitable wood filler or epoxy putty based on the size of the hole and the material of your door. Following the manufacturer’s instructions, mix the filler or putty, and apply it to the hole. Use a putty knife or your fingers to press the filler or putty firmly into the hole, ensuring there are no gaps or air pockets. Overfill the hole slightly, as the filler or putty will shrink as it dries.
Step 6: Allow the Filler or Putty to Dry
Allow the filler or putty to dry according to the manufacturer’s recommended drying time. This can vary depending on the product used and the size of the hole, so be sure to read and follow the instructions carefully.
Step 7: Sand the Filled Hole
Once the filler or putty is completely dry, use coarse-grit sandpaper to sand the surface flush with the door. Be sure to sand in the direction of the wood grain to avoid creating scratches or gouges. After the surface is flush, use medium-grit sandpaper to smooth the surface further, followed by fine-grit sandpaper for a final, smooth finish.
Step 8: Paint or Stain the Patched Area
If your door is painted or stained, apply a matching paint or stain to the patched area to blend it with the rest of the door. Allow the paint or stain to dry according to the manufacturer’s instructions before proceeding.
Step 9: Determine the Correct Size for the New Door Knob Hole
Consult the installation instructions for your new door knob and latch assembly to determine the correct size for the new hole. If the existing hole is too large, you may need to purchase a door knob with a larger diameter or a cover plate to conceal the oversized hole.
Step 10: Mark the Location for the New Hole
Using a pencil, mark the center point for the new hole on the door. Ensure the new hole’s location is centered within the patched area and will not interfere with the door’s function or aesthetics.
Step 11: Chisel a Recess for the Latch Assembly (If Needed)
If your new latch assembly requires a recess in the door’s edge, use a wood chisel and hammer to carefully create a shallow recess. Measure and mark the dimensions of the recess according to the latch assembly’s instructions, and chisel out the material to the appropriate depth.
Step 12: Install the New Door Knob and Latch Assembly
Following the manufacturer’s instructions, install the new door knob and latch assembly into the door. Ensure the latch assembly is properly seated in the recess (if needed) and aligned with the new hole’s center point.
Step 13: Secure the Door Knob and Latch Assembly
Using a screwdriver, secure the door knob and latch assembly to the door with the provided screws. Make sure the screws are tight, but take care not to overtighten them, as this can cause damage to the door or the assembly itself.
Step 14: Test the Door Knob Functionality
Once the new door knob and latch assembly are installed, test the functionality of the door knob by turning it and opening the door. Check that the latch engages and disengages smoothly and that the door knob turns freely. If there are any issues with the functionality, make any necessary adjustments to the latch assembly or door knob.
Step 15: Install a Cover Plate (If Needed)
If your new door knob does not cover the entire patched area, you may choose to install a cover plate to conceal the oversized hole. Select a cover plate that matches the finish of your door knob and door. Align the cover plate with the door knob and secure it in place with the provided screws or adhesive, following the manufacturer’s instructions.
Step 16: Inspect the Final Result
Once the new door knob, latch assembly, and cover plate (if needed) are installed, inspect the door to ensure the patched area is well-blended and that the door knob functions properly. If necessary, make any final adjustments or touch-ups to the paint or stain to achieve a seamless appearance.
By following these steps, you can successfully fix a door knob hole that is too big and restore the functionality and appearance of your door. Taking the time to properly prepare the hole, fill it with an appropriate filler or putty, and install a new door knob and latch assembly can result in a durable and attractive repair.
You Can Check It Out to Fix Ghost Door
How Do You Fix a Door Handle if The Hole Is Too Big
At some point, everyone has probably experienced a door handle that’s loose and wobbly. This is usually because the hole in the door is too big. Luckily, this is an easy problem to fix. All you need is a little bit of putty. Start by kneading the putty until it’s pliable, then press it into the hole around the handle.
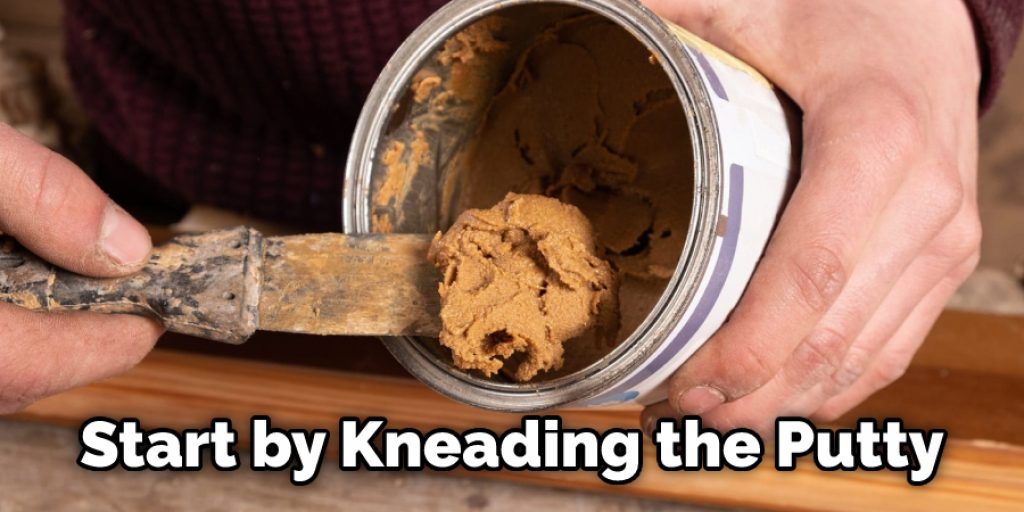
Use your fingers to smooth out any rough edges. Once the putty is dry, you should have a tight, secure fit. So next time your door handle starts to come loose, don’t be afraid to reach for the putty. You can fix the problem and keep your doors functioning properly with just a few minutes of work.
How Do You Fix a Misaligned Door Knob Hole
You can fix a misaligned door knob hole in a few minutes with nothing more than a screwdriver and a hammer. First, remove the screws that hold the doorknob in place. Next, use the screwdriver to carefully enlarge the hole until it is the same size as the knob.
Be sure to work slowly and evenly so that the hole does not become too large. Finally, reattach the doorknob using the screws. This process may need to be repeated if the hole becomes misaligned again. However, you can easily fix a misaligned door knob hole with a little patience.
Frequently Asked Question
What Is the Standard Door Knob Hole Size?
The standard door knob hole size is 2 1/8 inches in diameter. If your hole is larger than this, you will need to patch it up before you can install your doorknob.
What Is a Lockset Bore?
The lockset bore is the hole in your door that the locking mechanism fits into. If this hole is too big, it can cause your doorknob to lose and be wobbly. There are a few ways to fix this problem, depending on how big the hole is and what type of doorknob you have.
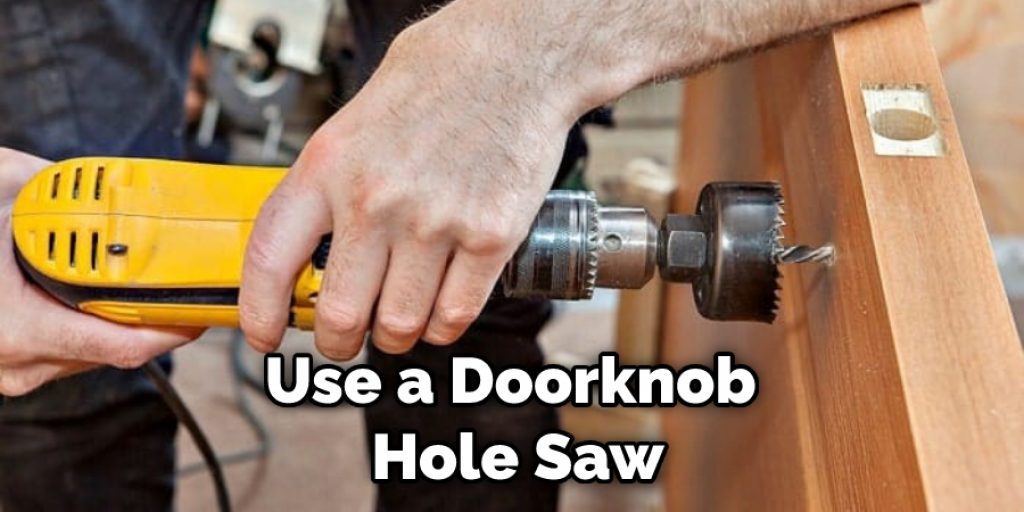
Are Door Knobs One Size Fits All?
Door knobs come in various sizes, so it is important to make sure that the hole in the door for the knob is the correct size. If the hole is too big, you can use a doorknob hole saw to make it the correct size.
Conclusion
So there you have it! There are a few easy ways to fix a door knob hole that is too big. If you follow these tips, your doors will look good as new. Have any questions or comments? Leave them below, and we’ll get back to you soon. Thanks for reading our post about how to fix a door knob hole that is too big.