If your knife blade is chipped, don’t worry! You can fix it yourself at home with a few simple tools and some time. This article will show you how to fix a chipped knife blade. So follow along and get your knife back in working condition!
If a knife blade is chipped, it can weaken and be prone to breaking. A broken blade can be extremely dangerous, so it’s important to fix any blades’ chips as soon as possible.
Summary: Repairing a chipped knife blade requires specialized tools and techniques. First, the damaged area needs to be cleaned of any dirt or residue, then the chip should be ground down with a file or grinding wheel. After that, the edges need to be smoothed out and sharpened with a sharpening stone. Finally, the blade should be coated in oil to protect it from further damage. Following this process will help restore your knife blade to its original condition.
20 Steps to Follow on How to Fix a Chipped Knife Blade
Step 1: Gather the Necessary Tools and Materials
Before starting the process of fixing a chipped knife blade, gather the necessary tools and materials. You will need:
- A sharpening stone (preferably a combination stone with both coarse and fine grits)
- Water or honing oil (depending on the type of stone you are using)
- A cloth or towel
- A leather strop or honing rod (optional)
- Safety gloves
Step 2: Understand the Type of Chip
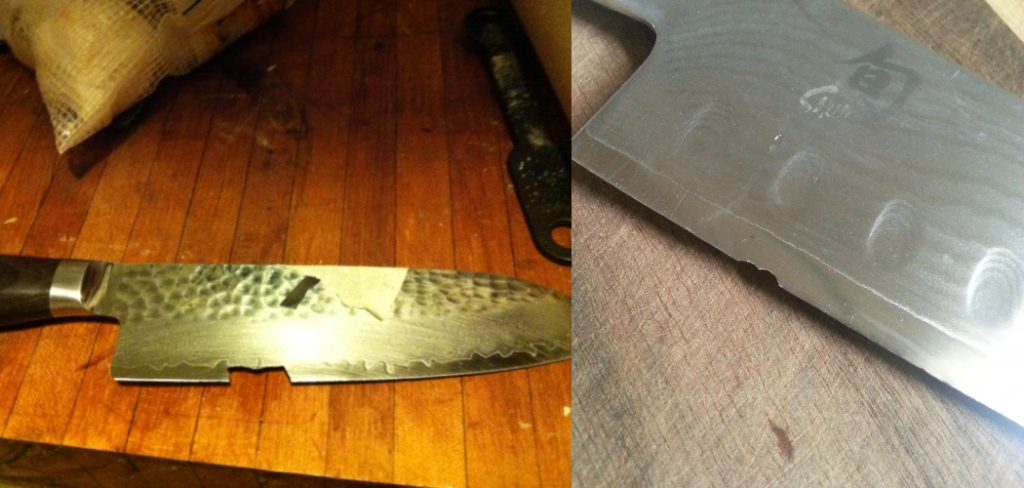
Examine the chip on your knife blade to determine its size and depth. This will help you decide how much material you need to remove during the sharpening process to fix the chip.
Step 3: Prepare the Sharpening Stone
Soak your sharpening stone in water or apply honing oil as per the manufacturer’s instructions. This will help ensure smooth and consistent sharpening. Place the stone on a non-slip surface, such as a wet cloth or a rubber mat, to prevent it from moving during the sharpening process.
Step 4: Start with the Coarse Grit Side of the Stone
Begin the sharpening process using the coarse grit side of your combination stone. This will help remove more material quickly, allowing you to reshape the blade and remove the chip.
Step 5: Establish the Correct Sharpening Angle
Hold the knife at the appropriate sharpening angle, which typically ranges from 15 to 20 degrees, depending on the type of knife and its intended use. To find the correct angle, place the blade flat against the stone, then slowly lift the spine until the edge touches the stone at the desired angle.
Step 6: Sharpen the Chipped Area
With the knife at the correct angle, begin sharpening the chipped area by moving the blade across the stone in a sweeping motion. Apply consistent pressure as you slide the blade across the stone, ensuring that the entire length of the edge makes contact with the stone. This will help remove material evenly and restore the blade’s original shape.
Step 7: Monitor Your Progress
Periodically check your progress by examining the blade to see if the chip has been removed. This will help you determine when to stop sharpening with the coarse grit stone and move on to the finer grit. Be patient, as this process can take some time, depending on the size and depth of the chip.
Step 8: Switch to the Fine Grit Stone
Once the chip has been removed and the blade’s shape has been restored, switch to the fine grit side of the sharpening stone. This will help refine the edge and remove any burrs or imperfections created during the coarse grit sharpening process.
Step 9: Hone the Blade
Using the same sharpening angle and technique as before, hone the blade with the fine grit stone. This will help create a sharp, polished edge. Continue honing until you achieve the desired level of sharpness.
Step 10: Strop or Hone the Blade (Optional)
For an even sharper edge, you can strop the blade using a leather strop or hone it using a honing rod. This step is optional but can help improve the overall performance of the knife.
Step 11: Clean the Knife and Sharpening Stone
After sharpening, carefully wipe the blade clean with a cloth or towel to remove any metal particles or residue. Rinse the sharpening stone thoroughly to remove any debris, then allow it to dry completely before storing it.
Step 12: Test the Sharpness
Carefully test the sharpness of the knife by slicing through a piece of paper or cutting a delicate material, such as a tomato. If the knife cuts smoothly and easily, the sharpening process was successful, and the chip has been fixed.
Step 13: Store the Knife Properly
To prevent future chipping and damage, store your knife properly when not in use. Use a knife block, magnetic strip, or individual blade protectors to keep the knife’s edge from coming into contact with other surfaces that could cause damage.
Step 14: Handle the Knife with Care
When using your knife, be mindful of the surfaces you cut on. Avoid cutting on hard surfaces, such as glass, marble, or metal, as these can cause the blade to chip or become dull more quickly. Instead, use a wooden or plastic cutting board to protect the blade’s edge.
Step 15: Perform Regular Maintenance
Regularly maintain your knife by honing and sharpening it as needed. This will help keep the blade in optimal condition and prevent chipping and other damage. How often you need to sharpen your knife will depend on how frequently it is used and the type of cutting tasks it performs.
Step 16: Inspect Your Knife Regularly
Periodically inspect your knife for signs of wear or damage, such as chips, nicks, or a dull edge. Address any issues promptly to keep your knife functioning efficiently and safely.
Step 17: Avoid Misusing the Knife
Never use your knife for tasks it is not designed for, such as prying open containers, cutting through bone, or as a screwdriver. Misusing your knife can cause the blade to chip or become damaged in other ways.
Step 18: Educate Yourself on Proper Knife Care
Invest time in learning about proper knife care and maintenance to better understand how to prevent chipping and other damage. This knowledge can help you keep your knives in peak condition and extend their lifespan.
Step 19: Share Your Knowledge
Share your knowledge and experiences with others who may be facing similar issues with their knives. By educating others about proper knife care and maintenance, you can help promote safer and more efficient use of knives in your community.
Step 20: Stay Informed on Industry Advances
Stay informed about advances in knife manufacturing, materials, and maintenance techniques. New products and methods are continually being developed, which can help make knife care more accessible and effective. By staying up-to-date on the latest information, you can ensure that your knives remain in top condition for years to come.
Frequently Asked Question
What’s the Best Fixer Stone to Take Care of Damaged Blades?
A few different fixer stones are available on the market, and each one has its benefits. Some of the most popular fixer stones include diamond sharpening, Arkansas, and water stones.
What’s the Right Sharpening Angle to Fix a Chipped Knife?
The best sharpening angle to fix a chipped knife blade is around 20 degrees. You can use a protractor or a digital angle finder to help get the correct angle.
Is There a Risk to Damage the Knife Even More?
There is always a risk of damaging the knife even more when sharpening it. However, if you are careful and take your time, you can fix the chip without causing any additional damage. Be sure to use a sharpening angle appropriate for the type of knife you are working on, and be especially careful when sharpening serrated blades.
What Is There to Do After Fixing the Blade?
Once the blade is fixed, it’s important to take steps to protect it from further damage. One way to do this is to keep the knife in a protective case or sheath when it’s not in use. You can also apply a coat of oil or wax to the blade to help protect it from rust and corrosion. If you have any questions about how to fix a bent knife blade, or if you need help with any other knife repair issues, please feel free to contact us. Our friendly and knowledgeable staff is always happy to help.
You Check it Out to Fix a Bent Knife Tip
Conclusion
While it may seem daunting, fixing a chipped knife blade is relatively easy. With the right tools and some patience, you can have your blade looking as good as new in no time. So, if you’ve ever had a chip in your knife blade, try following these simple steps to fix it yourself – and save yourself some money in the process. Thanks for reading our post about how to fix a chipped knife blade.
You Can Check It Out To Fix Runny Pecan Pie