Camper delamination is a common issue faced by RV owners, where the outer surface of the camper begins to separate from the underlying structure. This can result from prolonged exposure to moisture, heat, or physical damage, leading to unsightly bubbles or wrinkles on the camper’s exterior.
If left unaddressed, delamination can compromise the structural integrity of the camper, potentially causing more significant damage and costly repairs. Fortunately, with timely intervention and the right techniques, delamination can be effectively managed and repaired, ensuring the longevity and appearance of your camper.
This guide will walk you through how to fix camper delamination, providing you with practical solutions to maintain your RV in excellent condition.
Understanding Camper Delamination
Delamination occurs when the layers of a camper’s walls, typically consisting of a fiberglass outer shell, a wooden or foam core, and an inner panel, start to detach from one another. This separation is often caused by water infiltration, where moisture seeps into the layers through small cracks or poorly sealed joints.
Over time, this moisture weakens the adhesive bonds holding the layers together, leading to a noticeable deformation of the camper’s exterior surfaces. Other contributing factors may include prolonged exposure to intense sunlight, which can dry out and degrade the materials, or physical trauma that disrupts the structural adhesion.
Recognizing the signs of delamination early, such as soft spots, bubbling, or visible gaps, is crucial for addressing the issue promptly and preventing further damage.
Common Causes of Delamination
Several factors can contribute to the onset of camper delamination, and understanding these can help in both prevention and early detection. The most frequent cause is water intrusion, which occurs when water penetrates the camper’s exterior through damaged seals, cracks, or areas with inadequate waterproofing.
This can often happen near window edges, roof lines, or any fixtures that penetrate the camper’s surface, such as antennas or vents. Another significant cause is prolonged exposure to harsh environmental conditions, such as excessive heat or UV radiation from the sun. Over time, these elements can break down the camper’s materials and adhesives, leading to separation between layers.
Additionally, the quality of materials and construction can also play a role; poor manufacturing techniques or substandard materials are more prone to delamination. Finally, physical impacts from accidents or rough handling during travel can inflict immediate or gradual damage, resulting in delamination. Understanding these causes is the first step in taking preventive measures and ensuring the structural integrity of your camper.
10 Methods How to Fix Camper Delamination
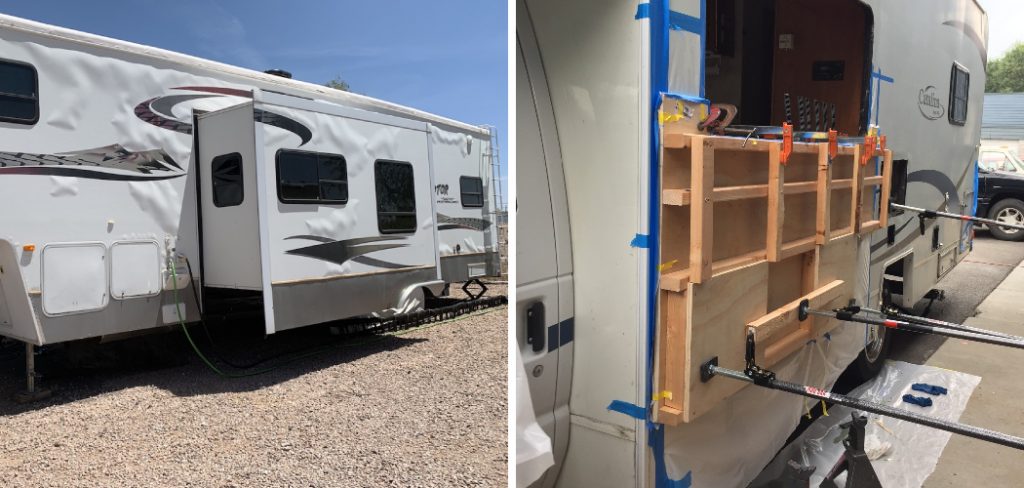
1. Assess the Extent of Delamination
Before starting any repairs, the first step is to thoroughly assess the extent of the delamination. Carefully inspect the affected areas for signs of separation, bubbles, or soft spots. Use a flashlight to check for moisture damage underneath the surface.
Pay special attention to corners, seams, and areas around windows and doors, where moisture is likely to enter. Document your findings, noting the size and location of each affected area, as this will guide your repair strategy and help you determine whether a patch or a complete panel replacement is necessary.
2. Gather Necessary Tools and Materials
Once you have assessed the damage, gather all the necessary tools and materials for the repair. Common items you’ll need include a utility knife, caulk gun, adhesive (such as epoxy or construction adhesive), clamps, a roller or squeegee, wood filler, sandpaper, a heat gun, and primer or paint for finishing.
Additionally, if you need to replace panels, make sure to procure materials that match the existing structure. Having everything ready before you begin will streamline the repair process and minimize interruptions.
3. Remove the Affected Area
For extensive delamination, you may need to remove the affected layer. Use a utility knife to carefully cut around the delaminated section, taking care to avoid damaging adjacent materials. If the delamination has caused significant damage to the underlying wood, remove this layer as well.
Once you have exposed the damaged area, inspect it for signs of rot or mold. If you find any, treat it appropriately by removing the affected wood and allowing the area to dry thoroughly before proceeding with repairs.
4. Dry Out the Area
If moisture is present in the affected area, it is crucial to allow it to dry out completely before making any repairs. Use a heat gun or a fan to help speed up the drying process, being cautious not to apply excessive heat that could damage surrounding materials.
This step is essential for preventing future delamination and ensuring that your adhesive bonds properly. Depending on the severity of the moisture intrusion, you may need to leave the area to dry for several hours or even days before proceeding.
5. Reattach Delaminated Sections
For minor delamination, you can often reattach the delaminated sections without complete removal. Apply a high-quality adhesive or epoxy to the affected area, carefully working it into the separation.
Once the adhesive is in place, use a roller or squeegee to ensure a firm bond and remove any air bubbles. Secure the area using clamps to hold the layers together while the adhesive cures. Follow the manufacturer’s instructions for drying time to ensure a strong bond. This method is less invasive and can often restore the camper’s integrity effectively.
6. Use Wood Filler for Minor Imperfections
If you encounter minor imperfections in the wood or underlying structure, wood filler can be an effective solution. After ensuring the area is dry, apply wood filler to any cracks, holes, or soft spots, smoothing it out with a putty knife.
Allow the filler to dry completely, then sand it down to create a flush surface. This step not only improves the aesthetic appeal but also reinforces the structural integrity of the camper. Once sanded, you can proceed to prime and paint the area for a seamless finish.
7. Seal All Joints and Seams
To prevent future delamination, it’s vital to seal all joints and seams in your camper. Use a high-quality sealant designed for exterior use, applying it generously around windows, doors, and any other vulnerable areas. Pay special attention to seams where water might penetrate.
A well-sealed camper will resist moisture intrusion and significantly reduce the risk of delamination reoccurring. Regularly inspect and maintain these seals to ensure they remain intact, particularly after harsh weather conditions.
8. Repaint or Refinish the Exterior
Once repairs are complete, consider repainting or refinishing the exterior of your camper. Choose a weather-resistant paint that matches the original color scheme, applying a primer first to ensure better adhesion.
This not only improves the appearance of your camper but also provides an additional layer of protection against moisture and UV damage. A fresh coat of paint can revive the camper’s exterior and extend its life, making it look brand new again.
9. Conduct Regular Maintenance Checks
To prevent future delamination, establish a routine maintenance schedule for your camper. Regularly check for signs of moisture intrusion, peeling paint, or damaged seals. Pay close attention to the roof, windows, and any areas where water may accumulate.
Cleaning the exterior and checking for debris that could trap moisture will help maintain your camper’s integrity. By being proactive and addressing minor issues before they escalate, you can avoid the headache of extensive repairs in the future.
10. Consult a Professional for Extensive Damage
If you find that the delamination is extensive or complicated, it may be best to consult a professional. Experienced RV technicians have the knowledge and tools necessary to assess and repair delamination effectively.
They can offer solutions you might not have considered and ensure that the repairs are done correctly to prevent future issues. Investing in professional help can save you time and effort and ensure that your camper is safe for future use.
Common Mistakes to Avoid
When tackling camper delamination repair, it’s essential to steer clear of several common mistakes that can compromise the integrity of your work. Firstly, failing to correctly identify and assess the extent of the delamination could lead to overlooked areas of damage that require attention.
Make sure to conduct a thorough inspection before commencing repairs. Secondly, using inadequate or low-quality materials can result in poor adhesion, leading to renewed delamination. Always opt for high-quality adhesives, sealants, and replacement materials. Additionally, skimping on drying time either before or after applying adhesive can inhibit proper bonding.
Be patient and allow ample time for all components to dry thoroughly. Lastly, improper sealing of joints and seams can leave your camper vulnerable to moisture intrusion. Be meticulous in applying sealant to ensure a comprehensive barrier is in place. By avoiding these pitfalls, you’ll enhance the durability and longevity of your repair efforts.
Conclusion
Fixing camper delamination is essential for maintaining the integrity and appearance of your vehicle. By following these ten effective methods—from assessing the damage and gathering tools to repairing delaminated sections, sealing joints, and conducting regular maintenance—you can restore your camper and protect it from future issues.
A well-maintained camper not only enhances your travel experience but also ensures the safety and comfort of your adventures on the road. Thanks for reading our blog post on how to fix camper delamination! We hope you found it helpful and informative.